

Replay historical Home Assistant activity safely, verify it locally, and manage it through your existing dashboard
The presence_simulation custom integration uses recorded Home Assistant history to reproduce earlier states for selected lights, switches, covers, media players, and other compatible entities. This guide covers planning, safe manual installation, configuration, local verification, routine operation, and troubleshooting. It also explains how to connect the existing Home Assistant interface through a Localtonet HTTP tunnel after the integration works locally. Presence Simulation does not run a separate web server, so remote access always targets Home Assistant itself.
📋 What's in this guide
How Presence Simulation works
Presence Simulation is a Home Assistant custom integration intended to make an unoccupied home appear active. Instead of generating a fixed lighting schedule, it reads historical entity states from the Home Assistant database. It then applies the states recorded a configured number of days earlier to the entities included in a simulation.
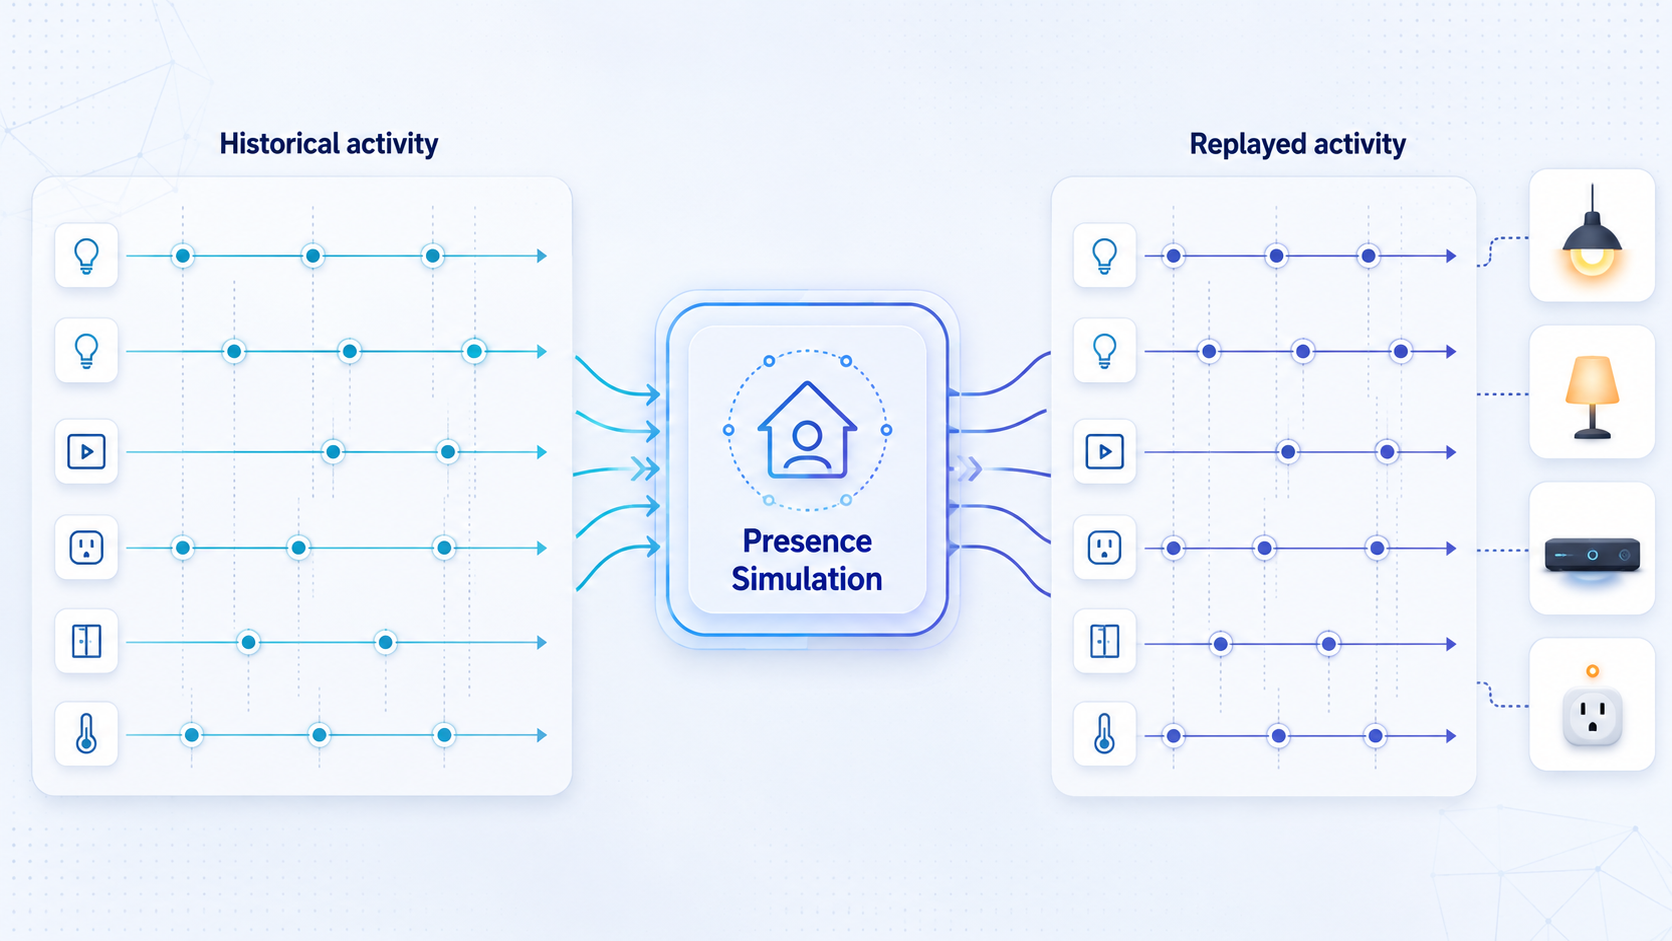
The number of days used to look back is called the delta. A delta of five tells the integration to use activity from five days ago. The Home Assistant recorder database must retain more history than the selected delta. If the required period has already been purged, or the selected entities were excluded from recording, the integration cannot reproduce that activity correctly.
The relationship between Home Assistant's interface and database features matters here. The Home Assistant History integration presents state changes from the recorder database, while the Recorder integration controls how data is stored, filtered, and purged. Presence Simulation depends on usable recorded data rather than simply requiring the History page to be visible.
If a simulation continues for longer than its delta period, the integration resets its simulation cycle and starts again. It continues until the simulation is stopped. This permits extended operation without requiring a separately authored schedule for every future day.
Presence Simulation can reproduce light brightness and color-related behavior only when the necessary attributes exist in the recorder database. Without those stored attributes, it can still reproduce basic light on and off activity. The official Presence Simulation repository identifies Light Reilluminator as an optional companion component for storing relevant light attributes, but it is not required for basic state playback.
The integration runs inside Home Assistant and is managed through Home Assistant entities, actions, and integration settings. It does not provide a separate hostname, listening port, or web interface. When remote management is needed, the network target is the existing Home Assistant interface.
Prerequisites and installation planning
Begin with a working Home Assistant installation and administrative access to its integration settings. A manual installation also requires access to the Home Assistant configuration directory. How you reach that directory depends on the installation method, so do not assume a particular shell, add-on, container mount, operating system, or network share.
Presence Simulation is a community custom integration rather than a built-in Home Assistant integration. Home Assistant documents the expected layout and loading model for custom integration files. Community integrations should be assessed and maintained separately from Home Assistant core.
The Presence Simulation project gives ~/.homeassistant as one possible configuration-directory example. It is not a universal path. Before copying or cloning anything, identify the actual configuration directory used by your deployment. The final component path under that directory must be:
custom_components/presence_simulation
The contents of the repository's custom_components/presence_simulation directory belong at that destination. Avoid introducing an extra level such as custom_components/presence_simulation/presence_simulation. Home Assistant will not discover the integration when its files are nested incorrectly.
Confirm that usable history exists
The project requires the History integration to be active and notes that it is enabled by default. Customized deployments can differ. The recorder must also retain a period longer than the simulation delta. The project documents a default retention period of 10 days, while Home Assistant's recorder configuration can change retention and exclude particular entities or domains.
Treat retention and delta as a matched pair. A configured retention period does not guarantee useful data if a purge has just occurred, the entity was recently added, the entity was unavailable, or recorder filters excluded it. Inspect the relevant entity's history before relying on a simulation.
Select low-risk test entities
Begin with one or two visible, non-critical entities. A lamp is easier to observe and recover than a large group containing unrelated equipment. Documented domains include light, cover, media_player, and input_select. The integration can also work with on/off entities that Home Assistant can control through homeassistant.turn_on and homeassistant.turn_off, including switches, groups, and automations.
Historical playback can cause selected entities to change without a person being present. Exclude locks, alarms, heating equipment, cooking appliances, garage mechanisms, medical devices, and any entity whose unexpected operation could cause injury or property damage. Review every group member because Presence Simulation acts on entities within a selected group independently.
Back up before changing custom components
Create a usable Home Assistant backup before adding or replacing custom-component files. Home Assistant provides current guidance for creating and managing backups. Confirm that your chosen backup includes the configuration data needed for recovery and that you know how to access it if Home Assistant fails to restart.
A backup is especially important during manual updates. Files removed or renamed upstream can remain in an existing destination if a new version is copied over the old one. Do not place passwords, Localtonet device tokens, Home Assistant credentials, or unrelated configuration files inside the component directory.
| Requirement | Why it matters | What to verify |
|---|---|---|
| Working Home Assistant | The component runs inside Home Assistant | The local dashboard and integrations interface work before installation |
| Configuration-directory access | Manual installation requires copying component files | You know the actual configuration directory for this deployment |
| History and recorder data | The simulation reads historical entity states | The test entities have usable data for the intended period |
| Sufficient retention | The database must cover the selected delta | Retention is longer than the number of days used by the simulation |
| Safe test entities | The integration causes real state changes | The initial selection is small, visible, and non-critical |
| Recoverable backup | A failed or incompatible custom integration can disrupt startup | A current backup exists before files are changed |
Manually install Presence Simulation
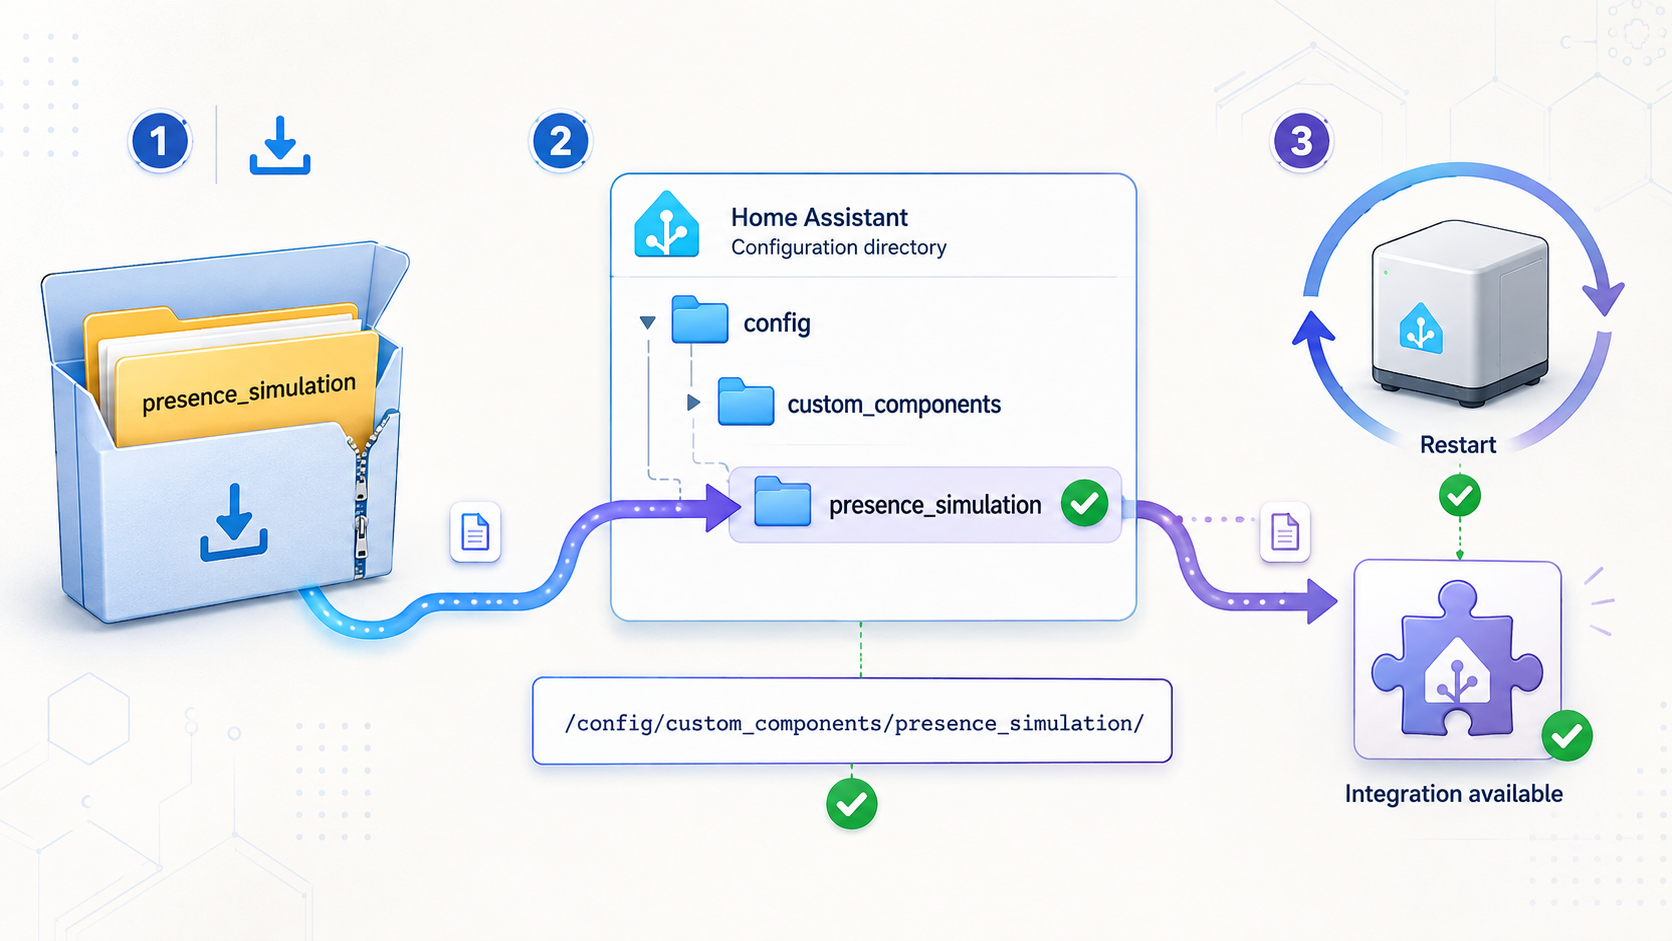
custom_components and requires a Home Assistant restart.
The upstream project recommends HACS because HACS can manage and track custom-integration updates. Manual installation remains useful when HACS is unavailable, when you need direct control over the installed files, or when diagnosing repository discovery.
The safest general manual method is to download or clone the repository somewhere separate, then copy only its custom_components/presence_simulation directory into Home Assistant. This avoids treating the entire, normally nonempty Home Assistant configuration directory as a Git clone destination.
Method 1: Copy the component directory manually
Locate and back up the configuration directory
Identify the configuration directory used by your deployment and create a current backup. The upstream ~/.homeassistant example does not apply to every Home Assistant installation.
Obtain the official project files
Download a release or obtain the repository from slashback100/presence_simulation. Review the project releases before installing or updating so you know which version you are deploying.
Create the custom-components parent directory if needed
Under the Home Assistant configuration directory, make sure custom_components exists. Do not rename it, and do not place the project at the root of the configuration directory.
Copy the complete integration directory
Copy the repository's complete custom_components/presence_simulation directory into Home Assistant's custom_components directory. For an update, back up and replace the old component directory as a complete version rather than mixing arbitrary files from different releases.
Inspect the final layout
Confirm that the component files are directly inside custom_components/presence_simulation. Ensure the Home Assistant process can read them and that no extra repository directory was inserted.
Restart Home Assistant
Restart Home Assistant using the supported procedure for your installation. Refreshing the browser is not sufficient because Home Assistant loads the Python integration code during startup.
Method 2: Use Git safely through a temporary directory
The upstream README publishes this command from inside the Home Assistant configuration directory:
git clone https://github.com/slashback100/presence_simulation.git .The final dot tells Git to clone into the current directory. A clone into an existing destination generally requires that destination to be empty. A working Home Assistant configuration directory is normally nonempty, so the upstream command is not a safe general-purpose instruction for an established system. It can fail because files already exist, and using the wrong current directory can create a confusing or hazardous layout.
A safer practical workflow is to clone into a newly created temporary directory and copy only the integration subtree. On a Unix-like system with Git and standard shell tools, first replace the configuration path below with the verified path for your installation:
config_dir="/path/to/home-assistant/config"
temp_dir="$(mktemp -d)"

git clone https://github.com/slashback100/presence_simulation.git \
  "$temp_dir/presence_simulation"

mkdir -p "$config_dir/custom_components"

cp -a \
  "$temp_dir/presence_simulation/custom_components/presence_simulation" \
  "$config_dir/custom_components/"

rm -rf "$temp_dir"
Use that copy sequence only for a fresh installation where $config_dir/custom_components/presence_simulation does not already exist. If it does exist, stop, create a backup, and replace the old directory deliberately. Copy behavior differs by operating system and can merge directories in ways that leave obsolete files behind.
On Windows or on Home Assistant installations without shell access, perform the same logical workflow with the available file-management method: obtain the repository in a separate location, find its custom_components/presence_simulation directory, copy that directory into the real configuration directory, inspect the final layout, and restart Home Assistant.
You can download or clone the repository on another trusted computer and transfer only the component directory. The important result is the correct, complete directory under Home Assistant, not where the repository was originally downloaded.
Alternative: Install through HACS
Although this guide focuses on manual installation, HACS is the recommended upstream option. With HACS already installed, search for Presence Simulation, select the matching integration, install it, and restart Home Assistant. The project notes that it can also be added as a custom repository when normal discovery does not work.
HACS changes how the custom-component files and updates are managed. It does not remove the restart, configuration, history, testing, or safety requirements described in this guide.
Add and configure the integration
After Home Assistant restarts, sign in locally and open the integrations interface. Navigation wording can change between Home Assistant releases. Use the control for adding an integration, search for Presence Simulation, select the custom integration, and confirm the addition.
The integration creates a switch entity whose name is based on the name chosen during setup. The project uses switch.presence_simulation as an example, but the actual entity ID in your system can differ.
Open the integrations interface
Use a local Home Assistant session and an account permitted to add integrations. If the local dashboard is not healthy after the restart, resolve that problem before continuing.
Add Presence Simulation
Search for Presence Simulation, select the matching custom integration, and confirm. If it is missing, troubleshoot file placement and startup logs instead of attempting unrelated configuration changes.
Select simulation entities
Choose one or more safe entities or groups. Supported examples include lights, switches, covers, light groups, media players, and compatible entities that Home Assistant can turn on and off. Begin with a limited selection.
Set the history delta
Enter the number of days back to replay. Recorder retention must be greater than this value, and the selected entities must have relevant data during the corresponding historical period.
Choose the poll interval
Set how frequently the integration checks whether it has been requested to stop. The documented default is 30 seconds. A smaller interval may make stop requests take effect sooner, but the project warns that it requires more processing.
Choose restoration and randomization behavior
Decide whether states should be restored to their pre-simulation values after the simulation. Set randomization to 0 to disable it, or enter a positive number of seconds as the maximum offset added to or subtracted from historical event times.
Set unavailable-state and brightness options
Choose whether a historical unavailable state should be treated as off. For lights, default brightness can be set from 1 to 100. A value of 0 means the simulation does not set brightness, so the light keeps its last brightness value.
Save and identify the created switch
Complete setup, locate the resulting switch entity, and record its actual entity ID. The switch is on while its simulation is running and off otherwise. You can edit the integration options later.
Understand the main options
| Option | Purpose | Planning consideration |
|---|---|---|
| Entities | Defines what the simulation may control | Groups are processed as individual members, so inspect membership carefully |
| Delta | Selects how many days back the integration reads | Recorder retention must be longer than the delta |
| Poll interval | Controls how quickly stop requests are noticed | The documented default is 30 seconds; smaller values require more processing |
| Restore states | Restores states captured before the simulation began | Test restoration with a small entity set before relying on it |
| Random offset | Varies historical event timing | 0 disables it; a positive value sets the maximum offset in seconds |
| Unavailable as off | Maps historical unavailable records to an off state | Enable only when unavailable should genuinely be interpreted that way |
| Default brightness | Sets light brightness during simulation | Use 1 to 100, or 0 to leave brightness unchanged |
Version 4 and later support several simulation switches with separate configurations. Keep their names descriptive so dashboards, automations, and action calls can identify the intended simulation.
Verify the installation locally
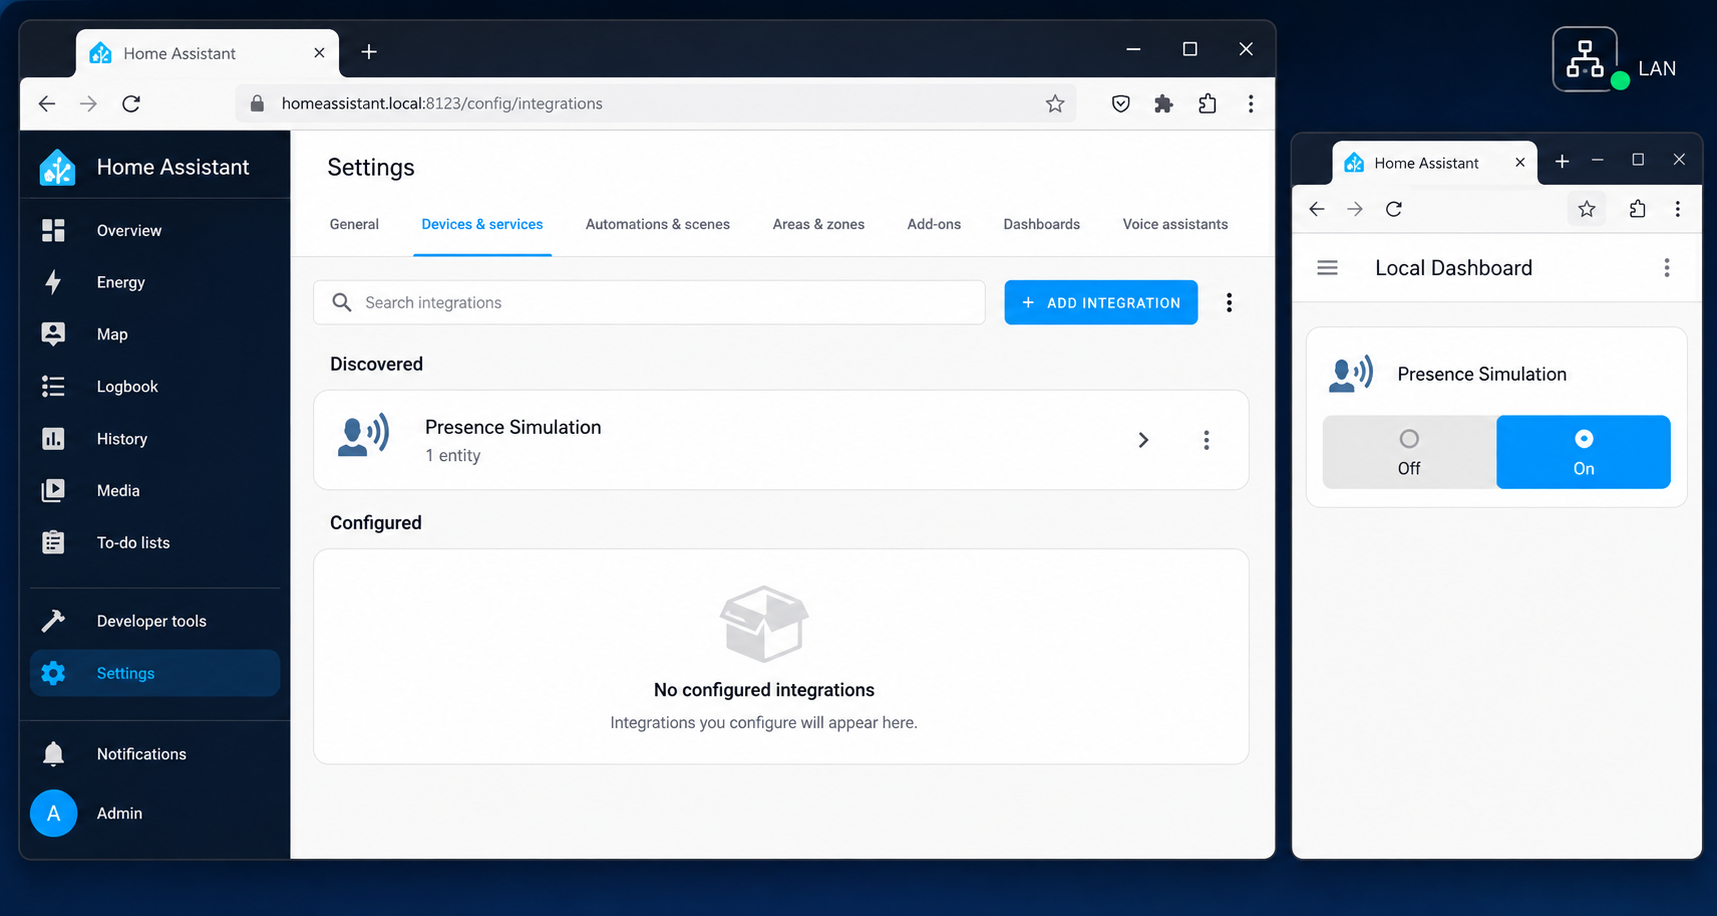
Complete local verification before creating a public tunnel. This separates component, history, and entity problems from network or reverse-proxy problems.
Confirm a clean Home Assistant restart
Make sure the local dashboard loads and normal integrations remain operational. Review Home Assistant logs if startup fails or new errors appear.
Confirm integration discovery
Verify that Presence Simulation appears in the integrations interface and that its configuration entry exists after setup.
Inspect the created switch
Locate the switch entity created from your simulation name. Confirm that it is initially off unless you intentionally started it.
Check the source history
Inspect the selected test entities at the historical time represented by the delta. Confirm that state changes actually exist for the period you are about to replay.
Run a controlled simulation
Turn on the simulation while observing the low-risk test entities. Allow enough time for a known historical event to be reached.
Stop and verify recovery
Turn the simulation off and allow for the configured poll interval. Confirm that the switch returns to off and verify restoration if that option was enabled.
Check basic on and off behavior before evaluating brightness or color. If switching works but attributes do not, inspect whether the attributes were retained in the recorder database. Presence Simulation cannot replay data that was never stored.
Presence Simulation follows historical timing. If the selected entities had no changes at the corresponding historical time, there may be nothing to replay during a short test. Use a historical period with known, safe activity.
Start, stop, and manage simulations
The simplest control method is the switch entity created by the integration. Turning the switch on starts its simulation, and turning it off stops it. The switch state indicates whether that simulation is running.
The integration also registers three Home Assistant actions, historically referred to as services:
presence_simulation.startstarts a simulation.presence_simulation.stopstops a simulation.presence_simulation.toggleswitches a simulation between running and stopped.
From version 4 onward, switch_id is mandatory when several Presence Simulation switches exist. It identifies the simulation to control. Use the real entity ID from your installation instead of copying an example unchanged.
A start call can override configured values with a list of entities, a delta, state restoration, a random offset, unavailable-state handling, and brightness. The upstream project provides this example:
switch_id: switch.presence_simulation
entity_id:
  - group.outside_lights
  - light.living_room
  - light.hall
delta: 5
restore_states: true
random: 300
unavailable_as_off: true
brightness: 75
These entity IDs are placeholders. Validate your own IDs and test the action locally before placing it in an automation. Avoid automations that can start a high-impact entity set unexpectedly.
The component code includes behavior intended to launch a simulation after Home Assistant starts when its switch indicates it was running. Account for this when restarting Home Assistant during maintenance or while the home is occupied. After an upgrade or unplanned restart, verify the simulation state and controlled entities instead of assuming they are off.
Access Home Assistant through Localtonet
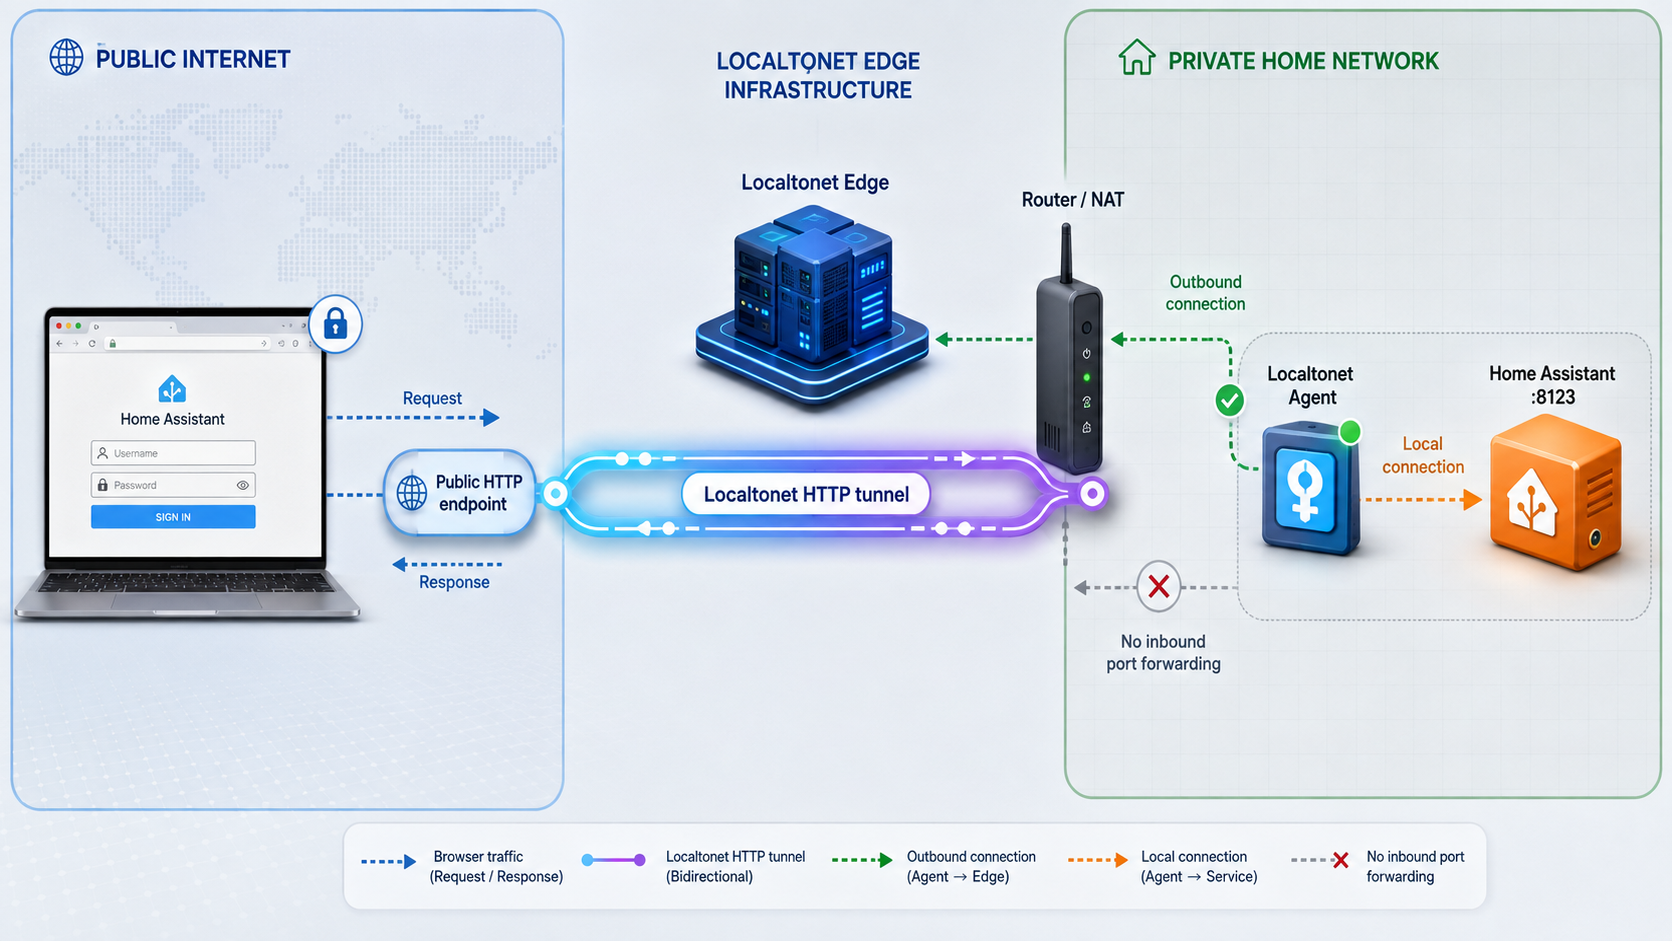
Once Presence Simulation is installed, configured, and verified locally, you can make the existing Home Assistant interface reachable through Localtonet. Our client establishes an outbound connection to a Localtonet relay, so you do not need inbound router port forwarding, firewall changes, VPN setup, or a public IP address.
The local target is the same Home Assistant endpoint that already works from the device running the Localtonet client. It is not presence_simulation, a component directory, or a new port. Determine the exact local IP address or hostname, port, and protocol before creating a tunnel.
Follow the current Localtonet HTTP tunnel documentation alongside the workflow below. Current server choices, client installation details, and available domain options can vary by account, platform, plan, or client version, so use the values displayed in the current product.
Check the Home Assistant HTTP and proxy path first
Home Assistant applies explicit security rules to forwarded client-address headers. Its
HTTP integration documentation
explains the use_x_forwarded_for and trusted_proxies settings used when Home Assistant is behind a reverse proxy. Home Assistant requires the immediate proxy to be trusted before it accepts forwarded headers from that path.
Whether you need to change Home Assistant's http configuration depends on the actual route between the Localtonet public endpoint and Home Assistant. The path can differ when the Localtonet client targets Home Assistant directly, targets an existing local reverse proxy, or runs in a container or network namespace with a separate source address.
Do not copy a trusted proxy address from another tutorial. Determine which immediate proxy address or network Home Assistant actually sees, then trust only the necessary source according to Home Assistant's documentation. Do not add an unnecessarily broad private network, all-address range, or guessed container subnet merely to clear an error.
A Home Assistant installation that has already been configured for an existing reverse proxy may have an appropriate http section. A deployment without such a path may not need one. If forwarded headers are required for your architecture, the conceptual configuration is:
http:
  use_x_forwarded_for: true
  trusted_proxies:
    - PROXY_ADDRESS_OR_NETWORK_VERIFIED_FOR_YOUR_PATH
The placeholder is intentionally not a usable address. Replace it only with the immediate proxy source verified for your environment. Validate Home Assistant configuration and restart it using the supported procedure after making a configuration change.
Trusting the wrong source can weaken the meaning of client-address information, while failing to trust the actual immediate proxy can cause Home Assistant to reject requests. Use Home Assistant logs, your deployment topology, and the official HTTP documentation to identify the correct source. Keep the trusted scope as narrow as practical.
Verify the target from the client device
From the device that will run Localtonet, open the exact Home Assistant local address and confirm that the sign-in interface, dashboard, and a low-risk entity work. Record the working protocol, address, and port without exposing credentials.
Install and run the Localtonet client
Install our client on the Home Assistant host or another device that can reach the verified endpoint. Use the current installation method for that operating system and client version.
Authenticate or select the device
Use the device-specific authentication token for the client that will run the tunnel. Keep the token private and do not place it in screenshots, logs, examples, or public configuration.
Select an available relay server
Choose a server or region currently available in the dashboard. Do not copy a hardcoded server code from a tutorial because current choices can vary.
Create the HTTP/s tunnel
Point the tunnel to the exact Home Assistant local IP address or hostname and port reachable from the client. Match the protocol expected by the local endpoint. HTTP tunnels can provide a public HTTPS address through a generated subdomain, a selected subdomain where supported, or a custom domain.
Start the tunnel
Creating a tunnel does not start it. Use the Start button and confirm that the selected client is connected and the tunnel is running. The public address remains available only while the client is connected and the tunnel is active.
Test from a separate network
Open the assigned public address from a separate network. Confirm that Home Assistant presents its expected sign-in flow, then verify dashboard loading, navigation, and the Presence Simulation switch without activating unsafe equipment.
Stop access when it is no longer needed
Stop the tunnel when remote access is unnecessary. Delete tunnels that are no longer part of your intended configuration.
Localtonet transports access to the existing Home Assistant interface. It does not repair Presence Simulation, modify recorder retention, create Home Assistant users, or override Home Assistant permissions. If the integration is unavailable locally, solve that local issue before troubleshooting the tunnel.
Secure remote Home Assistant management
A remotely reachable Home Assistant interface can expose household state and control physical devices. Treat it as a sensitive administrative endpoint. Remote connectivity should complement Home Assistant authentication and authorization rather than replace them.
Verify that the public address shows only the intended Home Assistant application. If it displays another service, a directory listing, an unexpected administrative interface, or a generic backend, stop the tunnel and correct the local target.
Do not expose a shell, file share, database, Home Assistant configuration directory, or development server as a substitute for the web interface. Keep backups and component source files outside the public HTTP target.
Troubleshooting installation, playback, and remote access
Presence Simulation does not appear in integrations
Confirm that Home Assistant fully restarted. Then inspect the final path. The directory must be named presence_simulation and sit directly under custom_components. An extra repository directory, a hyphenated name, or copying only one source file can prevent discovery.
Review Home Assistant logs for manifest, import, dependency, or configuration-flow errors. Ensure all files came from one project version. The v5.3 release fixed a configuration-flow validator error affecting new initial setup, so compare an older installation with the current project release before diagnosing a problem already fixed upstream.
The integration appears, but configuration fails
Verify that you installed the intended slashback100/presence_simulation project. A similarly named repository uses different directory names and configuration behavior. Back up the existing custom component, replace it with one complete version, restart Home Assistant, and review the new log entries.
The switch turns on, but no entities change
Inspect historical data at the time represented by the delta. Confirm that recorder retention exceeds the delta and that filters did not exclude the entities. Reduce the test to one or two entities with known activity and verify that they support the expected Home Assistant turn-on and turn-off behavior.
Brightness or color is not reproduced
Basic states may be present while the required light attributes are absent. Presence Simulation cannot replay attributes that the recorder did not retain. Basic on and off simulation can still work. The upstream project documents Light Reilluminator as an optional companion for retaining brightness and color-temperature values.
A stop request seems delayed
The poll interval determines how quickly the integration notices a stop request. Its documented default is 30 seconds. Wait for the configured interval before assuming the request failed. A smaller interval can improve responsiveness but requires more processing.
States are not restored as expected
Confirm that restoration was enabled. Test with a small entity set and temporarily account for competing automations, manual control, unavailable devices, and device-side behavior. Those factors can change states during the same period and produce a result different from an isolated restoration test.
The Localtonet public address does not load
Confirm that Home Assistant still works from the Localtonet client device using the exact configured protocol, address, and port. Then verify that the selected Localtonet device is connected and the tunnel has been started. A created tunnel is not available until it is running.
If the local endpoint expects HTTPS, do not target it as plain HTTP. If an existing local reverse proxy provides the endpoint, make sure the Localtonet client can reach that proxy and that the proxy can still reach Home Assistant.
Home Assistant reports a request from a reverse proxy
Home Assistant can reject a request when forwarded headers arrive through an immediate proxy that is not listed in trusted_proxies. Review the Home Assistant log entry, identify the immediate source address it reports, and compare that information with the real network path. Configure use_x_forwarded_for and the narrowest correct trusted proxy entry only when the architecture requires them.
Do not repeatedly add broad networks until the error disappears. If the reported address is unexpected, first verify that the tunnel targets the correct endpoint and that no unplanned proxy, container gateway, or load balancer sits in the path.
Home Assistant rejects invalid forwarded headers
Invalid or conflicting forwarded-header behavior indicates that the proxy chain and Home Assistant's HTTP configuration do not agree. Check whether more than one intermediary is modifying forwarding headers, whether Home Assistant trusts the actual immediate proxy, and whether the request is reaching the endpoint you intended. Use the official Home Assistant HTTP integration documentation as the controlling reference.
The page opens, but login, navigation, or live updates fail
Test the local endpoint first, then test the public address in a clean browser session. A page shell loading does not prove that authentication callbacks, API requests, and Home Assistant's live frontend connection are working. Browser console or network errors, Home Assistant logs, and logs from an existing local reverse proxy can help distinguish an authentication problem from a forwarding or WebSocket-related problem.
Confirm that the tunnel points to the normal Home Assistant web endpoint rather than a partial frontend, cached page, or different proxy route. Also check whether an existing reverse proxy has host, scheme, or WebSocket handling rules that differ between local and tunneled requests. Do not disable Home Assistant security checks merely to make the page load.
The public address opens the wrong application
Stop the tunnel immediately. The configured port may belong to another service, or the address may identify the wrong device. Reconfirm the endpoint from the Localtonet client device before restarting the tunnel.
Home Assistant loads, but Presence Simulation is missing remotely
Check whether the same account can see the integration and switch locally. Localtonet does not change Home Assistant permissions, dashboard composition, entity visibility, or integration state. Resolve the Home Assistant account or dashboard issue locally.
Frequently asked questions
Does Presence Simulation have its own port or web server?
No separate network endpoint is documented. Presence Simulation runs inside Home Assistant and is controlled through Home Assistant switches, actions, and integration options. A Localtonet tunnel should target the existing Home Assistant web interface.
Is HACS required?
No. HACS is recommended upstream because it helps manage and track updates, but the project also supports manual file installation. Every method requires Home Assistant to restart before the integration can be configured.
Can I clone the repository directly into my Home Assistant configuration directory?
The upstream command clones into the current directory, which generally must be empty. An established Home Assistant configuration directory is normally nonempty, so that is not a safe general workflow. Clone into a new temporary directory and copy only custom_components/presence_simulation.
Where should the files be placed?
Place the complete component directory at custom_components/presence_simulation under the actual Home Assistant configuration directory. The upstream ~/.homeassistant path is only an example.
How much history does a simulation need?
Recorder retention must be longer than the selected delta, and the relevant entities must have usable recorded data during that period. The project documents 10 days as the default retention period, but recorder settings and filters can change the available data.
Can Presence Simulation control more than lights?
Yes. Documented domains include lights, covers, media players, and input selects. Compatible on/off entities controlled through Home Assistant's turn-on and turn-off actions can also be used, including switches, groups, and automations.
Can I create more than one simulation?
Yes. Version 4 and later support multiple independently controlled simulation switches with separate entities and options. When several switches exist, action calls must identify the appropriate switch_id.
Do I need router port forwarding for Localtonet?
No. Our client establishes an outbound connection to a Localtonet relay, so the workflow does not require inbound router port forwarding, firewall changes, VPN setup, or a public IP address. The tunnel is available only while the selected client is connected and the tunnel is running.
Which Home Assistant port should I enter in Localtonet?
Use the port from the Home Assistant web endpoint that already works from the Localtonet client device. Do not assume a universal port because deployments can use different protocols, containers, gateways, or reverse proxies.
Must I add Localtonet to Home Assistant trusted proxies?
Not as a universal rule. The required Home Assistant HTTP configuration depends on the actual proxy path and forwarded headers. If Home Assistant receives forwarded headers through a reverse proxy, identify and trust the immediate proxy source according to the official HTTP documentation. Never guess or add an unnecessarily broad range.
Connect your verified Home Assistant interface with Localtonet
After Presence Simulation works locally, run our client on a device that can reach Home Assistant, create the appropriate HTTP/s tunnel, verify the Home Assistant proxy path, and start the tunnel when remote management is needed. Keep Home Assistant authentication enabled and stop remote access when it is no longer required.
Get Started Free →

