

Build a persistent internet-monitoring dashboard, validate its data locally, and prepare it for controlled remote access
DOCSight is a self-hosted monitoring and evidence system designed around recurring internet connection problems, particularly DOCSIS cable issues. This guide installs the documented container image with Docker, preserves configuration and history in a named volume, completes the initial setup, and verifies the dashboard at its local HTTP endpoint. It also covers demo mode, cross-platform Docker commands, diagnostics, release pinning, container updates, rollback planning, data protection, and common failure modes. Remote access with Localtonet is covered as a conditional workflow, but public exposure must wait until DOCSight authentication has been configured and verified from current project guidance.
📋 What's in this guide
What DOCSight does and where it fits
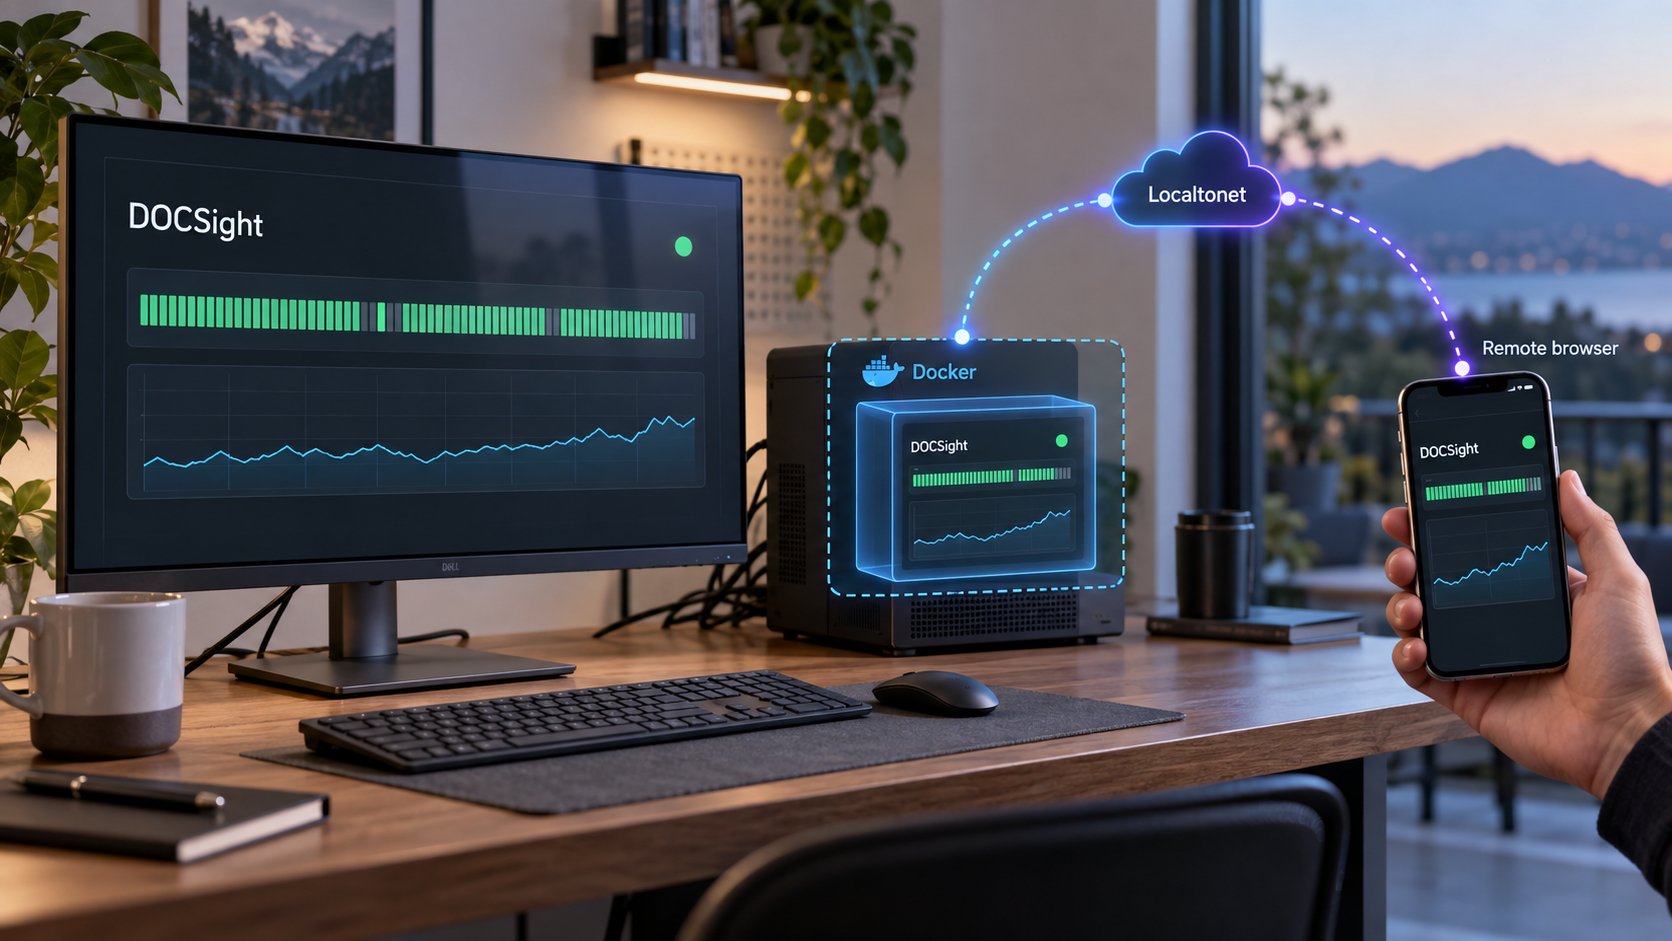
DOCSight is not simply an uptime page or a general-purpose charting dashboard. It is a self-hosted evidence system for investigating recurring internet connection problems. It brings signal history, speed measurements, latency observations, packet loss, modem events, incident notes, and report generation into one workflow. That combination is useful when a problem is intermittent and a single speed test or modem screenshot does not show the broader pattern.
The application is particularly focused on DOCSIS cable connections. With a supported cable modem, DOCSight can retain observations such as signal power, signal-to-noise measurements, channel information, and modulation data. It can place those observations alongside speed, latency, packet-loss, outage, and incident information. This helps reveal whether several symptoms occurred during the same time window.
DOCSight also includes a Generic Router mode for connections or routers that do not provide supported DOCSIS signal data. That mode supports applicable workflows involving speed tests, latency monitoring, notes, and reports, but it does not manufacture unavailable cable signal measurements. If DOCSIS analysis is your main reason for installing the application, check the project’s current supported-hardware information before committing to long-term collection.
http://localhost:8765.
DOCSight can help document when problems occur and how different measurements line up. It cannot repair a damaged cable, correct an ISP configuration, guarantee compensation, or guarantee a support or legal outcome. Signal-capacity estimates also are not the same as measured internet throughput or contracted tariff speed.
Choose persistent monitoring or demo mode
The project documents two straightforward container launches. The persistent deployment is intended for connecting your own supported modem or selecting Generic Router mode. It uses a restart policy and stores configuration and history in a named Docker volume. The demo deployment generates synthetic data and is intended for evaluating the interface without connecting a router.
| Deployment | Best for | Data behavior | Container name |
|---|---|---|---|
| Persistent monitoring | Monitoring your own connection over time | Configuration and history are stored in the docsight_data volume |
docsight |
| Demo mode | Exploring the interface without a router | Generates synthetic DOCSIS history; the documented demo command does not attach the persistent volume | docsight-demo |
| Generic Router mode | Fiber, DSL, satellite, or unsupported-router workflows | Retains applicable speed, latency, incident, and report data, but not unavailable DOCSIS signal data | docsight |
The project’s official quick start is the best place to confirm the current image name and initial launch command. Consult the full installation guidance for deployment paths beyond the Docker Run workflow covered here.
Prerequisites and deployment decisions
The installation command is short, but a reliable monitoring deployment needs several decisions before the container starts. Complete these checks first so that a networking, storage, or port conflict does not look like a DOCSight application problem.
A running Docker engine
You need a machine with Docker installed and its engine running. The machine must be able to download the image from GitHub Container Registry at ghcr.io. On Windows 10 or Windows 11, the project identifies Docker Desktop as the normal supported path for continuous monitoring. An unsigned portable Windows Desktop Preview also exists, but the project describes it as a tryout build rather than the normal always-on collection path.
This guide follows the documented Docker path. A native Python installation has additional requirements, including compiled ICMP and traceroute helpers for complete probing behavior. Those native details are not required when using the container image.
The following command is a single line and works in PowerShell, Windows Command Prompt, and common POSIX shells such as Bash and Zsh:
docker versionA successful response should show that the Docker client can communicate with the engine. If only client information appears followed by an engine connection error, start or repair Docker before installing DOCSight.
A stable host for continuous collection
Choose a host that can remain powered on whenever measurements should be collected. A laptop that sleeps, changes networks, or leaves the premises will create gaps. A home server, a compatible NAS container environment, or another continuously running Docker host is generally a better operational fit.
The host must be able to reach the modem or router that DOCSight will monitor. Remote browser access does not fix local reachability between the container host and that device. Client isolation, VLAN rules, guest Wi-Fi, or host firewall rules can block monitoring even when the DOCSight web interface opens normally.
TCP port 8765 must be available
The documented command publishes container port 8765 as host port 8765. Another process or container cannot use the same host port. Review active container mappings with:
docker psIf port 8765 is occupied, do not stop an unknown service blindly. Identify the owner and decide whether to move that service, remove an obsolete container, or deliberately choose another host-side port. If you change the host port, update the browser address and any future Localtonet local target accordingly. The container-side application port remains 8765.
Persistent storage and recovery planning
For real monitoring, the official Docker command mounts the named Docker volume docsight_data at /data inside the container. DOCSight stores its configuration and history there. Containers are replaceable, but the volume is the state that should survive ordinary container recreation.
DOCSight lists Backup & Restore as a platform feature. However, the supplied project material does not provide the exact current in-application backup and restore procedure, archive format, compatibility rules, or a project-approved cross-platform raw-volume command. This article therefore does not invent a backup recipe or claim that an unverified archive procedure is supported.
Before collecting data you cannot afford to lose, follow the Backup & Restore instructions for your exact release and perform a test restoration in a disposable environment. A volume inspection proves that storage exists, but it is not a backup. Copying a live database without the project’s consistency procedure may not produce a reliable recovery point.
Modem or router selection
For full DOCSIS monitoring, use a modem family supported by the current release. Hardware support changes as drivers are added or corrected. At the time of the supplied project snapshot, the project reported drivers for 22 modem families, including an experimental driver. That count is mutable and must be rechecked against the current hardware list at publication and installation time.
If your connection is not DOCSIS, or your router cannot supply supported DOCSIS information, select Generic Router in the setup wizard. This preserves applicable non-DOCSIS workflows without pretending that cable signal data exists.
Authentication must be resolved before public access
DOCSight lists optional authentication as a platform feature. The supplied current evidence does not document the exact setup fields, defaults, credential requirements, environment variables, or verification sequence. Because remote publication is security-sensitive, this guide cannot present public access as a complete secure deployment.
Keep DOCSight local unless the documentation for your installed release provides an exact authentication procedure that you have completed and verified. Do not assume authentication is enabled by default, and do not treat a hard-to-guess tunnel URL as access control.
Install DOCSight with Docker
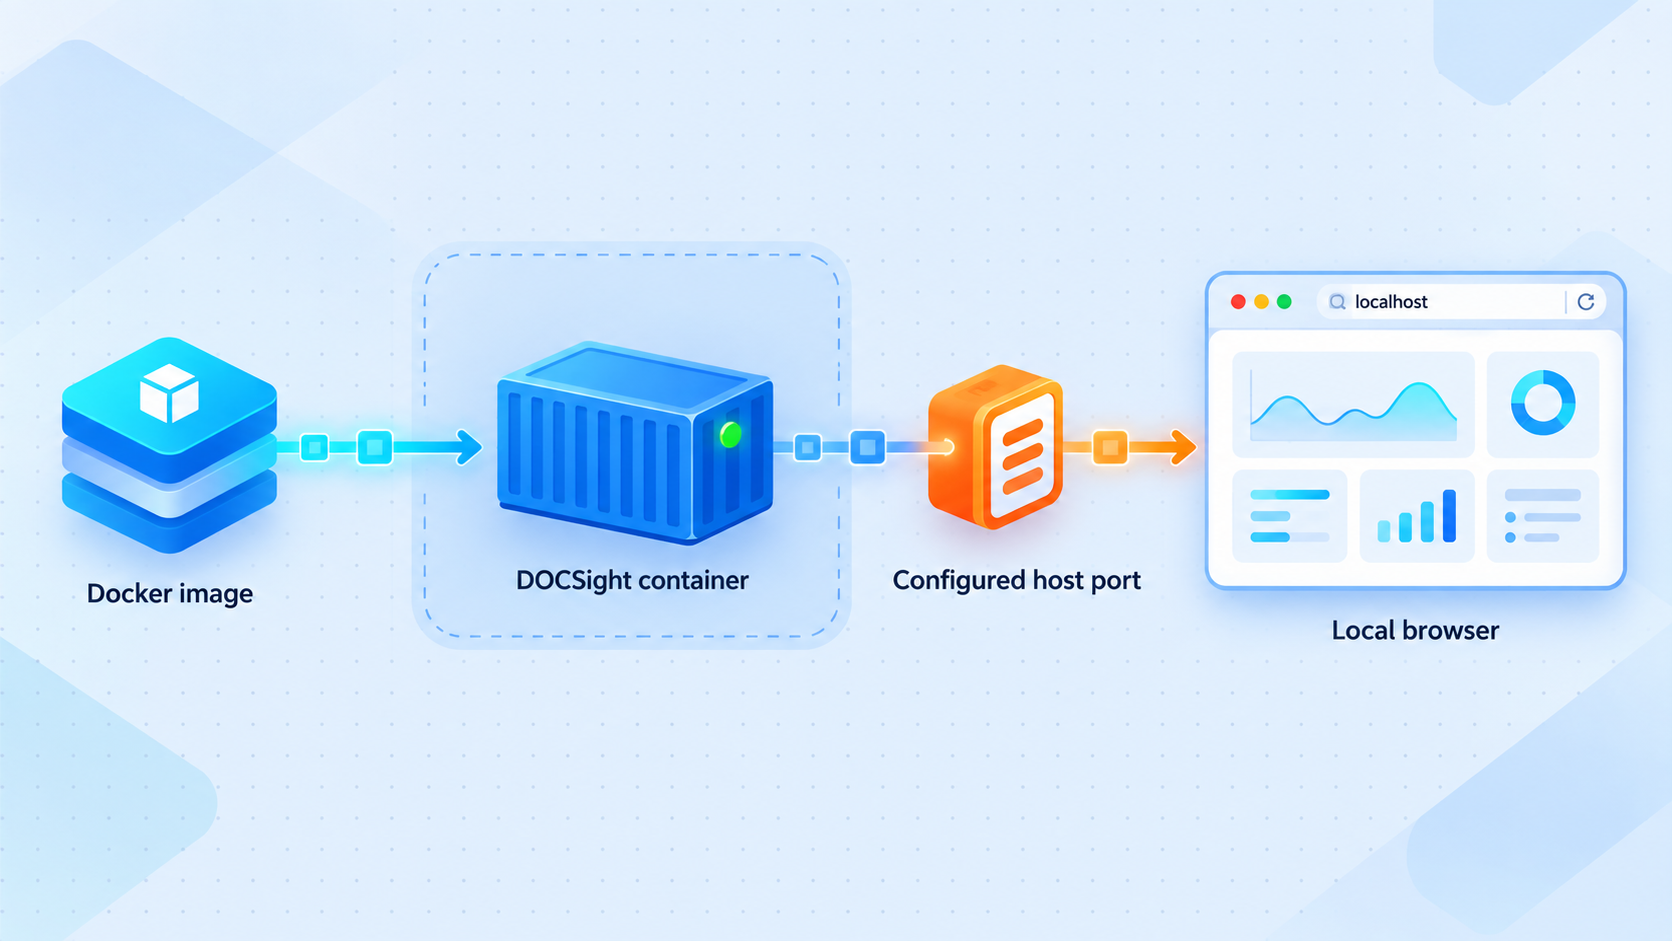
Run the following sequence from a terminal that can communicate with the Docker engine. The commands are intentionally formatted as single lines so they can be copied into PowerShell, Windows Command Prompt, Bash, or Zsh without shell-specific line-continuation characters.
Confirm Docker is running
Run docker version and resolve any engine connection error. Confirm that the host can pull images from ghcr.io and that host port 8765 is not assigned to another required service.
Start the persistent DOCSight container
Launch the official image with the documented container name, restart policy, port mapping, and persistent named volume.
Open the local dashboard
Visit http://localhost:8765 in a browser on the Docker host. If Docker runs elsewhere, use that host’s appropriate LAN address only where local firewall and network policy permit it.
Follow the setup wizard
Select a supported modem or choose Generic Router. Supply only the connection details requested by the current wizard for your selected device and environment.
Start the persistent deployment:
docker run -d --name docsight --restart unless-stopped -p 8765:8765 -v docsight_data:/data ghcr.io/itsdnns/docsight:latestEach option has a specific operational role:
-druns the container in the background.--name docsightassigns the predictable name used by status, log, update, and diagnostic commands.--restart unless-stoppedlets Docker restart the container unless an operator intentionally stops it.-p 8765:8765maps host TCP port 8765 to the application’s container port 8765.-v docsight_data:/datastores configuration and history in the nameddocsight_datavolume.ghcr.io/itsdnns/docsight:latestselects the image currently associated with the mutablelatesttag.
A later pull can retrieve a different image even though the command still says latest. For a reproducible deployment, select a specific release after reading its notes. The supplied evidence confirms the example tag v2026-09-16.1, but it must not be treated as the permanently current release. Check the current DOCSight releases before installation or update.
To install the supplied example release rather than latest, the command format is:
docker run -d --name docsight --restart unless-stopped -p 8765:8765 -v docsight_data:/data ghcr.io/itsdnns/docsight:v2026-09-16.1Recheck that tag before using it. Pinning makes the selected image explicit, but it does not replace release review, backup, or update planning.
Optional: try the synthetic demo first
To inspect DOCSight without connecting real equipment, start the documented demo container:
docker run -d --name docsight-demo -p 8765:8765 -e DEMO_MODE=true ghcr.io/itsdnns/docsight:latestDemo mode produces synthetic DOCSIS history inside the real product interface. It does not require a router and must not be interpreted as measurements from your connection. The demo and persistent commands both publish host port 8765, so they cannot run concurrently on the same host with those unchanged mappings.
Stop and remove the demo before creating the persistent deployment:
docker stop docsight-demodocker rm docsight-demo
Removing the demo container does not remove docsight_data because the documented demo command does not create or mount that volume.
Complete the DOCSight setup wizard
Open http://localhost:8765 after the container starts. The setup wizard is where you choose the type of network device DOCSight will monitor. Exact fields depend on the selected driver and application release, so enter only values requested by the wizard you are actually running.
For a supported cable modem
Select the matching supported modem family. Do not choose a model only because its product name looks similar. Firmware families can expose different local APIs, authentication behavior, and status formats. Confirm compatibility against the current hardware information.
The Docker host must be able to reach the modem’s local management interface. If the wizard cannot communicate with the modem, test reachability from the host and review segmentation between the host, container network, and modem. Do not expose the modem administration interface to the public internet as a troubleshooting shortcut.
For fiber, DSL, satellite, or an unsupported device
Select Generic Router. This mode omits DOCSIS signal collection but supports applicable speed testing, latency monitoring, incident notes, and reporting. Accurate partial evidence is preferable to selecting an incorrect cable driver and misinterpreting missing measurements.
Optional integrations and data boundaries
The project lists API tokens, notifications, Home Assistant, BQM, Smokeping, speed-test integrations, backup and restore, and browser or app push among its broader capabilities. These are not prerequisites for opening the first dashboard. Configure only the integrations you need and review what information each integration sends elsewhere.
Self-hosting does not mean every optional integration remains local. DOCSight states that monitoring history and generated reports stay on your hardware, while optional integrations communicate with services you choose. Review the project’s data contract for current storage and sharing boundaries.
Generated reports, evidence exports, and diagnostic files can contain connection details, timestamps, incident notes, configuration context, or other information you did not intend to publish. Inspect and redact each file as appropriate before sending it to an ISP, attaching it to an issue, or sharing it publicly.
Verify the installation locally
Do not plan a public tunnel until DOCSight works locally. Local verification separates application and Docker failures from tunnel configuration problems and gives you a clear troubleshooting baseline.
Check the container state
docker ps --filter name=docsight
Confirm that the docsight container is running and inspect the displayed port mapping. If the container is absent, include stopped containers:
docker ps -a --filter name=docsight
A stopped container usually requires log inspection. Repeating the original docker run command with the same name will produce a name-conflict error while the existing container remains present.
Open the dashboard in a browser
From the Docker host, navigate to http://localhost:8765. You should receive the DOCSight interface or setup wizard.
From another device, localhost refers to that device, not the Docker host. Use the Docker host’s LAN address only if your host firewall and local network policy permit access.
Confirm persistent storage exists
docker volume inspect docsight_dataDocker should return metadata for the named volume. Do not manually edit files inside the volume unless documentation for your installed DOCSight release explicitly directs you to do so.
Confirm observations over time
A dashboard loading successfully proves that the web application is available, but it does not prove that modem polling, latency checks, speed measurements, or optional integrations work. Allow DOCSight to collect data and check whether expected observations appear with plausible timestamps.
Missing data should be treated as unavailable, not as proof of a perfect connection. The supplied release notes state that several analysis areas no longer interpret absent measurements as healthy or perfect results. Check the selected driver, network reachability, logs, and diagnostic output if expected measurements remain absent.
Routine operation, diagnostics, updates, and data protection
Preserve the distinction between the replaceable application container and the persistent docsight_data volume. Routine container actions should not delete the volume.
View logs
docker logs docsightFollow new output with:
docker logs -f docsight
Leave follow mode with Ctrl+C. This closes the local log viewer without stopping the container.
Stop, start, or restart DOCSight
docker stop docsightdocker start docsightdocker restart docsight
Run only the operation you need. An intentional stop remains significant because the restart policy is unless-stopped. Verify that collection resumed after host maintenance.
Run the built-in passive doctor
DOCSight documents a diagnostic module that checks the local runtime, configuration, storage, database, secret-file presence, and optional integration configuration. Its default checks do not contact third-party services.
docker exec docsight python -m app.doctorThe project also documents JSON output. Shell redirection works in PowerShell, Windows Command Prompt, Bash, and Zsh, although the resulting file path follows the current shell directory:
docker exec docsight python -m app.doctor --json > docsight-doctor.jsonReview this file before sharing it. A diagnostic tool intended for local troubleshooting can still reveal environmental details.
Record the deployed image before updating
A container created from latest does not update when the registry tag changes. Before replacement, record the image reference currently stored in the container configuration:
docker inspect docsight --format "{{.Config.Image}}"
This command is accepted by common POSIX shells and PowerShell. If quoting behavior differs in another shell or management interface, use docker inspect docsight and review the image field in the returned JSON.
Review and pull a specific release
Read the release notes before selecting a target. The following commands use v2026-09-16.1 only as the release confirmed in the supplied evidence. Replace it with the version you have reviewed:
docker pull ghcr.io/itsdnns/docsight:v2026-09-16.1Pulling an image does not alter the running container.
Complete the release-specific backup first
Use the current DOCSight Backup & Restore procedure for the installed release, then verify the backup through a test restoration. The evidence available for this revision does not contain those exact steps, so this article cannot truthfully provide a tested project-supported backup or restore command.
Do not continue with an important production update until that recovery gap is resolved. Recording the current image and retaining the named volume help with rollback planning, but neither is equivalent to a validated backup.
Recreate the container with the reviewed image
After completing and testing the release-supported backup, stop and remove only the container:
docker stop docsightdocker rm docsightRecreate it with the same name, restart policy, port mapping, and named volume, but use the reviewed release tag:
docker run -d --name docsight --restart unless-stopped -p 8765:8765 -v docsight_data:/data ghcr.io/itsdnns/docsight:v2026-09-16.1Then repeat the local verification checks: inspect container status, open the dashboard, review logs, run the doctor, and confirm that expected historical observations remain available.
Plan rollback before replacement
A container-level rollback means removing the new container and recreating it with the previously recorded image tag while attaching the same named volume. This is safe only when the older application remains compatible with the data format written by the newer release.
If an update performs an incompatible data migration, reusing the modified volume with older code may fail or damage the recovery attempt. Review release notes for migration warnings. Where backward compatibility is not confirmed, restore the pre-update backup according to the release-supported restore procedure instead of attaching an upgraded volume to older code.
Recreating an older image changes the application code, not the contents of docsight_data. Do not claim a rollback is complete until both application and data compatibility have been verified. Never add volume-removal options to routine container replacement commands.
Plan remote access with Localtonet
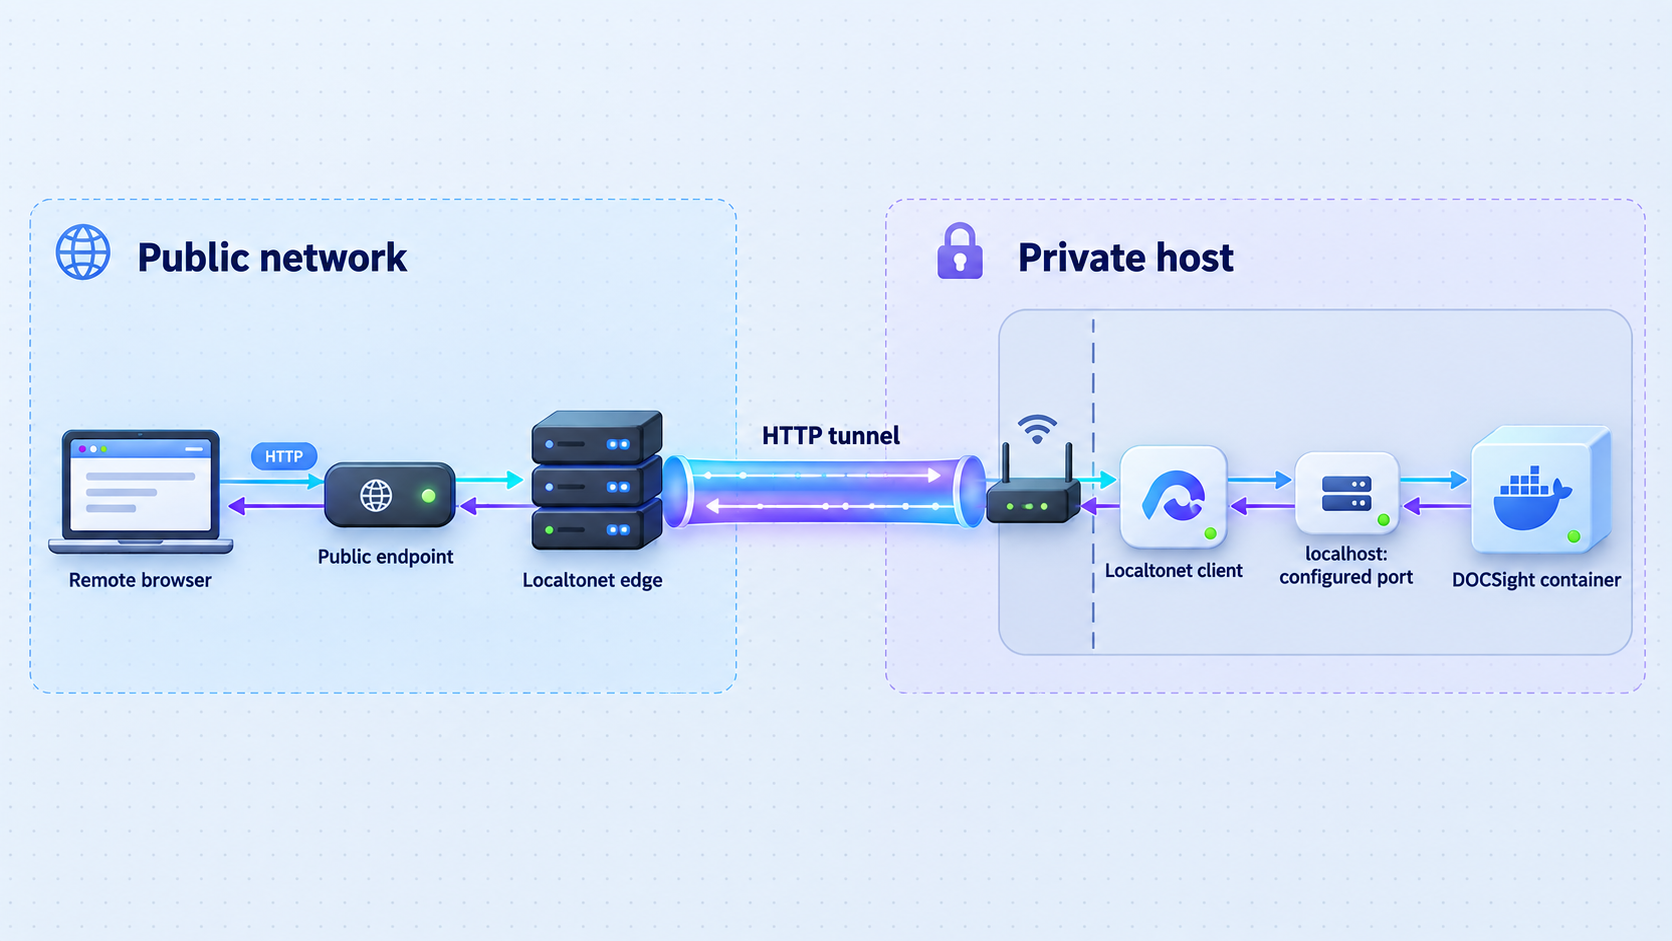
Localtonet can expose a locally running HTTP service without inbound router port forwarding, firewall changes for a public listener, VPN setup, or a public IP address. Our client on the selected device establishes an outbound connection to a Localtonet relay server, and an HTTP tunnel provides a public HTTPS address for the configured local target.
For DOCSight, the local target would ordinarily be the host running the service on TCP port 8765. If our client runs on another LAN device, that device must already be able to reach the Docker host. Localtonet cannot repair local routing, firewall, VLAN, or service-binding failures.
The available DOCSight evidence confirms that optional authentication exists but does not provide an exact setup and verification sequence. As a result, the secure remote-access workflow cannot be completed from the verified material available here. Keep the dashboard local until you have followed authentication documentation for your exact DOCSight release and confirmed from a private browser session that unauthenticated access is rejected.
The Localtonet lifecycle after the authentication gate is satisfied
Once current DOCSight documentation supplies an authentication procedure and you have verified it locally, the Localtonet lifecycle is:
- Install and run our client on the Docker host or another trusted device that can reach DOCSight.
- Authenticate or select that device using its device-specific token. Never expose the token.
- Select an available relay server or region from the current dashboard rather than copying a hardcoded server code.
- Create an HTTP tunnel whose local target is the reachable DOCSight host and TCP port 8765.
- Select the HTTP Process Type appropriate to your account, such as Random Sub Domain, Custom Sub Domain, or Custom Domain.
- Review the target and exposure settings, then start the tunnel. Creating it alone does not make it run.
- Test the public URL from a separate network and confirm that an unauthenticated browser cannot reach dashboard content.
- Stop or delete the tunnel when remote access is no longer required.
See our HTTP tunnel documentation for the current Localtonet dashboard workflow. Exact relay choices, custom-domain requirements, availability, and account options can change, so use the values shown in your dashboard.
| Client placement | Local target concept | Required condition |
|---|---|---|
| On the Docker host | The DOCSight service on local TCP port 8765 | The container and host-side port mapping must work locally |
| On another LAN device | The Docker host’s reachable LAN address and port 8765 | The client device must be allowed to reach the host through local routing and firewall rules |
| On an unrelated remote device | Not a usable target unless that device already has network reachability to DOCSight | Our client must run on a device that can actually reach the local service |
A public URL is available only while the selected Localtonet client is connected, the tunnel is running, and DOCSight responds at the configured target. A working tunnel cannot make a stopped container or unreachable Docker host available.
Security boundaries for DOCSight and remote access
DOCSight can contain outage timing, router context, connection measurements, incident notes, attachments, generated reports, and optional integration details. Publishing the dashboard changes its risk profile. Use layered controls rather than relying on the obscurity of a URL.
Verify application authentication first
The project confirms optional authentication, but the evidence supplied for this article does not establish its exact configuration. We therefore cannot provide made-up environment variables, default credentials, menu names, or password rules.
Consult the documentation for your installed release and the project’s security policy. A proper verification should demonstrate that a new private browsing session receives an authentication challenge and cannot display monitoring data before valid credentials are supplied.
Use least privilege for integrations
If you configure API tokens, Home Assistant, notifications, speed-test services, BQM, Smokeping, or another integration, grant only the permissions required for that workflow. Rotate disclosed credentials and remove unused integrations. Do not use a public tunnel to expose modem administration pages or unrelated management services.
Protect Localtonet device tokens
A Localtonet auth token identifies the client device. Keep it out of source control, screenshots, shell examples, chat messages, issue reports, and container configuration shared publicly. If a token may have been disclosed, use the current account workflow to replace or revoke it.
Control when the service is reachable
Start the tunnel only when remote access is needed and stop it afterward. Delete obsolete tunnel configurations when they are no longer required. Creating a tunnel does not start it, and stopping DOCSight does not automatically delete its Localtonet configuration.
Maintain software and recovery readiness
Review DOCSight release notes, Docker host updates, and Localtonet client updates routinely. Use release pinning where reproducibility matters. Complete the project-supported backup process before significant changes, and prove recovery in a test environment.
Treat a public address as discoverable. Use verified DOCSight authentication, strong unique credentials, least-privilege integrations, current software, and any appropriate network or account restrictions. Never share a dashboard link together with credentials or sensitive reports.
Troubleshooting installation and access problems
The Docker command reports a container-name conflict
A container named docsight already exists, even if it is stopped. Inspect it before taking action:
docker ps -a --filter name=docsightdocker logs docsightIf it is the intended installation, start or troubleshoot it instead of creating a duplicate. Remove it only after identifying its image and protecting the required persistent data.
Docker reports that port 8765 is already allocated
Another container or host process is using the port. Use docker ps to check container mappings, then identify non-container processes with the tools appropriate to your operating system. Do not terminate an unidentified process.
If you deliberately select a different host port, use that port for browser access and any future Localtonet target. For example, a mapping of -p 8876:8765 would use host port 8876 while leaving the DOCSight container port at 8765. This is a Docker networking example, not the project’s documented default.
The container exits immediately
docker ps -a --filter name=docsightdocker logs docsightPossible categories include image download problems, storage errors, port conflicts, or application startup failures. Follow the actual log message rather than guessing. If the container remains running, use the built-in doctor for a structured check.
The dashboard works on the server but not another LAN device
Confirm that the second device uses the Docker host’s LAN address rather than localhost. Check the host firewall, client isolation, VLAN policy, and whether the published port is available on the intended interface. Make only the smallest change allowed by your network policy.
The dashboard loads, but modem data is missing
A functioning web interface and functioning modem polling are separate conditions. Confirm that you selected the correct supported hardware family, that the Docker host can reach the modem, and that wizard values are accurate. Review logs and run:
docker exec docsight python -m app.doctorIf your device is unsupported, use Generic Router mode rather than expecting DOCSIS fields to populate. Missing measurements are unavailable data, not healthy measurements.
Monitoring stopped after a host restart
Confirm that Docker started, then inspect the container:
docker ps -a --filter name=docsight
The unless-stopped policy does not replace verification. If an operator previously stopped the container, or Docker cannot mount storage or start the application, collection may remain offline.
An update starts but historical data is missing
Stop troubleshooting actions that might modify storage. Inspect the container configuration and confirm that docsight_data is still mounted at /data. A replacement command that omitted the volume can start a fresh-looking installation without deleting the original volume.
docker inspect docsightIf the correct volume is attached and data remains unavailable, review release notes, logs, and the release-supported restore procedure. Do not repeatedly recreate containers or manually alter volume files.
A future Localtonet URL does not open
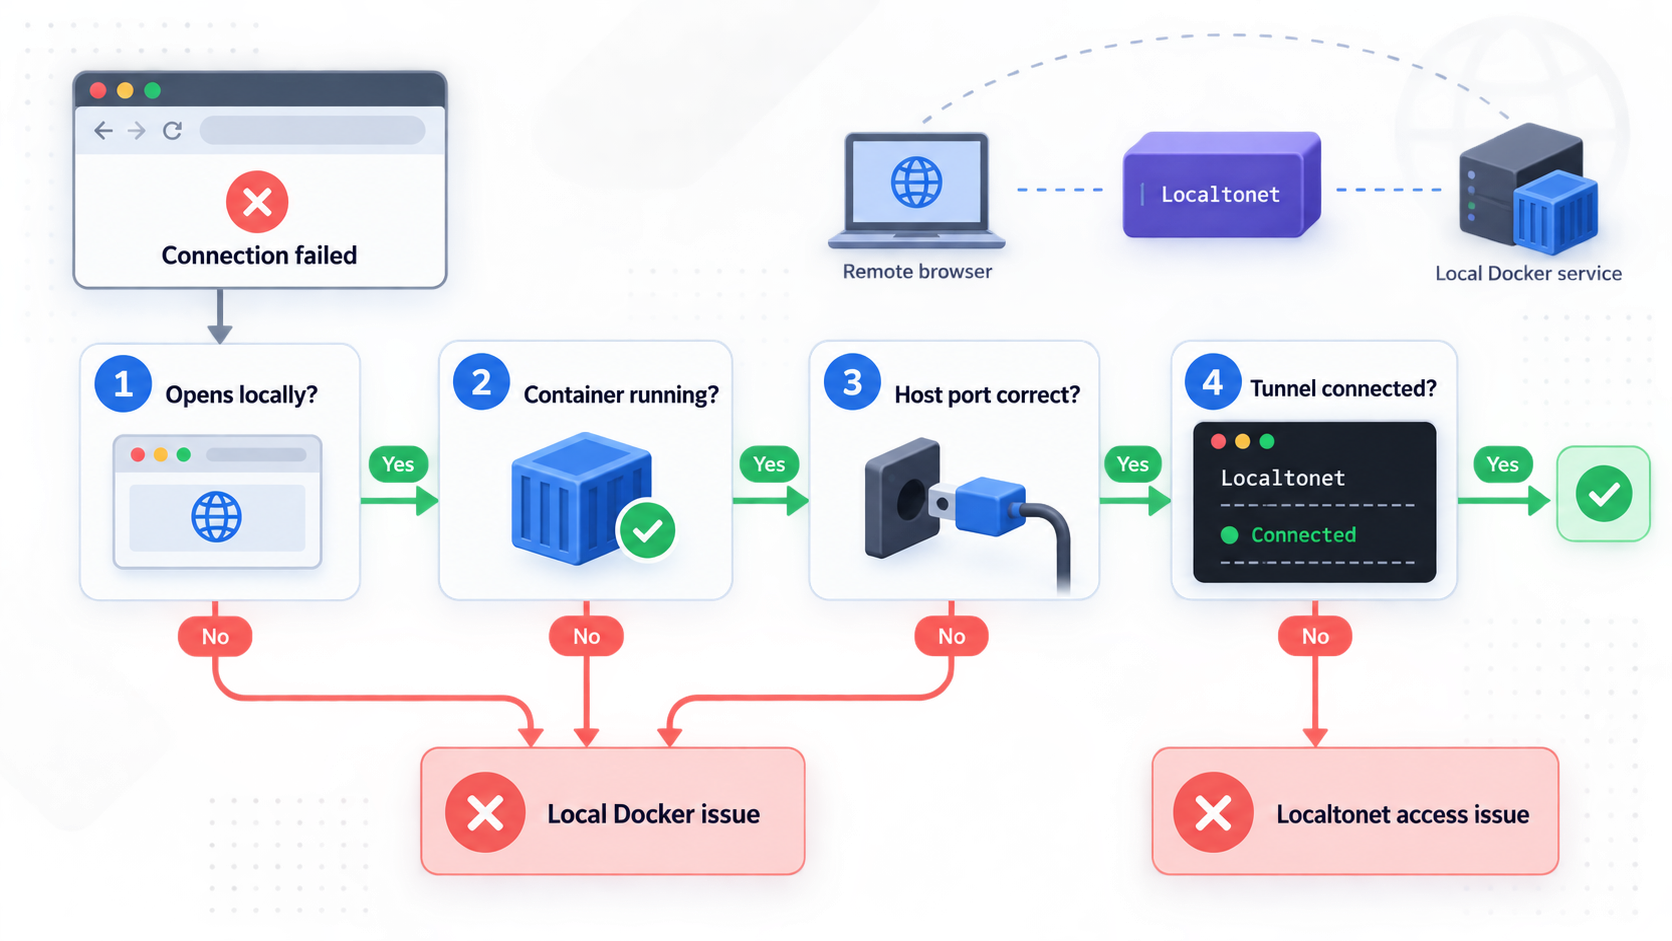
After authentication has been documented and the tunnel is allowed, work from the inside out:
- Open
http://localhost:8765on the Docker host. - If our client runs elsewhere, verify that its device can reach the Docker host and port.
- Confirm that the correct Localtonet device is connected.
- Confirm that the HTTP tunnel points to the correct local IP address and host port.
- Confirm that the tunnel was started, not merely created.
- Test the public URL from a separate network and verify that authentication blocks anonymous access.
If the public URL displays the wrong service, stop the tunnel immediately and recheck the local target. A changed port mapping or incorrect address can expose an unintended application.
Frequently asked questions
What URL does DOCSight use after Docker installation?
The documented Docker command publishes DOCSight at http://localhost:8765 on the Docker host. From another device, use a reachable address for the Docker host rather than localhost, subject to local firewall and network policy.
Do the Docker commands work in PowerShell?
The primary commands in this guide are presented on one line and work in PowerShell, Windows Command Prompt, and common POSIX shells. This avoids Bash backslash continuation syntax, which PowerShell does not use.
Does DOCSight require a cable modem?
No. DOCSight is strongest when it can collect DOCSIS signal data from a supported cable modem, but Generic Router mode supports applicable speed, latency, incident, and reporting workflows for other connections without claiming unavailable DOCSIS measurements.
Can I try DOCSight without connecting a router?
Yes. The documented demo command starts DOCSight with DEMO_MODE=true and generates synthetic DOCSIS history. It is for evaluation and is not evidence about your actual connection.
Where does the persistent installation store its data?
The documented Docker Run command mounts the named volume docsight_data at /data inside the container. Protect that volume during container replacement and use the project-supported backup and restore workflow for your installed release.
Does removing the container delete its history?
Removing the container normally leaves the separately named volume in place. However, Docker commands and graphical management tools can include volume-deletion options. Verify every removal action and never delete the volume unless erasing DOCSight configuration and history is intentional.
How do I update a Docker Run installation?
Review and pull a specific release, complete a release-supported backup, record the current image, stop and remove the container without deleting its volume, and recreate it with the same settings and the reviewed image tag. Verify the dashboard, logs, diagnostics, and historical data afterward.
Can I roll back by starting an older image?
Only if the older application is compatible with the current volume data. Recreating an older container does not reverse database or file migrations. Review release notes and restore a tested pre-update backup when backward compatibility is not confirmed.
Do I need router port forwarding for Localtonet?
No. Our client creates an outbound connection to a Localtonet relay server, so an HTTP tunnel does not require an inbound router port forward or a public IP address. Public DOCSight access should still wait until application authentication has been configured and verified.
Does creating a Localtonet tunnel start it?
No. Creating the configuration does not start the tunnel. The selected client must be connected and the tunnel must be started. It remains usable only while the client is connected, the tunnel is running, and DOCSight responds at the configured target.
Should I expose DOCSight before enabling authentication?
No. The currently supplied evidence confirms optional authentication but does not provide an exact setup procedure. Keep the dashboard local until current release documentation explains how to configure it and you have verified that anonymous requests cannot access dashboard content.
How do I collect DOCSight diagnostics?
Run docker exec docsight python -m app.doctor. Add --json and redirect the output to a file for machine-readable results. Review diagnostic output before sharing it because it may contain environmental context.
Prepare DOCSight for controlled access with Localtonet
Complete the local Docker installation, confirm that expected measurements are being collected, establish a tested backup and restore process, and follow current DOCSight authentication guidance. Once authentication is verified, you can use a Localtonet HTTP tunnel to reach the service without opening an inbound router port.
Get Started Free →

