

Install and verify the GoNavi desktop workbench, then publish only a separately configured and locally tested HTTP service
This guide is verified against GoNavi v1.0.0 and the current official installation documentation. It covers the supported desktop installation choices for Windows, macOS, and Linux, the first database connection, local workbench verification, and the documented developer build path. GoNavi also contains MCP HTTP and Web Server deployment components, but the available primary documentation does not establish a complete public contract for their environment variables, port, endpoint path, initial authentication setup, or routine container operation. We therefore provide conditional Localtonet instructions that begin only after an administrator has configured and locally verified one of those server modes from the exact version being deployed.
📋 What's in this guide
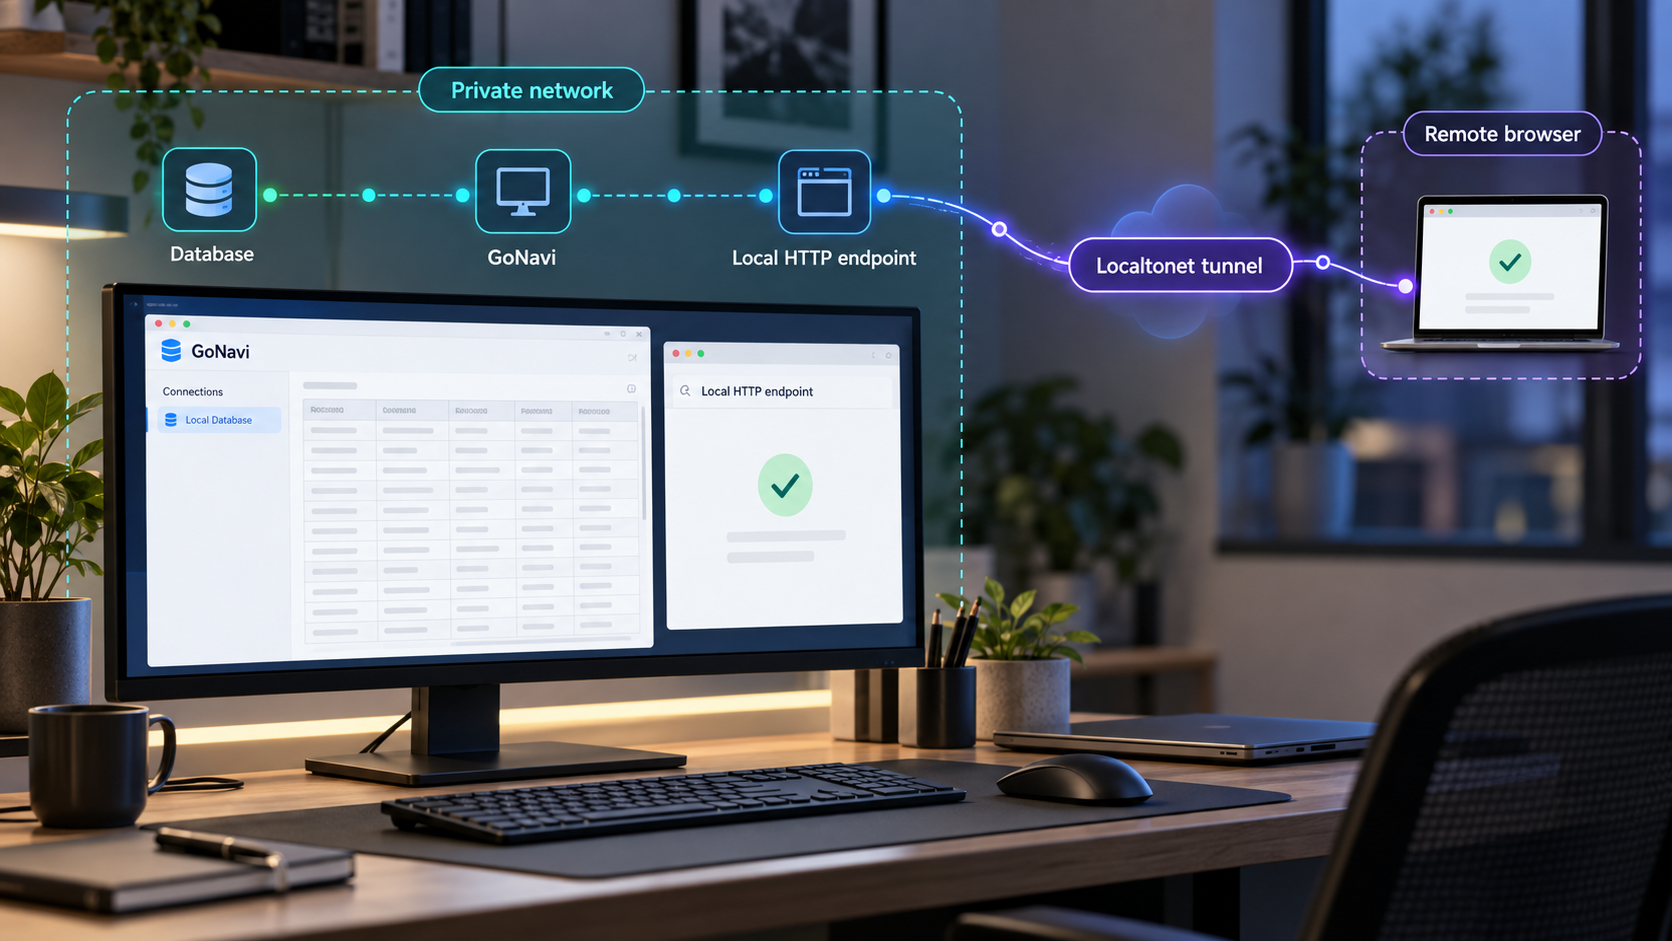
What GoNavi is and what this guide can verify
GoNavi is a cross-platform database workbench built with Go, React, Wails, and the native WebView provided by the operating system. Its official website describes a unified interface for more than 30 data sources, including relational databases, caches, message queues, vector databases, search platforms, time-series systems, and other specialized sources. Some integrations are built in, while others are delivered through optional driver agents.
The current release examined for this guide is GoNavi v1.0.0. Version-sensitive statements below refer to that release or to the current installation documentation. This distinction matters because installer assets, runtime dependencies, authentication behavior, deployment files, and server-mode configuration can change between releases.
The ordinary GoNavi experience is desktop-first. Launching the desktop application opens a native workbench. It does not, by itself, prove that an HTTP listener exists. A graphical window cannot be used as the target of a Localtonet HTTP tunnel unless a separate GoNavi MCP HTTP or Web Server process is listening on an address and port reachable by the Localtonet client.
The current GoNavi repository contains Dockerfile.mcp-server, Dockerfile.web-server, MCP-server and web-server Compose files, and corresponding environment examples. Those files show that dedicated server deployment paths exist. However, the primary evidence supplied for this revision does not include the contents of those files or a canonical server-mode guide defining all required variables, secret-generation rules, bind behavior, ports, endpoint paths, health checks, initial authentication, and startup or shutdown commands.
This article does not reconstruct a deployment from repository filenames or guess GoNavi configuration values. The desktop installation and workbench workflow are complete. The Localtonet workflow is complete from the point where an administrator already has a supported GoNavi HTTP endpoint responding locally. If your selected GoNavi version does not document enough information to reach that state, do not expose it and do not invent missing settings.
Prerequisites and platform decisions
Before installing GoNavi, identify the host operating system, processor architecture, available WebView runtime, and database you intend to test. Use a device on which you are authorized to install software. Managed workstations may require approval from an administrator even when the application is open source.
GoNavi v1.0.0 lists 24 release assets, but the supplied GitHub release-page extraction did not expose their filenames or package metadata. The official installation documentation provides the supported platform categories below. This guide therefore describes only those verified categories and does not infer additional architectures or Linux package formats from the asset count.
| Platform | Verified release choice | Runtime consideration |
|---|---|---|
| Windows | AMD64 .exe installer |
Depends on the system-provided Microsoft Edge WebView2 Runtime. |
| macOS on Intel | AMD64 .dmg |
GoNavi v1.0.0 uses an ad-hoc signature and is not Apple-notarized. |
| macOS on Apple Silicon | ARM64 .dmg |
GoNavi v1.0.0 uses an ad-hoc signature and is not Apple-notarized. |
| Linux | WebKitGTK 4.0 or WebKitGTK 4.1 build matching the distribution | The correct variant depends on the WebKitGTK generation available on the host. |
The official installation page documents Windows as an AMD64 build. It does not identify a Windows ARM64 desktop installer in the evidence available for this guide. Do not assume that every asset in the release is a Windows package or that an AMD64 installer is native to an ARM64 Windows device.
For Linux, the official documentation confirms WebKitGTK 4.0 and 4.1 variants but does not identify the exact v1.0.0 package formats in the supplied evidence. Package-manager commands differ among Debian-based, RPM-based, Arch-based, and other distributions. Inspect the actual release filename and use the distribution's supported installation procedure rather than pasting a command written for another package format.
Prepare a safe database target
GoNavi's quick-start guidance recommends beginning with a local or staging database. Gather the correct database type, hostname or URI, port, account details, database name, and any approved SSH or proxy settings. The correct values come from the database deployment or its administrator, not from GoNavi or Localtonet.
Prefer a read-only account for the first connection. The account should expose only the schemas, collections, topics, keys, or other objects needed for the test. Do not use an unrestricted production administrator account simply to prove that the application opens.
Download only from the official project
Use the official GoNavi v1.0.0 release, the main GoNavi Releases page, or the official GoNavi download page. A similarly named repository, fork, repackaged installer, or search result is not equivalent to the official Syngnat project.
Database passwords, connection URIs, SSH keys, API keys, exported connection profiles, Localtonet device tokens, TOTP seeds, recovery information, and private endpoint details must not appear in screenshots, public repositories, shell history, support posts, or shared examples.
Install GoNavi v1.0.0
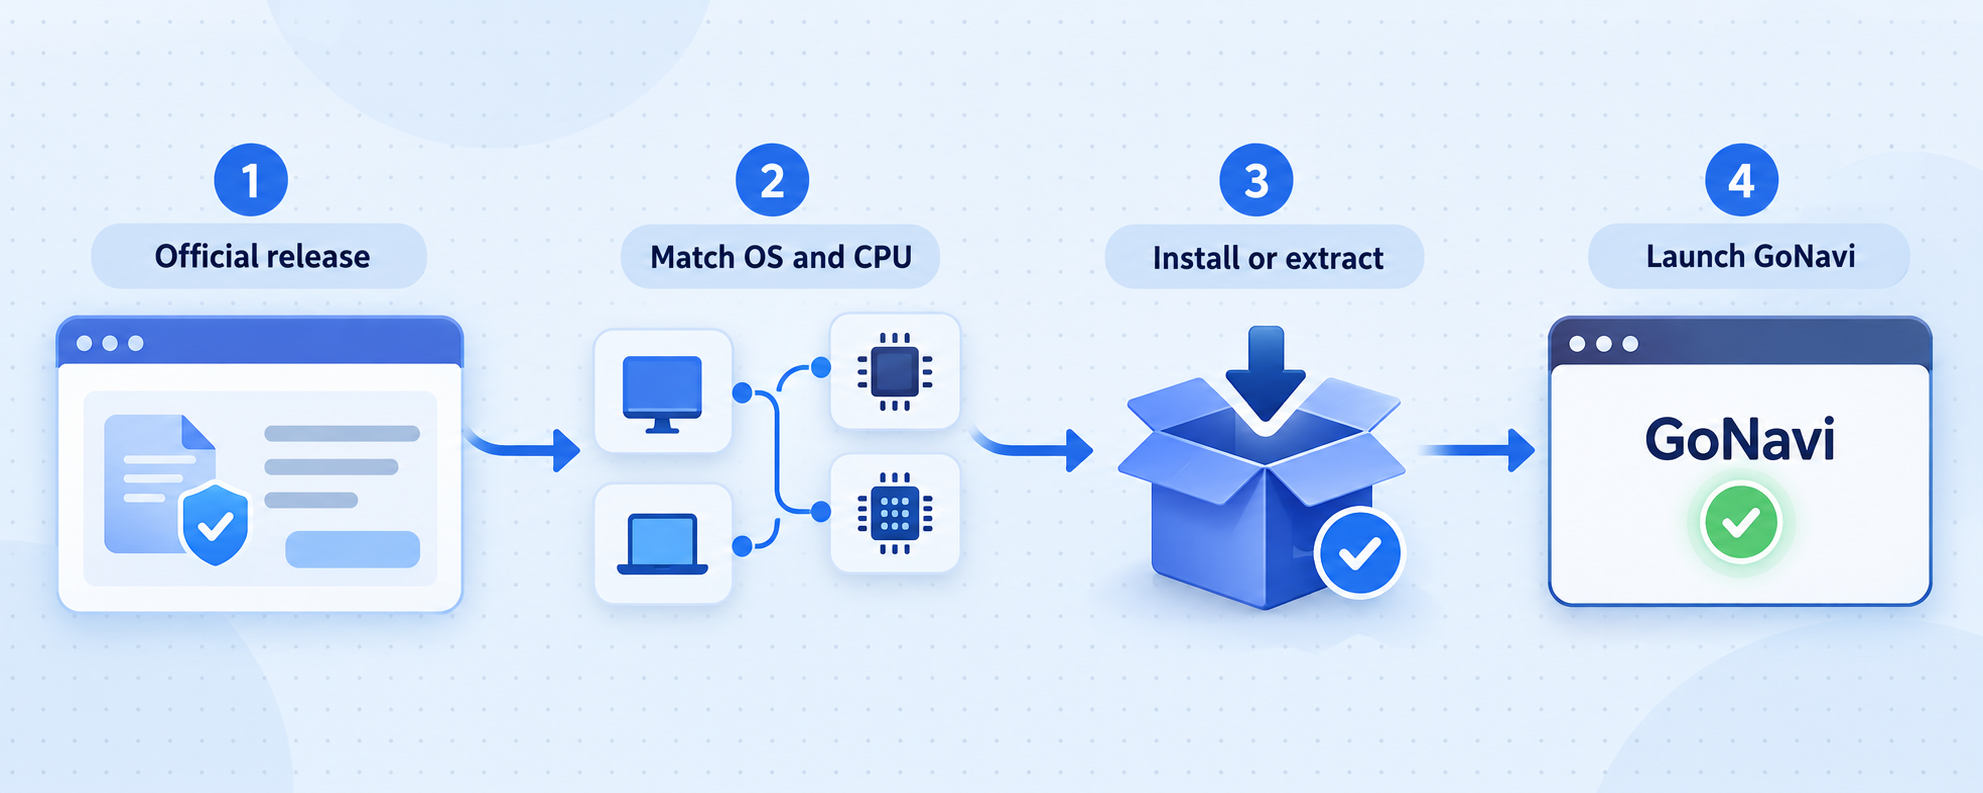
Open the v1.0.0 release
Open the official v1.0.0 release page and review its release notes. Confirm that the tag is v1.0.0 before choosing an asset. If your organization has approved a different version, use that version's own release notes and do not automatically apply v1.0.0-specific behavior to it.
Choose the documented platform build
Select the Windows AMD64 .exe, the macOS AMD64 or ARM64 .dmg matching the Mac, or a Linux build matching the host's WebKitGTK 4.0 or 4.1 environment. Read the complete filename before downloading. Do not infer package format or architecture from file size alone.
Install the selected package
On Windows, run the downloaded .exe through the normal approved installer workflow. On macOS, open the matching .dmg and install the application using Finder. On Linux, use the installation method appropriate to the package format actually supplied by the release and supported by the distribution.
Resolve the native WebView requirement
Windows requires Microsoft Edge WebView2 Runtime. Linux requires the WebKitGTK generation expected by the chosen build. On macOS, the v1.0.0 DMG is ad-hoc signed and not Apple-notarized, so Gatekeeper may require explicit approval after you verify the package source.
Launch and inspect the workbench
Start GoNavi and confirm that the interface renders, navigation works, and connection controls are available. This verifies the desktop package and basic runtime, but it does not yet verify database connectivity or any HTTP server mode.
Windows installation notes
GoNavi relies on the system-provided Microsoft Edge WebView2 Runtime instead of bundling a complete browser runtime. A missing or unusable WebView2 installation can result in a blank window or an immediate exit, particularly on restricted intranet images. Resolve the application-rendering problem before changing database credentials.
The current installation documentation specifies an AMD64 Windows build. If the host uses another processor architecture, verify compatibility from the exact release asset and operating-system documentation rather than assuming native support.
macOS installation notes for v1.0.0
Choose ARM64 for Apple Silicon or AMD64 for an Intel Mac. The v1.0.0 release notes specifically state that its DMG uses an ad-hoc signature and has not undergone Apple notarization. As a result, Gatekeeper may block the first launch.
First verify that the DMG came from the official project release. Then locate the installed application in Finder, hold Control while clicking it, and choose Open. Do not disable Gatekeeper globally. The evidence establishes this warning for v1.0.0, so check the applicable release notes before assuming that every future version has the same signing state.
Linux installation notes
Select the WebKitGTK 4.0 or 4.1 variant compatible with the distribution. If GoNavi does not launch, inspect terminal output for missing shared libraries or a WebKitGTK mismatch. Do not install random compatibility packages without first identifying what the selected build expects.
The available evidence does not establish whether every v1.0.0 Linux asset uses the same package format, and it does not provide one universal package-manager command. Follow the package type present in the official release and the normal procedure for the target distribution.
Current GoNavi material describes approximately 20 to 26 MB class installers in one repository overview and approximately 30 MB class binaries in the installation documentation. These are approximate download or binary-size descriptions, not guaranteed v1.0.0 asset sizes and not runtime memory figures. Native WebView processes, active connections, query results, and workload all affect memory use.
Configure the GoNavi desktop workbench
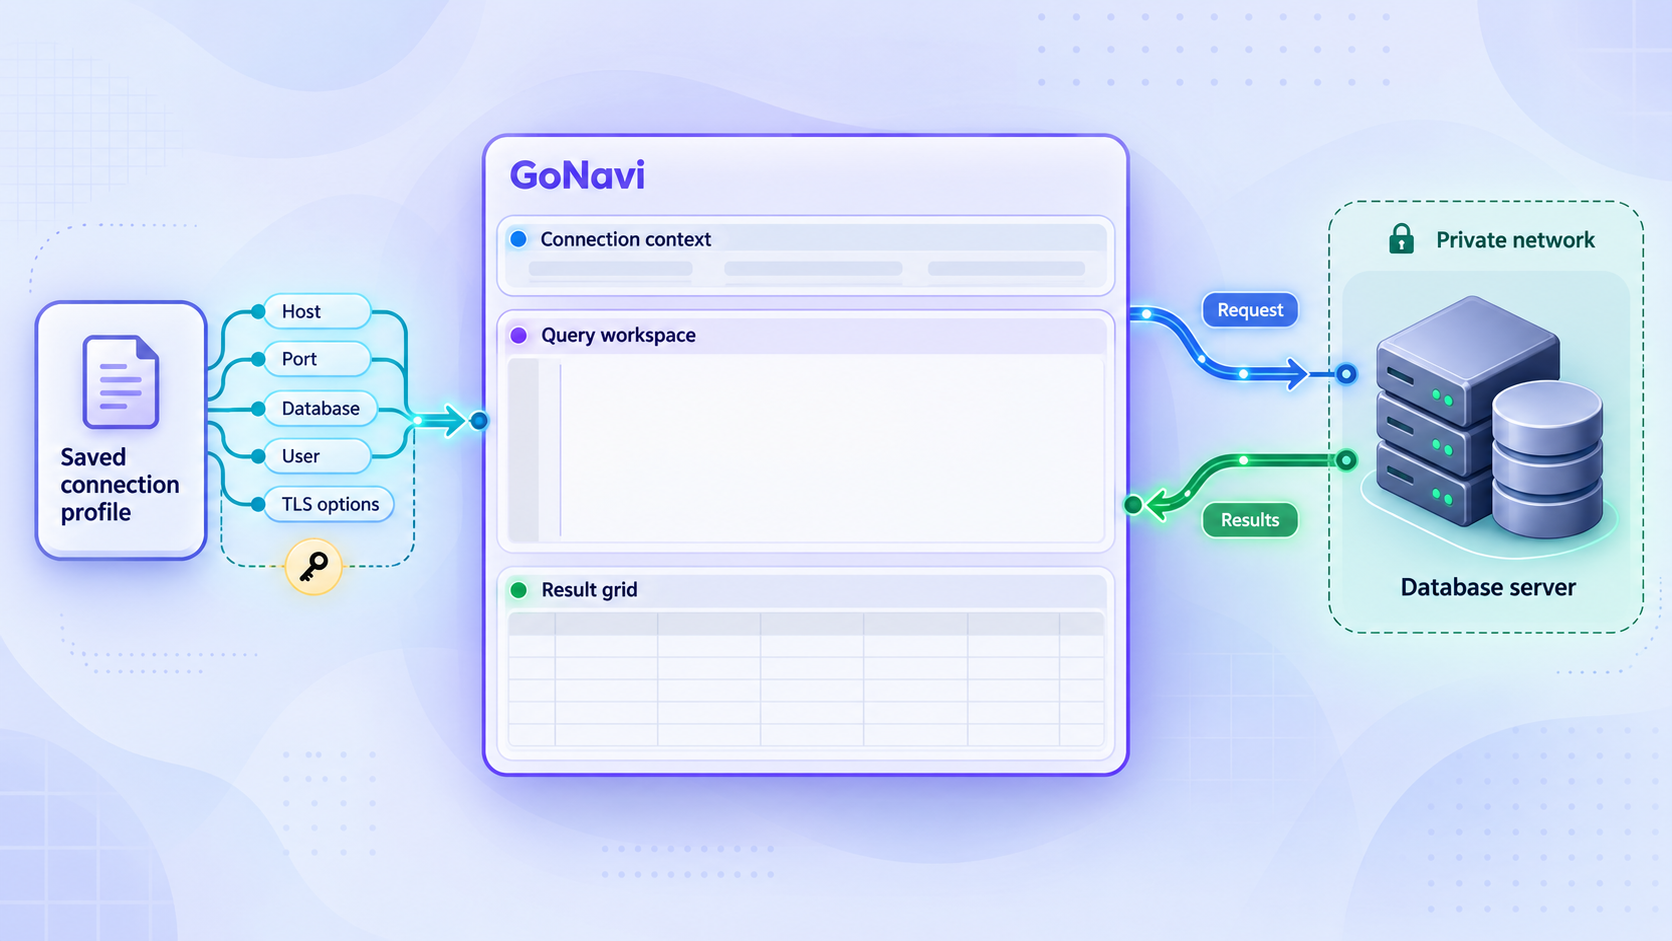
GoNavi's documented quick-start path is to launch the client, create a connection, select the database type, enter the required host and authentication information, save the connection, and open the query workspace or object tree.
Create a connection
Open GoNavi's connection creation interface and select the exact data-source type. Some sources are built in and others use optional driver agents, so verify the integration type shown by the current application.
Enter the connection details
Provide the host or URI, port, database name, and credentials required by the target system. Use values from the approved deployment configuration. Database defaults vary, so do not substitute a port or authentication method from an unrelated example.
Add SSH or proxy settings only when required
GoNavi supports optional SSH and proxy connection settings. Configure them only when they are part of the authorized route to the database. Obtain jump-host, proxy, credential, and host-verification requirements from your infrastructure administrator.
Save and open the connection
Give the profile a name that identifies its environment, such as local, development, or staging. Save it and connect. If GoNavi indicates that an optional driver agent is required, complete that supported driver setup before diagnosing the database itself.
Browse objects or open the query workspace
Confirm that the expected schemas, tables, keys, topics, collections, or other source-specific objects appear. What you can see depends on the selected data source and the permissions granted to the account.
Perform a low-risk verification
Browse a known object or run a read-only statement appropriate to the database. Confirm that GoNavi displays the expected result without making a schema change, writing production data, or starting an uncontrolled workload.
A successful launch does not validate query safety, driver compatibility, transaction behavior, or account permissions. Test with a local or staging system and a least-privilege account before introducing production access.
Verify the desktop installation in layers
Layered verification separates packaging failures, database failures, and remote-access failures. This prevents a tunnel from hiding a problem that already exists on the local machine.
Layer 1: Verify the application runtime
Confirm that GoNavi opens, renders a complete interface, responds to navigation, and can reach its settings and connection screens. Close it and launch it again. A repeatable launch provides stronger evidence than the first run immediately after installation.
Layer 2: Verify database authentication
Open the saved connection and confirm that authentication succeeds. If it fails, compare the data-source type, host or URI, port, database name, account, password, SSH route, proxy route, and account state with a known-good configuration.
Layer 3: Verify permissions and data visibility
Browse the object tree or run a low-risk read operation. Missing objects can indicate an incorrect database or schema, but they can also reflect intentional account restrictions. Confirm the account's grants before treating limited visibility as an application defect.
Layer 4: Verify routine workbench behavior
Open the query workspace, inspect a result, and confirm that it corresponds to the selected data source. If your intended workflow includes editing, export, synchronization, or optional drivers, test those functions separately in a non-production environment.
Optional developer build path
Most users should install an official release. Developers who need to review or modify the source can use the documented development prerequisites: Go 1.21 or newer, Node.js 18 or newer, and Wails CLI 2.11.0. Git and the operating system's Wails development dependencies are also required.
go install github.com/wailsapp/wails/v2/cmd/wails@v2.11.0
git clone https://github.com/Syngnat/GoNavi.git
cd GoNavi
git checkout v1.0.0
wails dev
Checking out the tag keeps this version-specific workflow separate from the repository's active development branch. The current quick-start documentation also provides a faster development command for cases where Go exports have not changed:
node tools/wails-fast-dev.mjs
The documented build commands place artifacts in build/bin:
wails build
wails build -clean
Use a clean build when preparing a release candidate. A source build introduces additional variables, including compiler versions, Node.js dependencies, platform SDKs, branch state, and local changes. An official release asset is usually the more reproducible route for ordinary desktop use.
Assess GoNavi MCP HTTP or Web Server mode before tunneling
Remote access requires a separately running network service. The GoNavi repository and overview establish that MCP HTTP and Web Server components exist, but the evidence available here does not provide enough detail to document one executable deployment without guessing.
| Item | What is verified | What remains version-specific |
|---|---|---|
| MCP server deployment | The repository contains a dedicated Dockerfile, Compose files, and an environment example. | Required variables, secrets, port, endpoint path, bind address, startup command, and client authentication contract are not present in the supplied evidence. |
| Web Server deployment | The repository contains a dedicated Dockerfile, Compose files, and an environment example. | Required variables, storage, port, bind address, authentication bootstrap, health check, and shutdown procedure are not established here. |
| Web authentication | The v1.0.0 release includes a fix that rejects replayed TOTP codes within the validation window. | The release notes do not define how to enable authentication, enroll TOTP, store its seed, recover access, or authenticate API requests. |
| Desktop launch | The desktop application starts the native workbench. | It must not be treated as proof that either server mode is active. |
A release-note entry about replayed TOTP codes confirms that v1.0.0 contains TOTP-related web authentication behavior. It does not establish the complete authentication workflow. Do not infer a default username, password, TOTP seed, validation interval, recovery procedure, or API header from that single change note.
A Dockerfile, Compose filename, or environment-example filename is evidence that a deployment path exists, not a complete operating procedure. Before publishing either server mode, obtain the exact files for the selected release and verify every required variable, secret, volume, image, bind address, port, endpoint path, authentication step, startup command, shutdown command, and upgrade requirement.
Required readiness checklist
Do not create the Localtonet tunnel until all of the following are known and tested:
- The GoNavi version and deployment files belong to the same release.
- The server mode starts successfully using a documented procedure.
- Required secrets are generated and stored outside source control.
- The listener's actual bind address and port are known.
- The intended HTTP endpoint path is known.
- Authentication has been enabled and tested according to that release's instructions.
- An unauthenticated request is rejected as expected.
- An authenticated local request returns the expected response.
- The service has a documented way to stop and restart cleanly.
- The database account behind the service has appropriate permissions.
Reproducible local verification pattern
Once the selected GoNavi instructions provide the real address, port, and path, test that exact endpoint on the Localtonet client device. Replace every placeholder below with a value explicitly configured or reported by GoNavi:
curl -i "http://<verified-local-address>:<verified-port>/<verified-path>"First perform the test without credentials and record the expected rejection behavior. Then use the authentication method documented by the selected GoNavi server mode and confirm the expected authenticated response. Do not place a password, session token, TOTP seed, API key, or reusable authorization header in shell history or published examples.
Record the HTTP status, relevant response headers, and a non-sensitive description of the response body. The same request path and authentication method must later be tested through the public Localtonet URL. If the service is intended for an MCP client rather than an ordinary browser, use a compatible MCP client for the final protocol-level test after basic HTTP reachability is established.
Expose the verified GoNavi HTTP endpoint with Localtonet
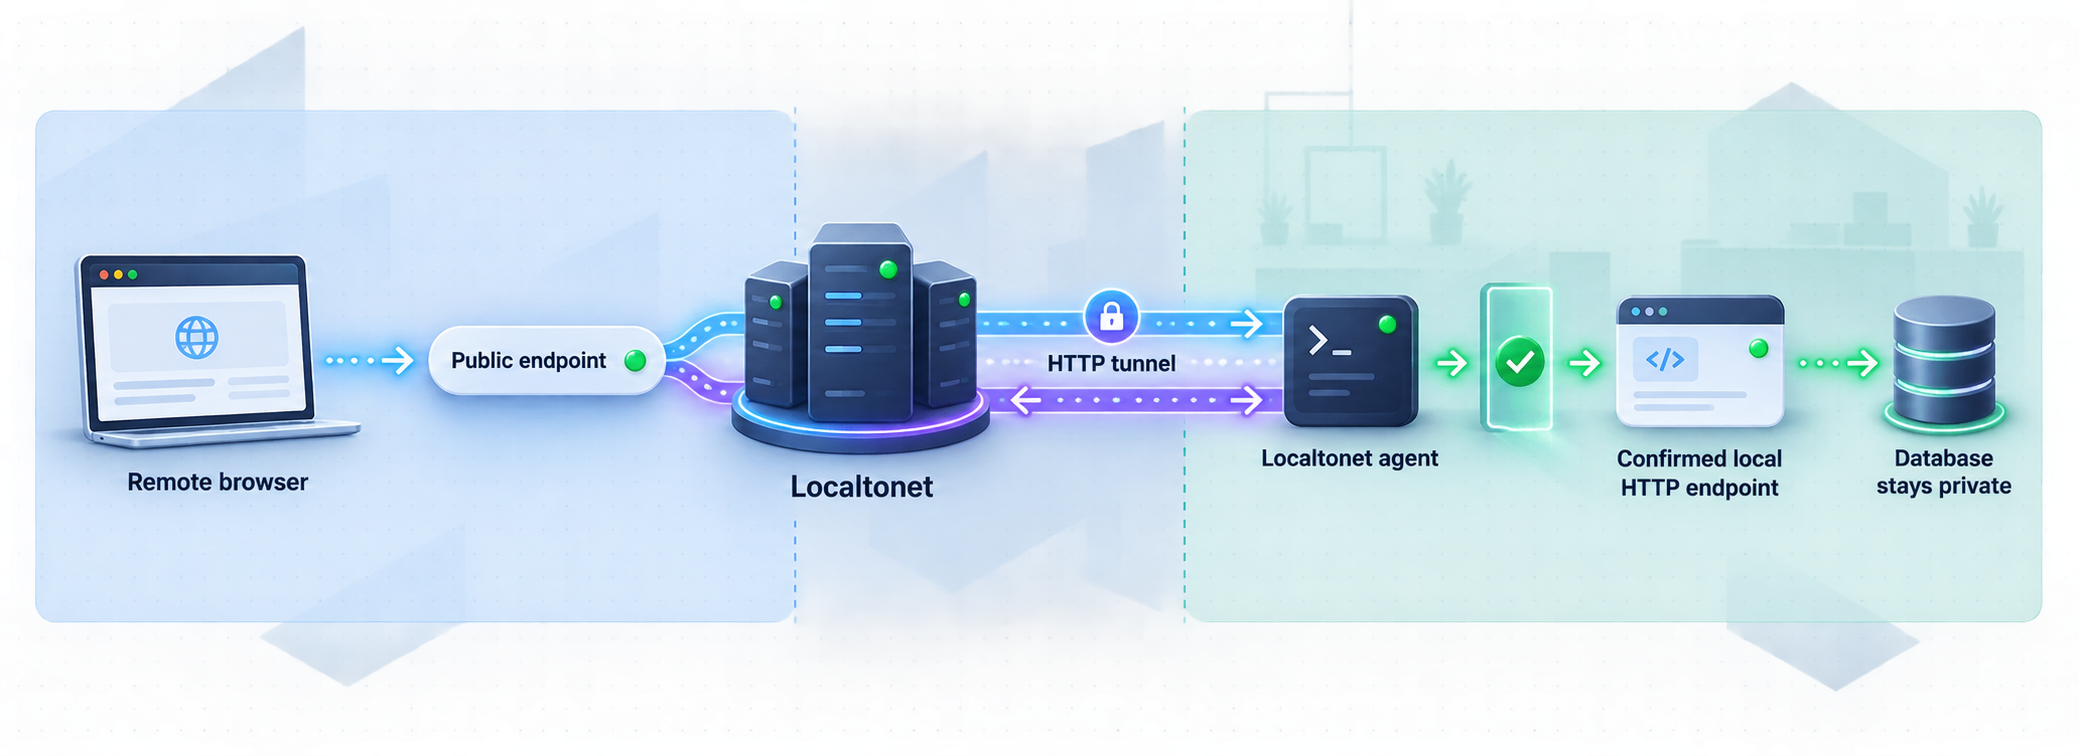
Our client establishes an outbound connection from the device to a Localtonet relay server. The resulting HTTP tunnel provides a public HTTPS address without inbound router port forwarding, router firewall changes, VPN setup, or a public IP address. The endpoint remains available only while the selected device is connected and the tunnel is running.
Follow this sequence only after the local GoNavi endpoint passes both expected-failure and expected-success tests.
Install and run the Localtonet client
Install our client on the computer that can reach the verified GoNavi HTTP listener. For a same-device deployment, this is the host running the GoNavi service. For another local host or container host, first confirm that the Localtonet client device can reach the exact address and port.
Authenticate or select the intended device
Use the device-specific authentication token assigned to that client. Treat the token as a secret. Never place it in screenshots, shared command examples, source control, or public support messages.
Select an available relay server
Choose a server or region currently available in the Localtonet dashboard. Do not copy a hardcoded server code from an older tutorial because availability can vary by current product configuration, deployment, region, client version, or plan.
Create the HTTP tunnel
Create an HTTP tunnel and set its local target to the exact IP address and port already verified from the Localtonet client device. Do not enter the database port unless your deliberate objective is a separate raw database-tunneling project.
Choose the HTTP process type
Select Random Sub Domain, Custom Sub Domain, or Custom Domain according to the options available in your account. All three serve the HTTP content at a public HTTPS address. Availability can vary, and custom-domain DNS requirements must be checked against the current Localtonet documentation.
Start the tunnel
Creating a tunnel does not start it. Press Start and confirm that the tunnel enters its running state while the selected Localtonet client remains connected.
Verify the public endpoint
Repeat the same path and authentication tests against the assigned public HTTPS address. Confirm that unauthenticated access fails as expected and that an authorized client receives the same functional response observed locally.
Stop or delete the tunnel when finished
Stop the tunnel after the remote session or integration test. Delete it if it is no longer required. Stopping Localtonet removes the public route but does not automatically stop the local GoNavi service.
Review the current Localtonet HTTP tunnel documentation while configuring the dashboard, particularly when using a custom domain.
Generated, custom-subdomain, and custom-domain choices
| Process type | Public address behavior | What to verify |
|---|---|---|
| Random Sub Domain | Uses a generated public HTTPS hostname. | Use the hostname assigned by the current tunnel configuration. |
| Custom Sub Domain | Uses a selected subdomain where that option is available. | Confirm availability and naming rules in the current dashboard. |
| Custom Domain | Uses your own domain with the required Localtonet configuration. | Follow current DNS instructions rather than copying records from an older article. |
Run a reproducible public test
Preserve the exact path used in the successful local request. Replace the public placeholder with the HTTPS hostname assigned to the running tunnel:
curl -i "https://<assigned-public-host>/<verified-path>"Compare the public result with the local baseline. An expected authentication rejection demonstrates that the request reached an access-control boundary, although it does not by itself validate the entire application workflow. Complete a second test using the server mode's documented authentication method, then verify the operation with the intended browser, API consumer, or MCP client.
Finally, stop the Localtonet tunnel and repeat the public request. The public endpoint should no longer be available. This negative test verifies the tunnel lifecycle and helps distinguish a Localtonet route from another accidentally exposed service.
Secure the GoNavi and Localtonet workflow
A remote GoNavi interface can sit close to connection profiles, schema information, query execution, exports, AI tools, or other database operations. Treat it as an administrative surface rather than a static website.
Test denied actions as carefully as successful ones. Verify that unauthenticated clients cannot access protected content, a read-only database account cannot perform writes, expired or replayed credentials are rejected according to the application contract, and stopping the tunnel removes the public route.
Localtonet provides connectivity to the local target you configure. It does not replace GoNavi authentication, database permissions, organizational identity controls, or network policy. Do not use tunneling as a way to bypass security requirements.
Troubleshooting installation and remote access
GoNavi opens to a blank window on Windows
Verify that Microsoft Edge WebView2 Runtime is installed and usable. This is a documented dependency, especially relevant to restricted Windows images. Restart GoNavi after resolving the runtime problem. Do not change database settings until the application interface renders correctly.
macOS blocks GoNavi v1.0.0
Confirm that the DMG came from the official v1.0.0 release and matches the Mac's architecture. The v1.0.0 DMG is ad-hoc signed and not Apple-notarized. Use Finder to Control-click the verified application and choose Open. Do not disable Gatekeeper globally.
The Linux build does not start
Check whether the selected asset expects WebKitGTK 4.0 or 4.1. Compare that requirement with the host libraries and inspect terminal output for missing dependencies. Also confirm that you installed the actual package format using the distribution's appropriate tooling.
The desktop app works but the database connection fails
Recheck the data-source type, host or URI, port, database name, account, password, SSH route, proxy route, and network reachability. If the source uses an optional driver agent, verify that the driver is installed and compatible. A successful connection from another tool does not prove that both tools use the same route, credentials, TLS configuration, or proxy.
Expected database objects are missing
Confirm that the intended database and schema are selected. Missing objects can be the correct result of least-privilege permissions. Compare the account grants with the required scope before changing the client.
No HTTP port appears after launching the desktop app
Do not assume that one should appear. The desktop workbench is not automatically the MCP server or Web Server deployment. Use an exact, version-matched server-mode procedure. If the required variables, startup command, bind address, port, endpoint, and authentication process cannot be established, stop rather than guessing.
The GoNavi HTTP endpoint does not work locally
Confirm that the selected server process is running and review its startup output. Verify the actual address, port, endpoint path, and authentication method. Localtonet cannot repair an application that has not started, a container that exited, a port that was not published, or an invalid GoNavi configuration.
Loopback works, but the Localtonet client cannot reach the service
A service bound only to loopback is reachable only from the same network namespace or host context. If GoNavi runs in a container or on another machine, verify the documented bind and port-publishing behavior before changing it. Do not broaden the listener without understanding the security impact.
The local endpoint works, but the public endpoint fails
Check that the Localtonet client is connected on the intended device, the HTTP tunnel uses the exact tested local IP and port, the selected relay is available, and the tunnel has been started. Verify that you are using the assigned public hostname and preserving the endpoint path.
Distinguish HTTP responses from network failures. An authentication rejection usually means the request reached the application or an authentication layer. A connection failure can indicate a stopped tunnel, disconnected client, incorrect target, inactive GoNavi process, or unreachable local host.
The tunnel fails after a restart
Check both lifecycles independently. The GoNavi server process must be running, the Localtonet client device must be connected, and the tunnel must be started. Creating a tunnel does not automatically start GoNavi, and starting GoNavi does not automatically start the Localtonet tunnel.
An upgrade changes authentication or endpoint behavior
Record the previous and current GoNavi versions. Compare the release-specific server deployment files, environment examples, authentication instructions, database drivers, and connection settings. Do not reuse v1.0.0 assumptions for another release without verification.
Frequently asked questions
Which GoNavi version does this guide cover?
The version-specific installation and release statements cover GoNavi v1.0.0. The Localtonet workflow applies only after the selected GoNavi version has a documented and locally verified HTTP listener.
Does launching GoNavi desktop create an HTTP server?
Do not assume that it does. The desktop workbench and the repository's MCP-server and Web Server components are separate concerns. A Localtonet HTTP tunnel requires a real listener with a known address and port.
What port and path does GoNavi use for MCP HTTP?
The supplied primary evidence does not establish a universal port or endpoint path. Obtain those values from the exact version's server-mode files or canonical instructions, then verify them locally. Do not choose a familiar development port by guesswork.
Does GoNavi v1.0.0 support TOTP authentication?
The v1.0.0 release notes include a web-authentication fix that rejects replayed TOTP codes within the validation window. That confirms TOTP-related behavior, but the supplied evidence does not document enrollment, seed storage, recovery, or the complete login workflow.
Which Windows GoNavi package is documented?
The current installation documentation identifies an AMD64 .exe installer and a dependency on Microsoft Edge WebView2 Runtime. The supplied evidence does not establish a Windows ARM64 desktop installer.
Which GoNavi package should I use on macOS?
Use the ARM64 .dmg on Apple Silicon or the AMD64 .dmg on an Intel Mac. GoNavi v1.0.0 is ad-hoc signed and not Apple-notarized, so Gatekeeper may require the Finder Control-click and Open workflow.
Which Linux package format does v1.0.0 use?
The supplied evidence confirms WebKitGTK 4.0 and 4.1 variants but does not expose the complete v1.0.0 asset filenames or establish one universal Linux package format. Inspect the official release asset and use the matching procedure for your distribution.
Should I use an HTTP tunnel or a TCP tunnel?
Use an HTTP tunnel for a verified GoNavi service that speaks HTTP. Do not switch to raw TCP merely because the HTTP deployment is incomplete. Direct database tunneling is a different project with a different threat model.
Does creating a Localtonet tunnel make it public immediately?
No. Creation and startup are separate lifecycle states. After configuring the HTTP target, press Start. The endpoint is available only while the selected client device is connected and the tunnel is running.
Does Localtonet replace GoNavi authentication or database permissions?
No. Localtonet provides connectivity to the configured target. GoNavi authentication, TOTP handling, database authorization, query permissions, and organizational access policies remain separate responsibilities.
Publish only a verified GoNavi HTTP service
Install and test GoNavi v1.0.0 locally first. When a version-matched MCP HTTP or Web Server deployment is authenticated, running, and responding on a confirmed local address and port, use Localtonet to provide a public HTTPS route without inbound router port forwarding.
Get Started Free →

