

Build a local-first homelab monitoring workflow, verify every layer, and connect it remotely only when you are ready
HomeButler is a self-hosted homelab operations tool distributed as a single Go binary. It can inspect host health, list Docker containers, map ports and service topology, produce change-aware reports, return machine-readable JSON, and run a browser dashboard at http://localhost:8080. This guide installs HomeButler using methods listed in its current project documentation, initializes it, verifies the CLI and dashboard locally, and then connects the working HTTP service to Localtonet. Version-sensitive HomeButler examples were reviewed against the current main-branch README and project website during the 2026 editorial revision, rather than the older v0.22.1 release instructions.
📋 What's in this guide
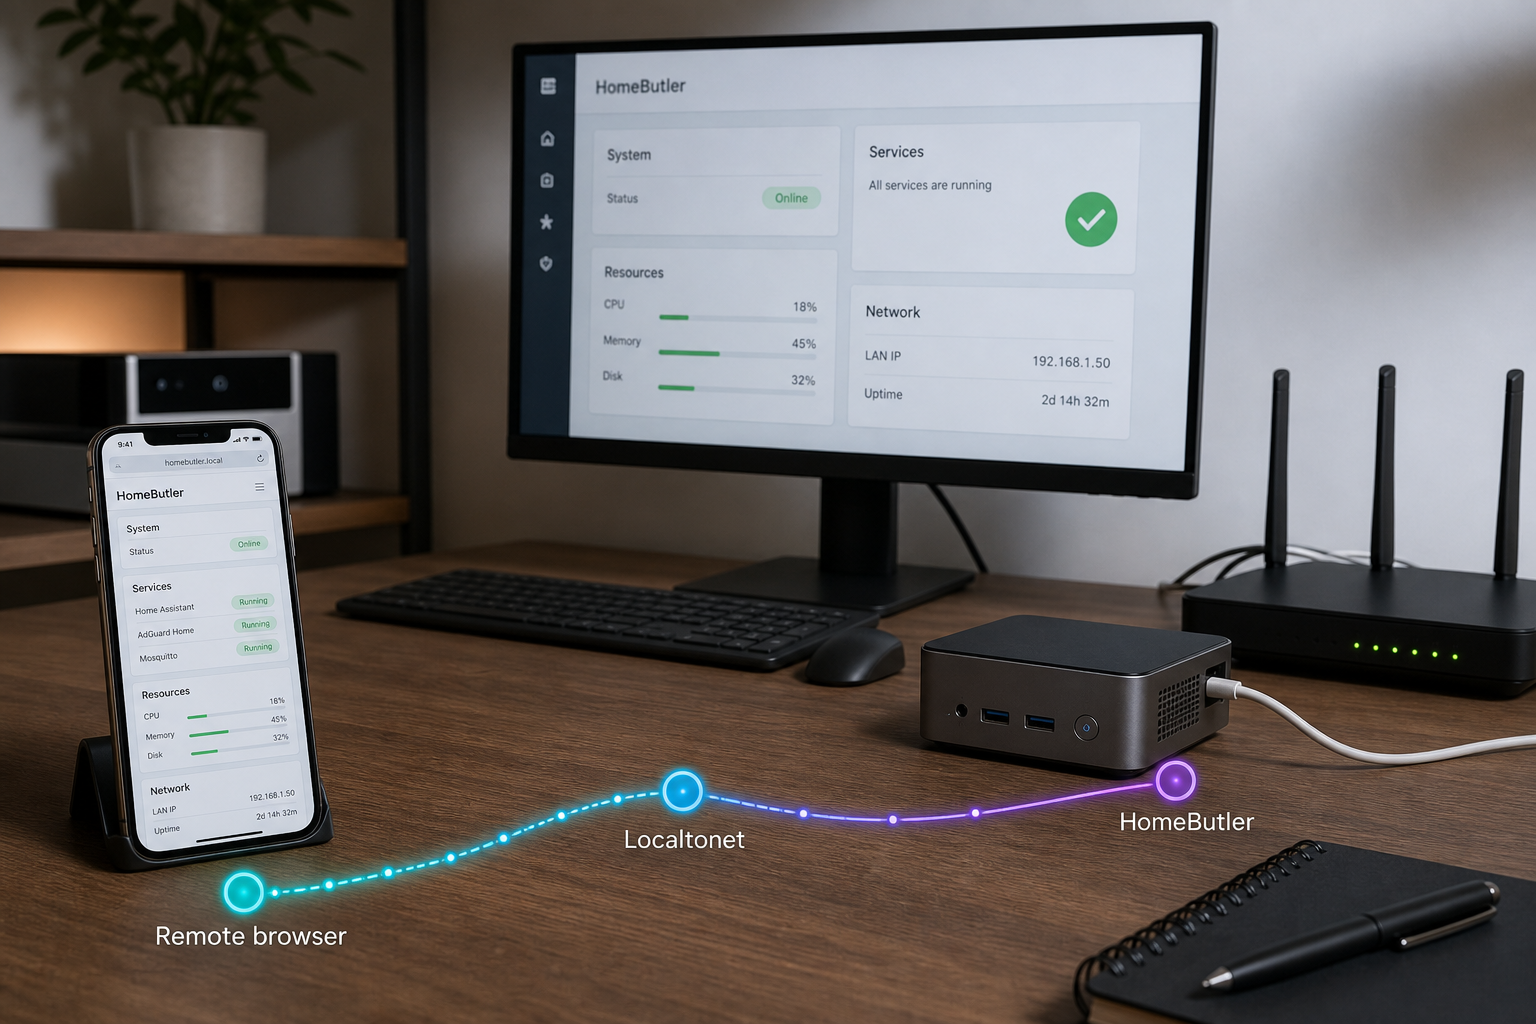
What HomeButler does in a homelab
HomeButler is intended to answer practical operations questions about a small server or homelab. Its current project description emphasizes change awareness: instead of reporting only what exists now, it can compare the current server state with an earlier saved report and identify changes worth reviewing. That distinction matters when a container is recreated under the same name, a process takes over a port, a service stops, or a disk changes significantly.
The project describes eight change kinds in its current README: gone, new, replaced, image, state, port, disk, and skipped. The same kind names are used in JSON output so that automation can branch on a structured value rather than attempting to interpret prose. A skipped result communicates that a comparison could not be made, which is different from claiming that nothing changed.
HomeButler is CLI-first, but it is not limited to terminal output. The current project documentation lists terminal commands, JSON output, a terminal dashboard, a web dashboard, and MCP support for AI tools. This tutorial focuses on the ordinary CLI and the web dashboard because they provide a clear path from local installation to remote browser access.
You can review the current project description and command examples in the HomeButler repository. The public HomeButler website provides a shorter overview of its local operations model.
homebutler serve command starts a dashboard at http://localhost:8080.
HomeButler also documents workflows for diagnosing containers, verifying backups, deploying supported self-hosted applications, viewing supported Proxmox resources, and giving AI tools a narrower interface than unrestricted SSH. Those capabilities can involve additional permissions and configuration. They are not required merely to install HomeButler and open its local dashboard, so this guide does not attempt to configure them.
A tunnel does not install, initialize, authenticate, or repair HomeButler. Complete the local workflow first. Confirm that commands execute and that the dashboard opens directly on the host before introducing remote connectivity.
Prerequisites and deployment decisions
Install HomeButler on the server or workstation whose resources you want to inspect. Host status, local Docker visibility, listening ports, and topology depend on what the process can see from that machine and what the current operating-system account is permitted to access.
The current one-line installer says that it detects the operating system and architecture automatically. The available project overview does not provide a complete platform matrix, so do not assume that every operating system release, processor architecture, or shell is supported. If installation reports an unsupported platform, check the current HomeButler releases and repository documentation instead of downloading an unrelated artifact or forcing a binary for another platform.
The current project quick start documents two installation paths: the official shell installer and Homebrew. An older v0.22.1 release also advertised a global npm package, but npm is not listed in the extracted current README quick start or current website installation guidance used for this revision. For that reason, this tutorial does not present npm as a current general installation method.
| Requirement or choice | Why it matters | What to confirm |
|---|---|---|
| Target homelab host | HomeButler reports what the running process can inspect. | Install it on the machine that has the required local visibility. |
| Installation method | The current project quick start documents a shell installer and Homebrew. | Use one method, not several overlapping installations. |
| Operating-system permissions | Container, port, file, and service visibility can depend on the current user. | Grant only the access needed for the workflows you plan to use. |
| Local browser access | The documented dashboard endpoint is host-local. | Be able to open http://localhost:8080 on the HomeButler machine. |
| Localtonet client | Our client must reach the dashboard target and connect outbound to a relay. | For this tutorial, run it on the same machine as HomeButler. |
The shell installation path requires curl and a compatible shell. The Homebrew path requires a working Homebrew installation. HomeButler itself is described as one Go binary with no database and no general daemon requirement, but those statements do not eliminate prerequisites imposed by the installer or operating system.
Remote access is a separate layer. The Localtonet client can expose a service running on its own device or another target reachable from that device. Because the verified HomeButler default is localhost:8080, the simplest arrangement is to run our client on the HomeButler host. That avoids assuming an undocumented HomeButler LAN bind option.
The one-line command downloads a script from the project repository and sends it directly to a shell. In a security-sensitive environment, inspect the current script before executing it or use the documented Homebrew method if that better matches your software-management policy.
Install HomeButler using a current documented method
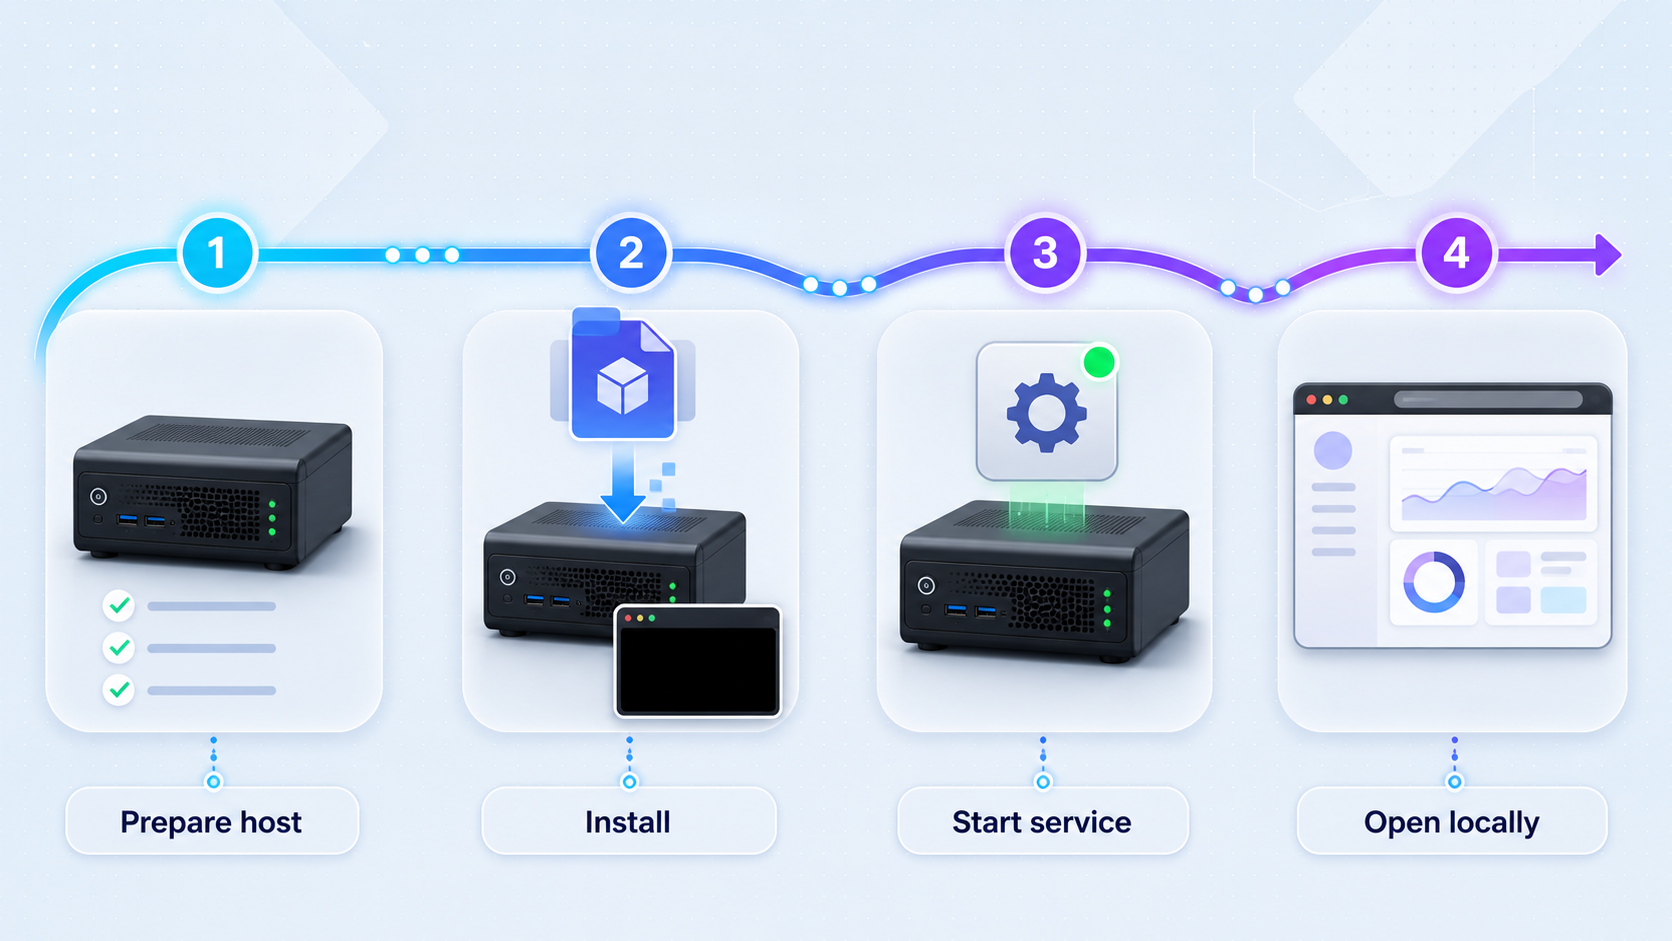
Use one installation method for the initial deployment. Installing the same command through several package channels can leave multiple executables on the system, with the selected version depending on shell path order.
Open a terminal on the target host
Sign in as the operating-system user that will run HomeButler. Confirm that the account can use the selected installation method and has only the host-inspection permissions your intended workflows require.
Run one current installer
Choose either the project shell installer or the documented Homebrew formula. Review installer output for platform, architecture, permission, or path errors.
Verify command execution
Run the documented status command. If the shell cannot locate homebutler, resolve the installation path before continuing.
Initialize HomeButler
After the executable works, run the documented interactive initialization command and follow the prompts provided by the installed build.
Option 1: Use the official shell installer
The current repository quick start provides this command:
curl -fsSL https://raw.githubusercontent.com/Higangssh/homebutler/main/install.sh | sh
This URL follows the repository's main branch, so the downloaded script can change after publication. Review its current contents when reproducibility or change control matters. Read platform-detection errors literally and do not substitute a binary intended for another architecture.
Option 2: Install with Homebrew
The current repository and HomeButler website both document this formula:
brew install Higangssh/homebutler/homebutlerThis is appropriate for a machine already managed with Homebrew. It does not imply that Homebrew is required for HomeButler or available on every supported host.
Why npm is not included as a current installation option
HomeButler v0.22.1 release notes listed npm install -g homebutler, but the current quick start used for this revision lists only the shell installer and Homebrew. The repository still contains npm-related project files and documents MCP usage, but those facts alone do not confirm that global npm installation remains a supported equivalent for the current release.
If you maintain an older npm-based deployment, check the current project documentation and release notes before changing it. Do not mix npm, Homebrew, a downloaded release binary, and the shell installer without first determining which executable your shell actually runs.
Confirm that HomeButler runs
homebutler statusThe current quick start describes this command as reporting CPU, memory, disk, and uptime. A successful result verifies more than the presence of a file. It shows that the executable starts under the current user and can inspect basic host state.
Initialize HomeButler without inventing configuration fields
Run the current documented initialization command:
homebutler initFollow the prompts displayed by your installed build and add only the servers or integrations appropriate to your environment. Prompt names, available integrations, and configuration behavior can change between releases. This guide therefore does not prescribe fields that are not visible in the current evidence.
Keep addresses, credentials, hostnames, and tokens out of screenshots, command transcripts, public repositories, and support posts. Initialization can establish access to operational systems, so review every permission granted to the HomeButler process.
The current project overview confirms homebutler init, but it does not provide enough evidence here to reproduce every prompt or make claims about configuration validation, strict-mode exit behavior, fallback rules, or configuration-file resolution. Follow the prompts and help text from the build you installed rather than relying on older examples.
Create the first report
Run the current documented report command after initialization:
homebutler reportReports are central to HomeButler's change-aware model. The first useful saved state gives a later run something to compare against. The current README says the report header identifies the snapshot being compared, preventing ambiguity about the comparison window.
The current README also documents two report controls:
homebutler report --keep 7
homebutler report --no-save
The first example retains only the latest seven snapshots. The second previews a report without writing a snapshot. This revision intentionally does not claim a default retention count or a filesystem snapshot location because those details were not confirmed by the supplied current README extract.
Verify the HomeButler installation locally
Verify one layer at a time. Start with basic host status, continue to Docker and inventory only where relevant, then create a report and start the browser service. Local success provides a known baseline before a tunnel is introduced.
| Current documented command | Purpose | Interpretation |
|---|---|---|
homebutler status |
Inspect CPU, memory, disk, and uptime | A successful summary confirms basic host inspection. |
homebutler docker list |
List running containers | Results depend on Docker availability, running containers, and user permissions. |
homebutler inventory scan |
Discover containers, ports, and topology | Compare the result with your expected services and exposure. |
homebutler report |
Produce health and change information | Later saved reports can be compared with an earlier snapshot. |
homebutler serve |
Start the browser dashboard | The current documentation assigns http://localhost:8080. |
Check host status and JSON output
homebutler status
homebutler status --json
Test the format your workflow will actually consume. Human-readable output can work while a script still fails because it expects JSON fields or values from another HomeButler version. Treat structured output as version-sensitive and retest automation after an upgrade.
Inspect Docker and inventory visibility
homebutler docker list
homebutler inventory scan
homebutler inventory scan --json
An empty Docker result is not automatically an installation failure. Docker may be absent, no containers may be running, or the current user may lack access. Inventory results are also an important security checkpoint. Investigate unexpected listening services or public ports before adding another remote route to the host.
Verify report output
homebutler report
homebutler report --json
The current project documentation explicitly shows both forms. A first run may not have an earlier state from which to describe meaningful changes. After planned maintenance, run another saved report and review the comparison window shown in the report header.
HomeButler's current overview also describes a doctor-check capability, including checks for resource pressure, stopped containers, public ports, backup hygiene, notifications, baseline readiness, and configured Proxmox reachability. The supplied current quick-start extract does not show the exact doctor command syntax or its flags, so this revision does not publish older strict-mode or JSON examples as if they were confirmed for the current build.
Start and test the HomeButler dashboard
Start the documented web interface:
homebutler serveOpen the documented endpoint in a browser on the same machine:
http://localhost:8080Keep the terminal process running. Confirm that the page loads, then navigate through the views relevant to your host. Compare displayed status, containers, ports, and report information with the CLI results. Testing only the initial HTML response is not enough if later views rely on additional requests.
The name localhost always refers to the machine making the request. If HomeButler runs on a server but you type localhost:8080 into a laptop browser, the browser contacts the laptop. The current evidence confirms the local endpoint but does not confirm a custom bind-address option.
Similarly, the supplied current documentation does not confirm the older homebutler serve --port 9090 example. If port 8080 is unavailable, inspect the help and current repository documentation for the installed build rather than guessing a flag:
homebutler serve --helpOnly use an alternative port if your installed version documents how to select it. Once selected and locally verified, enter that same port as the Localtonet target.
Understand the dashboard lifecycle
HomeButler does not require a general always-on daemon, but the web dashboard still depends on the running homebutler serve process. If that process exits, the HTTP endpoint stops responding. A Localtonet tunnel cannot keep an application available after its local service has stopped.
The available current evidence does not establish an official system service, startup task, container deployment procedure, or supervisor configuration for the dashboard. Keep the process in the foreground while testing. If you later make it persistent, verify the current project's recommendation and use an operating-system service manager appropriate to your host.
The supplied current HomeButler evidence does not establish built-in dashboard authentication, role-based authorization, session controls, or an internet-exposure security model. Treat the interface as sensitive operational access until you have verified the behavior of your installed version.
Connect the verified dashboard to Localtonet
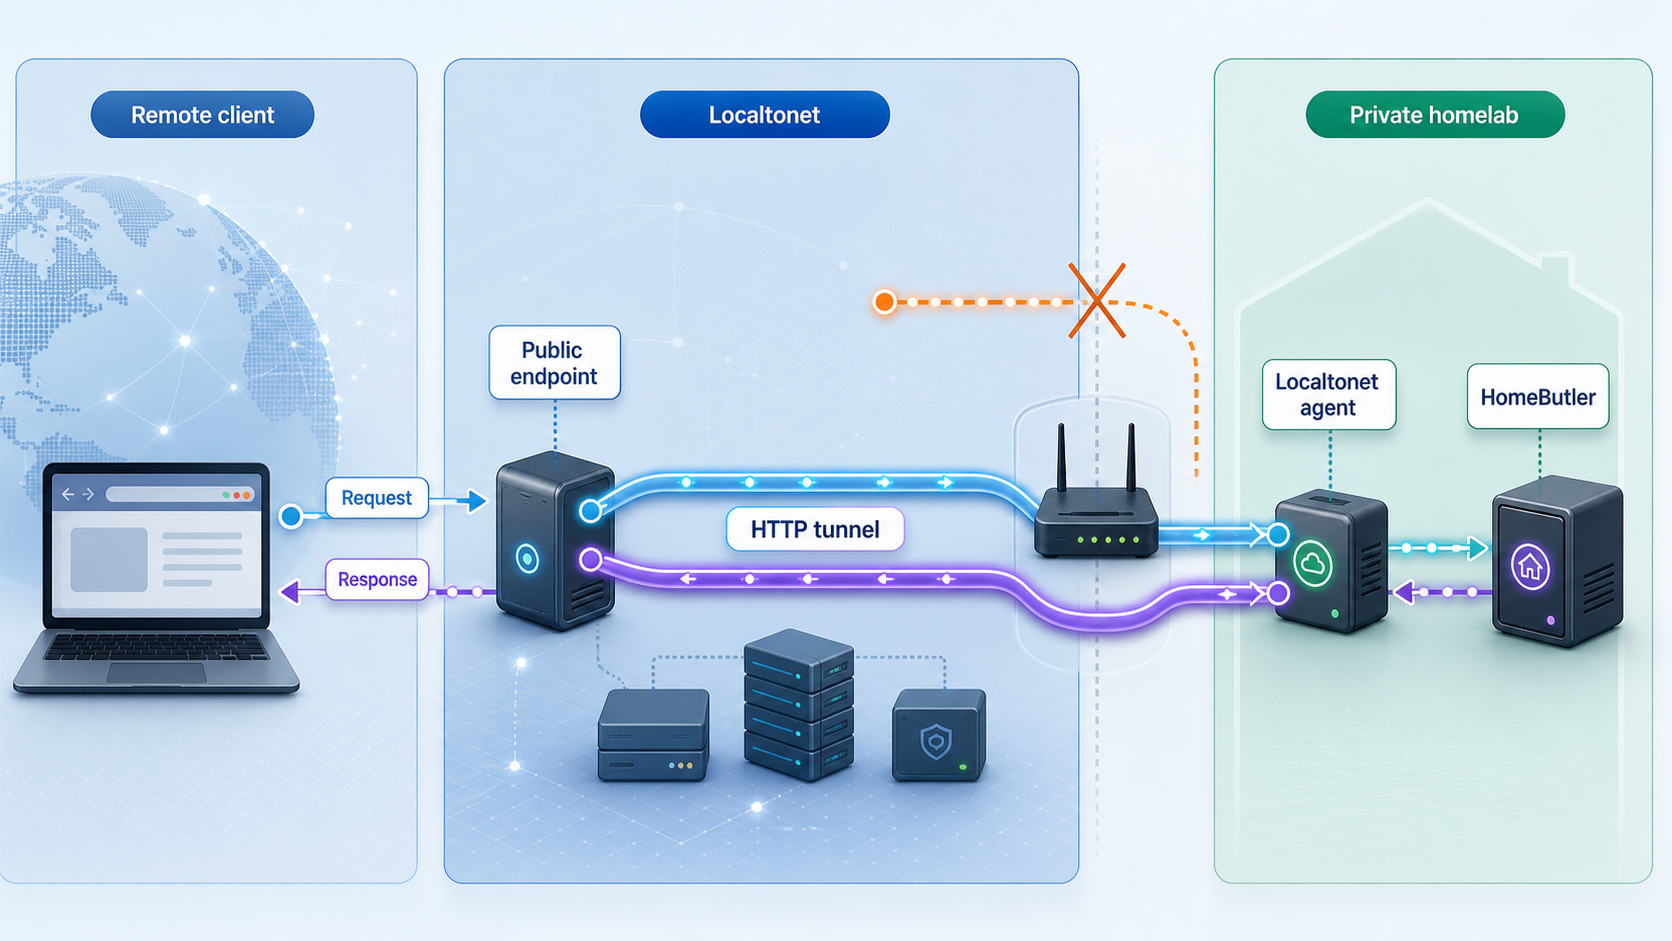
Once http://localhost:8080 works on the HomeButler machine, a Localtonet HTTP tunnel can provide a public HTTPS address for that local service. Our client establishes an outbound connection to a Localtonet relay server, so this workflow does not require inbound router port forwarding, inbound firewall changes, VPN setup, or a public IP address.
HomeButler remains on your machine. The tunnel forwards requests to the local IP address and port configured in the dashboard. Availability depends on three separate components: the HomeButler dashboard process, the selected Localtonet client connection, and the started tunnel.
Follow the current Localtonet HTTP tunnel documentation alongside the workflow below. Available relay servers, regions, domain options, and plan-dependent capabilities must be taken from the current dashboard rather than copied from an older tutorial.
Install and run the Localtonet client
Run our client on the HomeButler machine for this localhost-based setup. Confirm that the device connects outbound to Localtonet before creating the tunnel.
Open the HTTP tunnel page and select Process Type
Choose Random Sub Domain, Custom Sub Domain, or Custom Domain as available in your dashboard. These process types serve the configured content at a public HTTPS address. Check current documentation before configuring custom-domain DNS.
Select the correct AuthToken
Select the device-specific token for the Localtonet client running on the HomeButler machine. Keep the token private and never place it in screenshots, examples, source repositories, or support posts.
Select an available server
Choose a relay server or region from the current dashboard. Do not guess or hardcode a server code because availability can vary.
Enter the local IP address and port
For the same-device default workflow, use 127.0.0.1 and port 8080. If your installed HomeButler version documents another port and you verified it locally, enter that exact port instead.
Press Start and test the assigned HTTPS address
Creating a tunnel does not mean it is running. Review the device, server, local IP, and port, then use the Start button. Open the assigned public HTTPS address and confirm that it displays the intended HomeButler dashboard.
HomeButler continues to listen locally at an address such as http://127.0.0.1:8080. Localtonet provides a separate public HTTPS address. Do not enter the public hostname as the tunnel's local target.
If the Localtonet client runs on another device, 127.0.0.1 points to that other device, not the HomeButler host. Although our HTTP tunnels can target a service reachable from the client device, the supplied HomeButler evidence does not establish how to bind its dashboard for LAN access. Running both programs on the same machine is therefore the clearest verified arrangement for this tutorial.
Protect remote homelab monitoring access
A homelab dashboard can disclose hostnames, container names, service relationships, listening ports, resource pressure, backup state, server identifiers, and operational warnings. HomeButler also documents management-oriented workflows. This makes it more sensitive than a static demonstration page.
Localtonet provides the connectivity path and public HTTPS address for the HTTP tunnel. HTTPS and application authorization are different controls. An encrypted public connection does not prove that only an approved user can open or operate the dashboard.
Keep the Localtonet device token private. It identifies the client device and must not be guessed or exposed. Do not place it in terminal recordings, screenshots, public issue reports, repositories, or articles.
Apply least privilege to the operating-system account running HomeButler. Permissions affect which container sockets, service managers, files, ports, and host resources the process can inspect or control. Give it only the access required for the specific commands you use.
Inventory scanning can help identify unexpected ports before exposure:
homebutler inventory scanInvestigate anything that does not match the intended host design. Inventory output is useful evidence, but it is not a complete security assessment and does not replace host updates, firewall policy, application authorization, credential management, or backup testing.
If you cannot confirm effective authentication and authorization for the installed HomeButler dashboard, keep the Localtonet tunnel stopped. A generated or difficult-to-guess URL is not an authentication mechanism.
Routine operation and maintenance
Treat HomeButler and Localtonet as independent layers. HomeButler creates the local HTTP service. Our client maintains the outbound connection. The tunnel configuration controls the public route. A failure in any one layer can make remote access unavailable.
Recommended startup sequence
- Start HomeButler with
homebutler serve. - Open
http://localhost:8080on the HomeButler host. - Confirm that the expected dashboard and data load.
- Confirm that the selected Localtonet client device is connected.
- Review the HTTP tunnel target and press Start.
- Test the public HTTPS address and verify the page identity.
Recommended shutdown sequence
- Stop the Localtonet tunnel to remove its public route.
- Finish any remaining local HomeButler work.
- Stop the
homebutler serveprocess if the dashboard is no longer needed.
A tunnel can be stopped and started again. Delete it when the configuration is no longer needed. Stopping the tunnel does not stop HomeButler, and stopping HomeButler does not delete the tunnel configuration.
Refresh reports intentionally
Run a saved report after meaningful maintenance, such as changing a container deployment or resolving a host problem:
homebutler reportUse the documented preview mode when you do not want the current run saved:
homebutler report --no-saveIf you want to retain only a specific number of recent snapshots, the current README provides this example:
homebutler report --keep 7Avoid assuming a default retention value or storage path unless your installed version documents it. Review the report header so you know which snapshot was used for comparison.
Manage upgrades through the verified installation channel
The older v0.22.1 release advertised homebutler upgrade, but that command is not shown in the supplied current README quick start or current website extract. This revision therefore does not recommend it as a universal current upgrade workflow.
If you installed with Homebrew, check the current HomeButler formula and Homebrew workflow. If you used the project installer or a release asset, consult the current repository and release notes for the supported update procedure. Before any upgrade, record the working version and configuration, stop unnecessary public exposure, and retest the CLI and local dashboard before restarting the tunnel.
Retest JSON consumers after changes
The current project documents JSON for status, inventory, and reports. If scripts depend on those results, test them against the exact build you deploy. Do not assume that an older field layout, optional value, or exit behavior remains unchanged across releases.
Troubleshoot HomeButler and the tunnel layer by layer
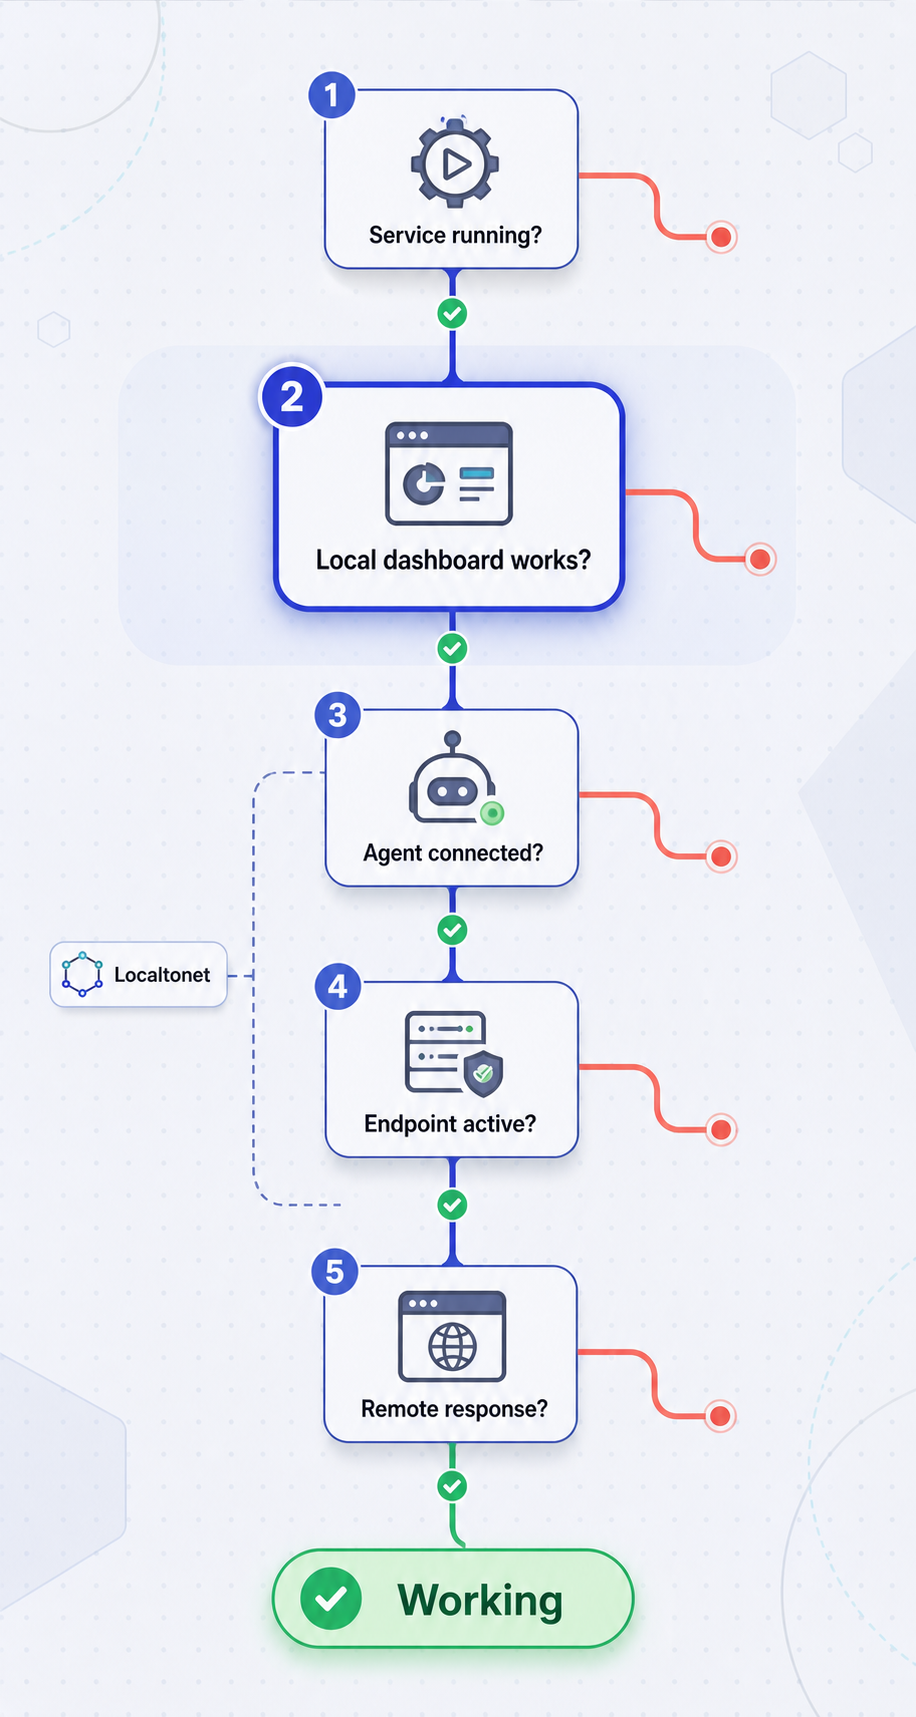
The shell cannot find homebutler
Review the selected installer's output, then open a new terminal so package-manager path changes can take effect. If several installation methods were attempted, determine which executable directories they used and remove ambiguity. Do not repeatedly run different installers without understanding where each one places the command.
Status works, but Docker data is empty
Confirm that Docker is installed, that containers are running, and that the current user has permission to inspect Docker. Compare these documented commands:
homebutler docker list
homebutler inventory scan
Missing container data can reflect the host environment or account permissions rather than a broken HomeButler installation.
Port 8080 is already in use
Stop or reconfigure the conflicting service if appropriate. The supplied current evidence does not confirm the older custom-port syntax, so check the help for your installed build:
homebutler serve --helpIf the current build documents a port option, choose an available port, verify the resulting local URL, and enter exactly the same port in the Localtonet HTTP tunnel.
The local dashboard does not load
Check the terminal running homebutler serve. The process must remain active. Confirm that you are opening localhost on the HomeButler machine and that port 8080 is not owned by another application. If HomeButler exits with an error, resolve that local error before troubleshooting Localtonet.
The local dashboard works, but the public address does not
- Confirm that
homebutler serveis still running. - Reload
http://localhost:8080on the HomeButler host. - Confirm that the correct Localtonet client device is connected.
- Verify that the HTTP tunnel targets
127.0.0.1and port8080. - Confirm that the tunnel was started, not merely created.
- Use the current public HTTPS address shown in the dashboard.
If our client is on another machine, 127.0.0.1 targets that machine. Move the client to the HomeButler host for this verified workflow rather than guessing a HomeButler LAN bind setting.
The public address displays the wrong application
Stop the tunnel immediately. Confirm that HomeButler is still running and directly inspect the configured local IP and port. A different process may have acquired the port after HomeButler stopped. Verify both the page identity and its displayed data before restarting remote access.
Remote access disappeared after closing a terminal
Determine which process ended. Closing the HomeButler terminal can stop the local dashboard. Closing the Localtonet client can remove the outbound relay connection. Stopping the tunnel in the dashboard disables the configured public route. All three layers must be active for remote access to work.
A report shows no changes
Confirm that there is an earlier saved report to compare against and read the comparison snapshot named in the report header. A run using --no-save intentionally does not write a new snapshot. Also remember that HomeButler suppresses changes it does not consider worth reporting and uses skipped when a comparison cannot be made.
Frequently asked questions
Which HomeButler installation methods are currently documented?
The current repository quick start documents the official shell installer and brew install Higangssh/homebutler/homebutler. An older v0.22.1 release listed npm, but npm is not presented here as a current general installation method because it is absent from the supplied current quick start and website guidance.
What address does the HomeButler dashboard use?
The current HomeButler quick start documents http://localhost:8080 for homebutler serve. The custom-port syntax from the older article was not confirmed by the supplied current evidence, so check homebutler serve --help before trying another port.
Does HomeButler require a database or permanent daemon?
The project describes HomeButler as a single Go binary with no database and no general daemon requirement. The web dashboard still requires the homebutler serve process to remain running while the dashboard is needed.
Where does HomeButler store snapshots, and how many does it keep?
The current evidence used for this revision confirms saved report comparisons, --no-save, and an explicit --keep 7 example. It does not confirm a current default retention count or filesystem path, so check the documentation and help for your installed version rather than relying on older defaults.
Can Localtonet install or configure HomeButler?
No. Localtonet provides connectivity to an already running service. Install HomeButler, complete homebutler init, verify its commands, and open the local dashboard before creating the HTTP tunnel.
Does creating a Localtonet tunnel start it automatically?
No. Creation and startup are separate lifecycle actions. Review the selected AuthToken, server, process type, local IP, and port, then use the Start button. The route works only while the selected client is connected and the tunnel is running.
Does the public HTTPS address authenticate HomeButler users?
No. HTTPS protects the public connection, while authentication and authorization determine who may use the dashboard. The supplied HomeButler evidence does not confirm built-in dashboard access controls suitable for public exposure.
How do I return the dashboard to local-only access?
Stop the Localtonet tunnel. HomeButler can continue running locally without the public route. If the local dashboard is no longer needed, also stop the homebutler serve process.
Connect your verified HomeButler dashboard with Localtonet
Install and test HomeButler locally, review its access-control model, and then create a Localtonet HTTP tunnel when you need remote connectivity without inbound router port forwarding.
Get Started Free →

