

Reach a Raspberry Pi through an outbound tunnel instead of opening the router
A Raspberry Pi often sits behind a home router, carrier-grade NAT, cellular connection, or network that does not permit inbound connections. With Localtonet, the client device establishes an outbound connection to one of our relay servers and publishes only the service you select. This tutorial uses Raspberry Pi SSH as the complete example, from operating-system checks and local verification through TCP tunnel creation, off-network testing, security hardening, and troubleshooting. It also explains when HTTP, UDP, File Server, or VPN Manager is a better fit.
📋 What's in this guide
How Raspberry Pi access works without port forwarding
Devices on a home or small-office network normally use private IP addresses that are not directly reachable from the public internet. The router translates outbound connections, but it does not automatically know which internal device should receive an unsolicited inbound connection. Traditional remote access addresses that problem with an inbound port-forwarding rule, a public IP address, and sometimes dynamic DNS.
Localtonet uses a different traffic direction. The Localtonet client runs on the Raspberry Pi, or on another local device that can reach the Pi, and initiates an outbound connection to a Localtonet relay server. When the selected tunnel is running, remote traffic sent to its assigned public URL or public host and port is forwarded to the configured local target. You do not need to add an inbound router port-forwarding rule, change the firewall to accept internet traffic, configure a VPN, or obtain a public IP address.
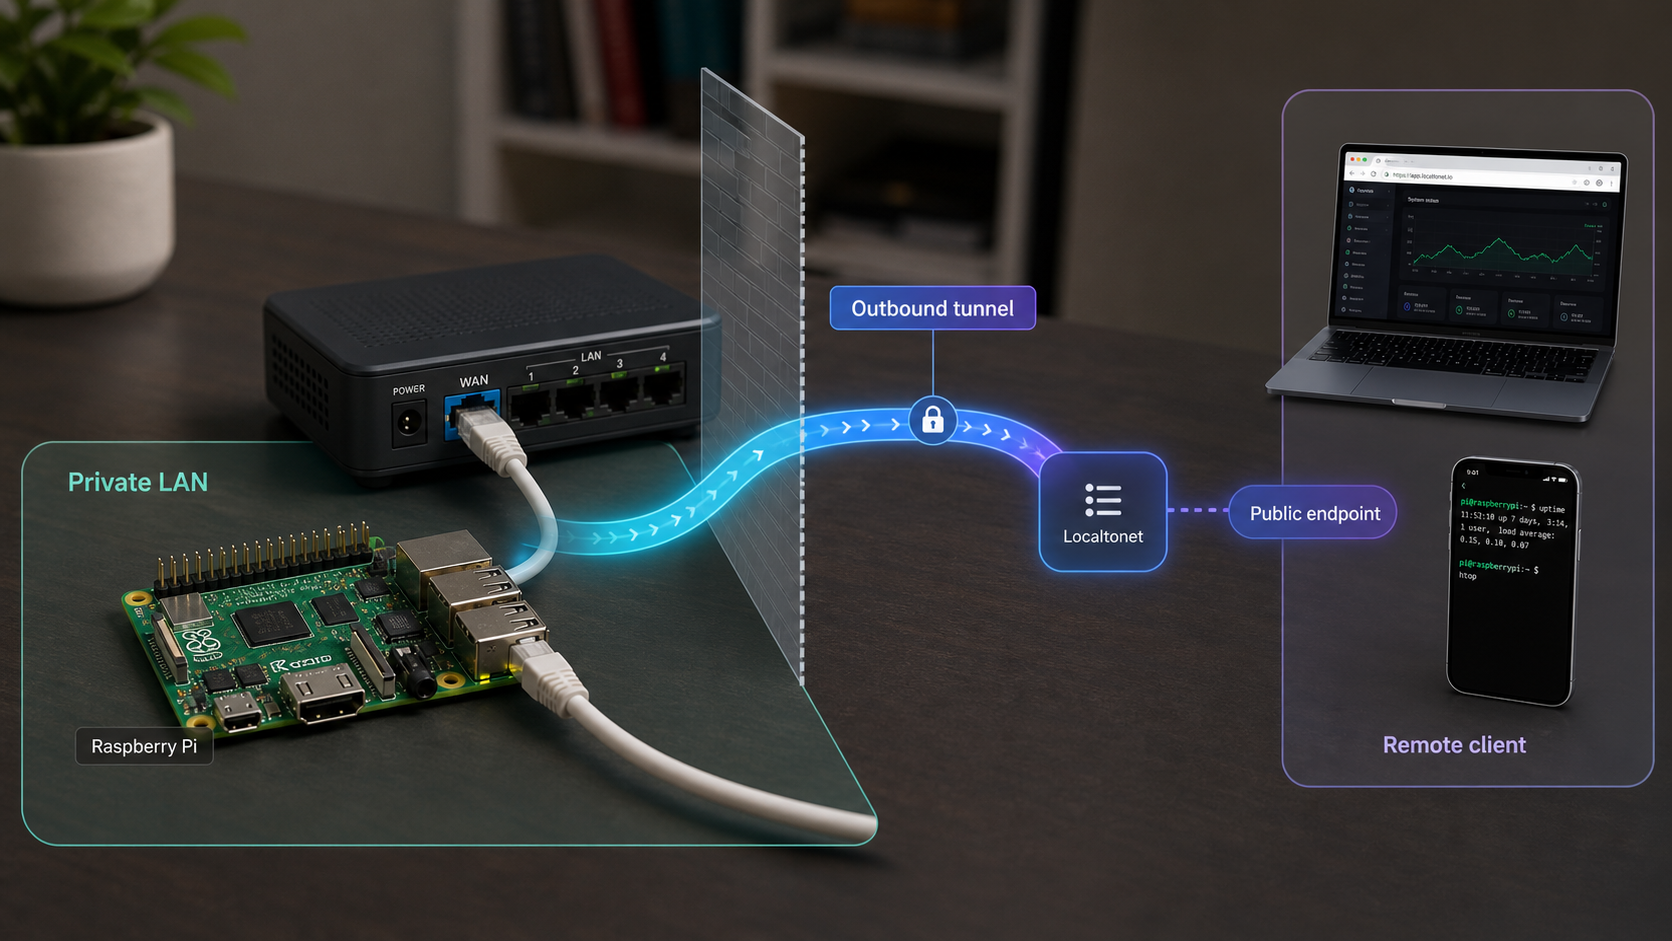
This model is useful behind conventional NAT and in common carrier-grade NAT situations because the Raspberry Pi does not need to accept a new connection directly from the internet. It must still have working outbound connectivity to the Localtonet service. A restrictive network can block or interrupt that connection, so outbound reachability remains an operational requirement.
Creating a Localtonet tunnel saves its configuration, but does not automatically make it available. You must start it with the Start button. The endpoint works only while the selected device is connected and the tunnel is running. You can later stop the tunnel or delete its configuration.
A tunnel narrows the networking task to a selected service, but it does not replace that service’s security controls. For SSH, the SSH server still authenticates the user and controls the resulting operating-system session. For a web application, the application remains responsible for login, authorization, session handling, and safe administrative routes.
Prerequisites and Raspberry Pi compatibility checks
This tutorial focuses on a Raspberry Pi running Raspberry Pi OS with an already-installed SSH server that can be enabled through the operating system. The Raspberry Pi Foundation offers both 32-bit and 64-bit Raspberry Pi OS variants, and the architecture reported by the operating system must match the Localtonet client build you select. Current Localtonet evidence supplied for this guide does not establish that every Raspberry Pi model, Raspberry Pi OS release, Linux distribution, or CPU architecture is supported by every client version.
Before installing anything, confirm the exact operating system and architecture rather than assuming that every Pi uses the same package. Run:
cat /etc/os-release
dpkg --print-architecture
uname -m
The operating-system file identifies the installed distribution and release. On Raspberry Pi OS, dpkg --print-architecture commonly reports the Debian package architecture, while uname -m reports the running kernel architecture. Use the values shown on your Pi to choose only a currently offered, matching Localtonet Linux or Raspberry Pi client. Do not install an amd64 or x86_64 build on an ARM-based Raspberry Pi.
What you need before starting
- A powered Raspberry Pi with a supported, maintained operating system and administrative access.
- A working Ethernet or Wi-Fi connection with outbound internet access.
- A Localtonet account. You can use the Localtonet registration page if you do not already have one.
- A current Localtonet client build that explicitly matches the Pi’s operating system and architecture.
- A device-specific Localtonet authentication token for the client that will run the tunnel.
- An SSH user account on the Raspberry Pi and, preferably, an SSH key already authorized for that account.
- An SSH client on the remote computer from which you will perform the off-network test.
- Permission from the device and network owner to publish and access the service.
The target service must be running before the tunnel can deliver useful traffic. A tunnel can forward a connection to an IP address and port, but it cannot enable SSH, repair a stopped web application, create an operating-system account, or grant filesystem permissions.
A Localtonet authentication token identifies the client device that runs the tunnel. Do not paste it into public commands, screenshots, source repositories, issue reports, or shared documents. Obtain the real token from your Localtonet account and enter it only through the current supported client workflow.
The current Localtonet dashboard and documentation are the authority for available client downloads, installation instructions, relay choices, protocol options, and plan availability. Consult the current Localtonet documentation before installing if the dashboard does not clearly provide a build for the architecture reported by your Pi.
Choose the access method by Raspberry Pi workload
“Remote Raspberry Pi access” can mean several different things. A terminal session uses SSH over TCP. A browser dashboard speaks HTTP. Some real-time or telemetry applications use UDP. A file-sharing task targets a folder rather than a listening application. Access to several private systems is a network-connectivity problem rather than a single-service publishing problem.
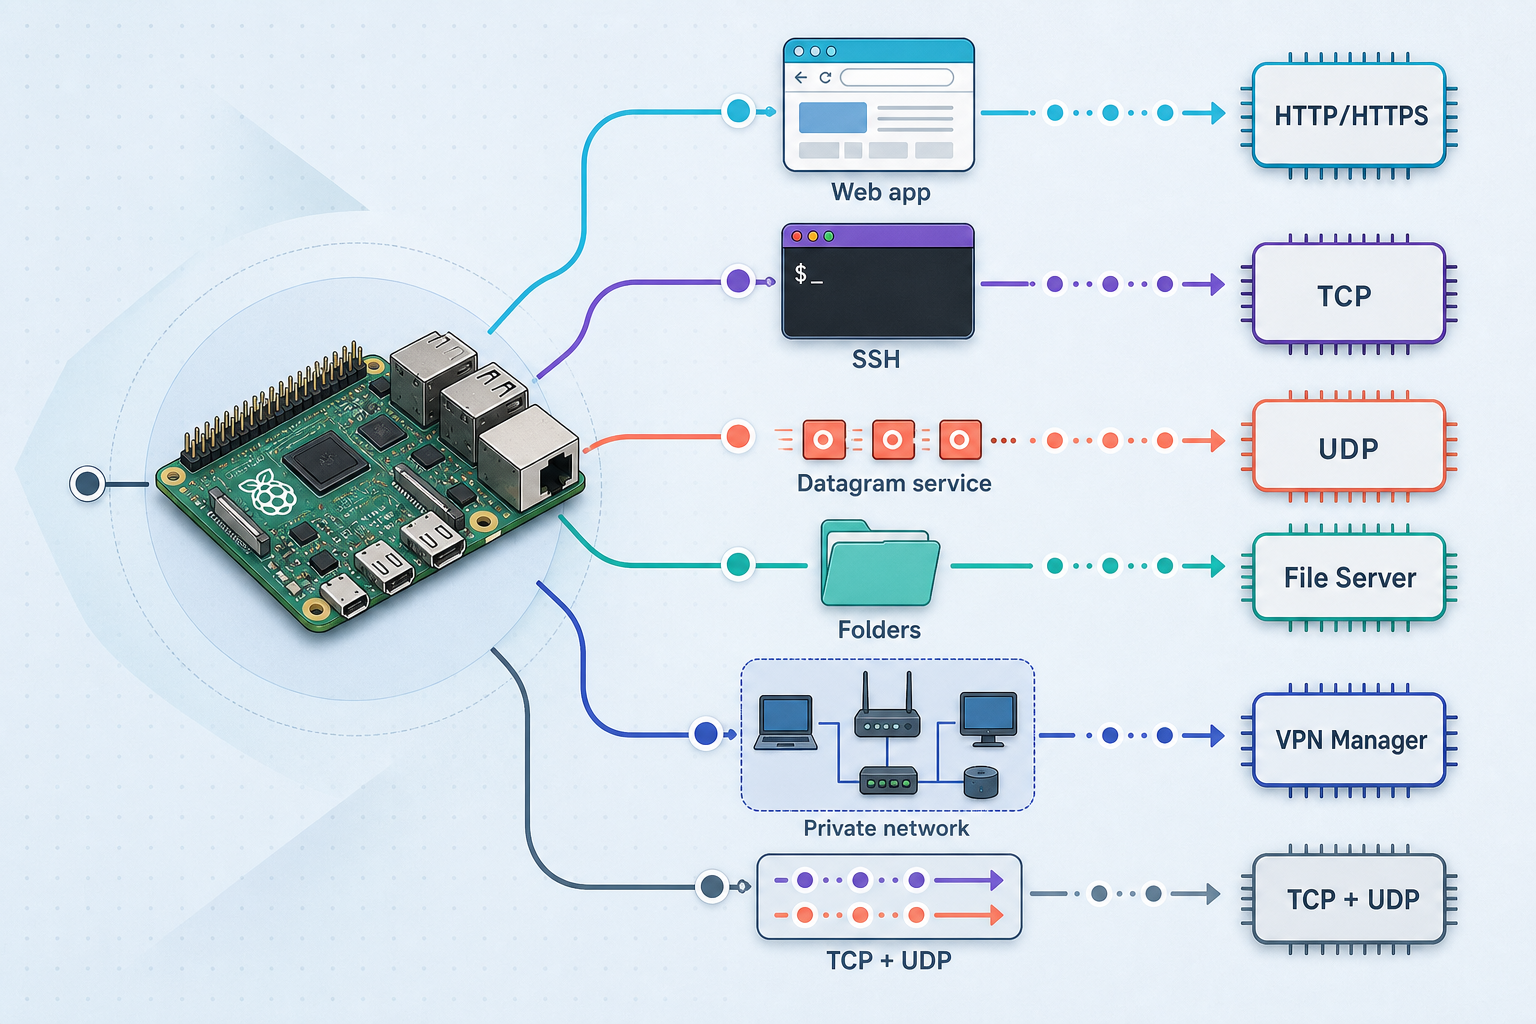
| Localtonet option | Raspberry Pi use case | Local target | Public access model |
|---|---|---|---|
| HTTP/s tunnel | Web dashboards, development sites, and HTTP APIs | Reachable local IP address and HTTP port | Public HTTPS address |
| TCP tunnel | SSH and other raw TCP services | Reachable local IP address and TCP port | Public host and port |
| UDP tunnel | An application that explicitly requires UDP | Reachable local IP address and UDP port | UDP forwarding endpoint |
| Combined UDP/TCP | A service that requires both transports | Relevant local IP address and port | Both protocol paths |
| File Server | Logs, media, project artifacts, and controlled file exchange | Local folder path | Default browser interface, SFTP, or WebDAV workflow |
| VPN Manager | Private mesh connectivity or access across local LANs | Private network configuration | Private connectivity governed by firewall rules |
Standard HTTP, TCP, UDP, combined UDP/TCP, and File Server tunnels are not VPN connections. VPN Manager is our actual private mesh VPN feature. It includes granular firewall rules and can bridge local LANs. See our VPN Manager overview when the requirement is network-level private access rather than one SSH endpoint.
Enable and test SSH on the Raspberry Pi
Complete this section locally before configuring Localtonet. If SSH does not work on the Pi itself or across the local network, adding a tunnel will not fix the underlying service.
Enable SSH with Raspberry Pi OS configuration
On Raspberry Pi OS with a local terminal, open the Raspberry Pi configuration utility:
sudo raspi-configIn the menu, open Interface Options, select SSH, and enable the SSH server. Menu wording can change between Raspberry Pi OS releases, so use the current Raspberry Pi remote-access documentation if the installed utility differs.
Raspberry Pi Imager can also preconfigure SSH when preparing an operating-system image. That route is useful for a headless Pi that has not yet been booted. Follow the current Raspberry Pi Imager options rather than relying on an old screenshot or assuming that a default user and password exist.
Confirm the SSH service state
After enabling SSH, check its service status:
sudo systemctl status sshThe status should indicate that the service is active. If it is inactive or failed, read the error shown by the service manager before proceeding. You can also inspect listening TCP sockets:
sudo ss -ltnp
Look for the SSH listening port configured on your system. Port 22 is the conventional default, but do not assume it if you previously changed the SSH server configuration. The port entered in Localtonet must match the port on which the SSH server is actually listening.
Test SSH locally
From the Raspberry Pi itself, test the loopback path:
ssh <username>@127.0.0.1
Replace <username> with a real non-administrative account on the Pi. On the first connection, inspect the host-key prompt before accepting it. Successful authentication confirms that the SSH server is accepting connections through the local loopback interface.
To test from another computer on the same LAN, first identify the Raspberry Pi’s current local addresses:
hostname -I
ip -br addr
Then connect from the second local computer:
ssh <username>@<raspberry-pi-lan-address>This LAN test matters when the Localtonet client will run on a different device. It proves that the client device’s network can reach the Raspberry Pi and that SSH is listening on an appropriate interface.
Use 127.0.0.1 as the tunnel target when the Localtonet client and SSH server run on the same Raspberry Pi. Loopback refers to the device on which the client process runs. If the Localtonet client runs on another computer, 127.0.0.1 refers to that other computer, not the Pi. In that design, enter the Raspberry Pi’s reachable LAN address and verify the connection from the client device first.
Install and connect the Localtonet client
Localtonet client packaging and installation details can vary by client version, operating system, and architecture. This article does not invent a repository, package name, shell installer, executable path, or command that may not apply to your Pi.
Confirm the Pi architecture
Use dpkg --print-architecture and uname -m. Record the results so that you do not select a client intended for another CPU family.
Open the current Localtonet installation route
Sign in to your Localtonet account and use the current dashboard or Localtonet documentation to locate the client offered for your operating system and architecture. If no matching Raspberry Pi or Linux ARM build is presented, stop and verify compatibility instead of substituting an unrelated package.
Follow the displayed installation instructions exactly
Install the matching client using the instructions supplied with that current build. Do not reuse a command copied from a different Linux architecture, an older release, or another tunneling product.
Authenticate the client as its own device
Use the device-specific authentication token generated for the Raspberry Pi client. Keep the token private and confirm in the dashboard that the intended device is connected before creating the tunnel.
If you intentionally run the Localtonet client on another LAN computer, use a token for that client device and ensure that the computer remains powered, connected, and able to reach the Pi. The tunnel depends on the selected client, not merely on the presence of a tunnel configuration in the dashboard.
Whether a Localtonet client starts automatically after a Raspberry Pi reboot depends on the current client version and supported installation method. Do not create an improvised system service or claim reboot recovery based on instructions for another client version. Follow the current Localtonet client documentation if unattended startup is required, then test it with a planned reboot.
Create a Localtonet TCP tunnel for Raspberry Pi SSH
Once SSH works locally and the Localtonet device appears connected, create a TCP tunnel. SSH is a raw TCP service, so it should not be placed behind an HTTP tunnel. The following sequence keeps the target and lifecycle explicit without hardcoding server codes, endpoint values, or plan-dependent options.
Open the TCP tunnel configuration
In the Localtonet dashboard, choose the TCP tunnel family for the SSH service. Confirm that you are creating a TCP tunnel rather than HTTP, UDP, File Server, Proxy Server, or VPN Manager.
Select the connected Raspberry Pi device
Select the authentication token associated with the Localtonet client running on the Pi. If the client runs on another local computer, select that device instead and use a Pi LAN address as the target.
Select a currently available relay server
Choose a server or region from the values currently offered in your dashboard. Available relay choices can vary, so do not copy a server code from an old tutorial.
Enter the SSH target IP address and port
If the client runs on the Raspberry Pi, enter 127.0.0.1 and the verified SSH port, commonly 22. If the client runs elsewhere, enter the Pi’s reachable LAN address and the verified SSH port. The target must match the service tested in the previous section.
Create the tunnel configuration
Save or create the TCP tunnel using the selected device, current relay, target IP address, and target port. Creating the configuration alone does not start it.
Start the tunnel
Use the Start button. Confirm that the selected device remains connected and that the tunnel changes to its running state.
Record the assigned public host and port
Use the host and port shown for this running TCP tunnel. Do not substitute the Pi’s private LAN address, assume that the public port is 22, or publish the real endpoint in screenshots and examples.
Stop or delete the tunnel when appropriate
Stop the tunnel when temporary remote access is finished. Delete obsolete configurations if they should not be reused. A stopped or deleted tunnel no longer provides the same active access path.
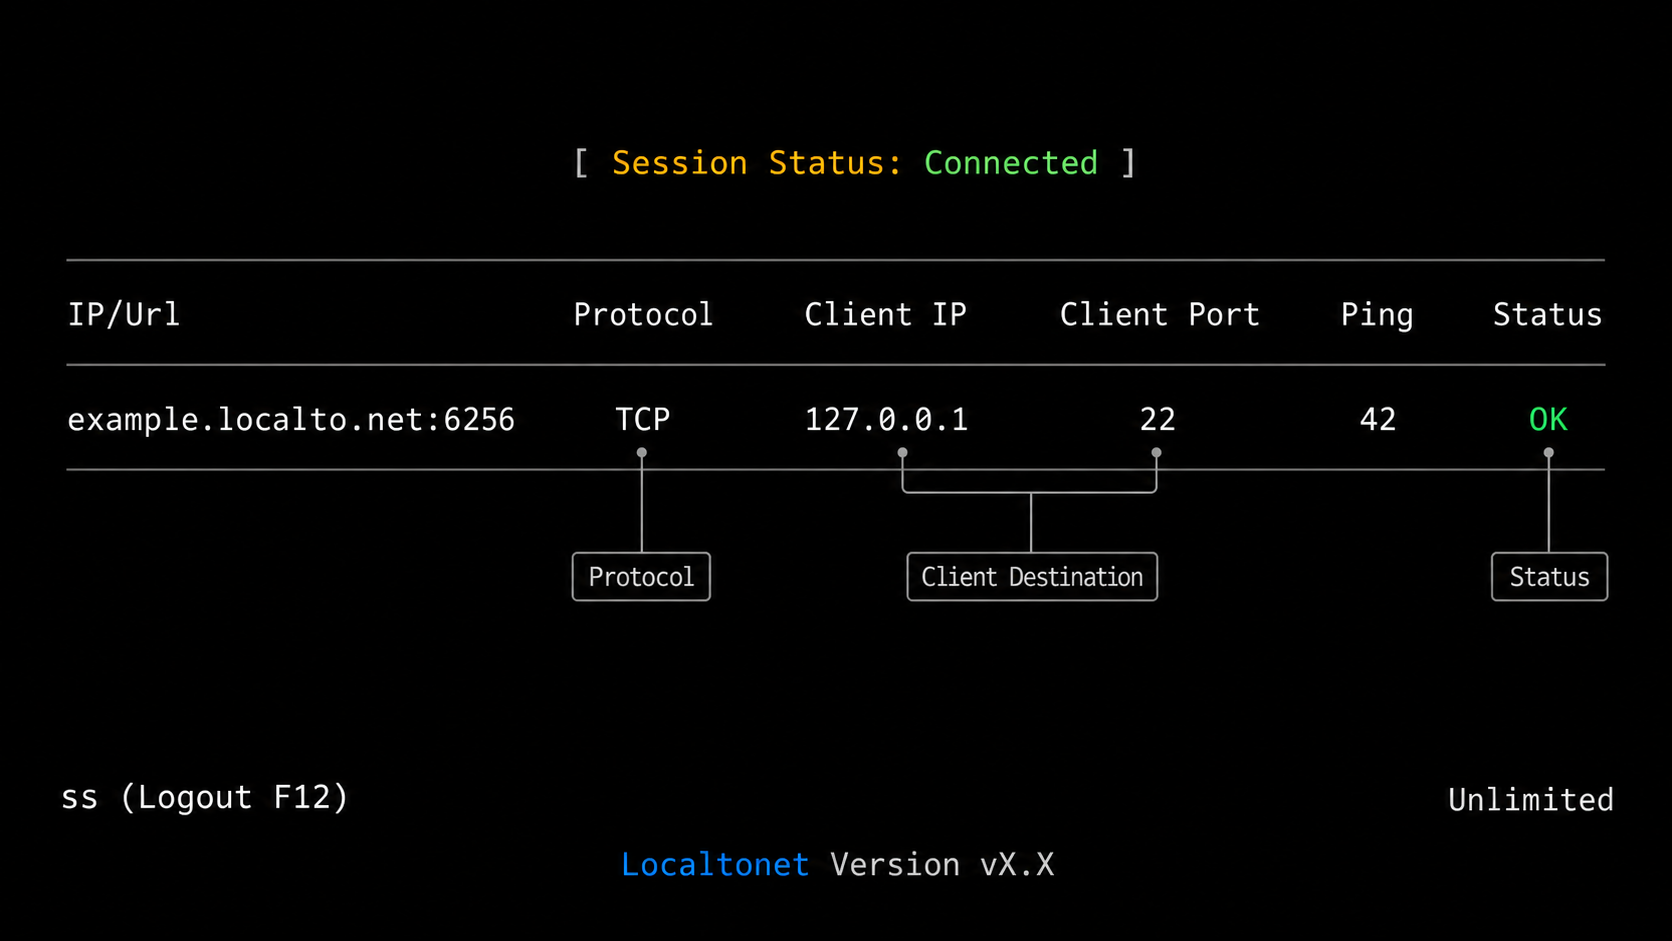
Consult the current Localtonet tunnel documentation alongside the live dashboard when field names or available options differ from this workflow. Protocol, relay, region, endpoint, and plan availability should always be taken from the current product rather than hardcoded into a long-lived Raspberry Pi setup guide.
Verify the local service and public endpoint
Verification should proceed from the inside out. First prove that the SSH server is running. Next prove that the Localtonet client can reach the target. Then prove that the tunnel is active. Finally, test from a genuinely external network.
1. Recheck the local listener
sudo systemctl status ssh
sudo ss -ltnp
If the service is not active or the expected port is absent, fix SSH before changing the tunnel. A TCP connection refused error commonly means that nothing is listening at the configured target address and port.
2. Recheck the exact target path
When the Localtonet client runs on the Pi, repeat the loopback test:
ssh <username>@127.0.0.1When the client runs on another LAN device, run the following from that device instead:
ssh <username>@<raspberry-pi-lan-address>If the second command fails locally, the same address will also fail as the tunnel target. Check the Pi address, network segmentation, SSH bind configuration, and local firewall before testing the public endpoint.
3. Confirm the Localtonet runtime state
In the Localtonet dashboard, verify both conditions:
- The selected device token reports that its client is connected.
- The TCP tunnel is running after you used the Start button.
A connected device does not imply that every saved tunnel is started. A started tunnel also cannot remain useful if its selected client disconnects.
4. Test from outside the Raspberry Pi network
Use a computer or phone tethered to a different internet connection, such as a mobile network. Testing from the same Wi-Fi network may not exercise the same public path and can conceal routing or name-resolution problems.
On a remote computer with an SSH client, use:
ssh -p <assigned-public-port> <username>@<assigned-public-host>Replace both endpoint placeholders with the host and port shown in the Localtonet dashboard. The public port is not necessarily the same as the Pi’s local SSH port. Never place the example placeholders, device token, or an assumed relay address into a production command.
On the first successful connection, SSH may present a host-key prompt. Verify the key through a trusted local or administrative channel before accepting it. If a known-host entry later changes unexpectedly, investigate rather than bypassing the warning automatically.
5. Test authorization boundaries
Confirm that the intended account can perform only the required tasks. Also verify that invalid credentials are rejected and that an ordinary user cannot perform administrative actions without the operating system’s normal authorization. Network reachability is only one layer of the test.
Treat assigned public hosts and ports as operational information even though SSH must still authenticate the user. Redact the endpoint, username, token, private IP addresses, and host keys from screenshots or support material unless disclosure is necessary through an approved private channel.
Harden SSH and limit the exposure
Avoiding inbound router port forwarding removes the need for a router rule, but the public TCP endpoint can still receive connection attempts while it is active. Secure the service as though it were reachable from an untrusted network.
A TCP tunnel forwards traffic to SSH. It does not make weak passwords safe, bypass legitimate security policy, select trustworthy users, or decide what an authenticated operating-system account may do. SSH configuration, account security, updates, and least privilege remain essential.
Use SSH keys where appropriate
Prefer a strong SSH key for administrative access when your environment supports it. Store the private key securely on the remote client and add only the required public key to the intended Pi account. Do not copy a private key to the Localtonet dashboard or embed it in a tunnel configuration.
Before considering password login changes, verify key access in a separate active session so that a configuration error does not lock you out. Follow current Raspberry Pi and OpenSSH documentation for the installed release because configuration files and included directives can vary.
Use a dedicated, least-privileged account
Connect as an ordinary named user rather than granting broader access than the task requires. Remove unused accounts, review group memberships, and grant administrative privileges only where necessary. An SSH tunnel should not turn a limited maintenance task into unrestricted operating-system access.
Keep the operating system and SSH server maintained
Apply supported Raspberry Pi OS security updates, monitor storage capacity, and remove network services that are no longer used. A tunnel cannot compensate for an unmaintained service with known vulnerabilities.
Expose only the required protocol
If SSH is the only requirement, publish only the verified SSH TCP port. Do not create additional HTTP, UDP, File Server, or VPN access merely because the options exist. If a browser dashboard is sufficient, consider whether SSH needs to be reachable at all.
Control the tunnel lifecycle
Stop temporary access after maintenance or support is complete. Delete abandoned configurations so that they cannot be restarted accidentally. A reduced availability window does not replace service authentication, but it prevents an unnecessary endpoint from remaining active indefinitely.
Protect credentials and operational data
Device tokens, SSH private keys, account passwords, private endpoints, application secrets, and backup credentials should not appear in shell history examples, public repositories, screenshots, or shared tickets. If a secret is exposed, use the applicable current product or operating-system process to replace it.
Plan for reboots, power loss, and routine operation
Remote access depends on several independent components: Raspberry Pi power, local networking, internet connectivity, the target service, the Localtonet client, the selected device connection, and the tunnel’s running state. A failure at any layer can make the endpoint unavailable.
Raspberry Pi deployments are particularly sensitive to power and storage conditions. Use an appropriate power supply, shut the system down cleanly when possible, and monitor for storage exhaustion or filesystem errors. If the Pi uses Wi-Fi, consider signal quality and whether the network changes after moving the device.
After a planned reboot, verify the system in this order:
- Confirm that the Pi has completed booting and has a valid local network address.
- Confirm that SSH is active and listening on the expected port.
- Confirm that the Localtonet client has started through a currently supported mechanism.
- Confirm that its device token reports connected.
- Confirm that the tunnel is running.
- Repeat the external SSH test using the endpoint currently shown in the dashboard.
Do not assume that installing the Localtonet client automatically enables startup after reboot or automatically restarts every tunnel. Persistent client startup, tunnel recovery, and endpoint behavior must be verified against documentation for the current client version and tested on the actual Raspberry Pi.
If remote availability is important, schedule a controlled reboot while local physical access is still possible. Confirm each layer rather than assuming that successful operation before the reboot proves unattended recovery afterward.
Troubleshoot common Raspberry Pi tunnel failures
Work from the local service toward the public endpoint. Changing several settings at once makes it harder to identify the failing layer.
| Symptom | Likely area | What to check |
|---|---|---|
| Local SSH connection is refused | SSH is disabled, stopped, or listening on another port | Run sudo systemctl status ssh and sudo ss -ltnp. Enable SSH through Raspberry Pi OS and use the port actually shown. |
| Loopback SSH works, but LAN SSH fails | Bind address, local firewall, network isolation, or wrong LAN address | Check ip -br addr, confirm that SSH is not restricted only to loopback, and test from the actual Localtonet client device. |
| The tunnel client runs on another device but targets 127.0.0.1 | Wrong target address | Replace loopback with the Raspberry Pi’s reachable LAN address. Loopback always identifies the machine running the client. |
| SSH works locally, but the device token is disconnected | Localtonet client is stopped, unauthenticated, or offline | Confirm that the correct client is running, that it uses the intended device token, and that the Pi has outbound connectivity. |
| The device is connected, but the endpoint does not respond | Tunnel is created but not started | Open the tunnel configuration and use the Start button. Confirm that the tunnel reports a running state. |
| The public connection is refused or times out | Wrong target IP, wrong target port, stopped service, or blocked path | Repeat the exact local target test, compare it with the tunnel fields, and verify both the device and tunnel states. |
| SSH connects but authentication fails | SSH account, key, password, or permissions | Test the same account and key locally. Check the account state and authorized-key file permissions. Do not weaken authentication merely to make the tunnel test pass. |
| The Pi can browse some sites, but the Localtonet client cannot connect | Outbound network restriction, filtering, DNS problem, or interrupted connectivity | Confirm general internet and DNS operation, review permitted outbound traffic with the network owner, and do not bypass organizational controls. |
| Access stops after a reboot | Client or tunnel did not recover automatically | Verify SSH, then the Localtonet client, device connection, and tunnel state in order. Follow current client-version startup documentation rather than inferring service behavior. |
| Access fails intermittently | Power, Wi-Fi, ISP, thermal, or storage instability | Check power supply quality, network signal, system logs, free storage, and whether the Pi itself restarted or lost connectivity. |
SSH is not enabled
If systemctl reports that SSH is inactive or unavailable, return to the Raspberry Pi OS configuration step. Do not troubleshoot the public endpoint until a local SSH connection succeeds.
The service is bound to the wrong interface
A service bound only to 127.0.0.1 can be reached by a Localtonet client running on the same Pi, but not by a client running on another LAN device. Conversely, a service that should be local-only should not be changed to listen on every network interface without a clear need and a security review. The safer fix may be to run the Localtonet client on the Pi rather than broadening the service bind address.
The local target port is wrong
The public port assigned by Localtonet and the Pi’s local SSH port are separate values. Enter the local port shown by ss as the tunnel target. Use the assigned public port only in the remote SSH command.
Authentication succeeds but files or commands fail
That is generally an operating-system authorization or filesystem-permission issue rather than a tunnel problem. Check the connected user, group membership, directory ownership, and command privileges. Avoid resolving permission errors by granting unnecessary administrative access.
The Raspberry Pi is unavailable
No tunnel can reach a Pi that has lost power, failed to boot, disconnected from the network, or stopped its target service. If local access is impossible, physical intervention may be required. For unattended sites, operational planning should include power quality, network recovery, and a tested maintenance process.
Alternatives for web apps, files, UDP, and private networks
Publish a Raspberry Pi web application
Use an HTTP/s tunnel when the target is a local HTTP application such as a development site, API, webhook receiver, or dashboard. HTTP tunnels point to a reachable local IP address and port and provide a public HTTPS address. HTTP Process Type choices include Random Sub Domain, Custom Sub Domain, and Custom Domain, subject to current dashboard and plan availability.
A public HTTPS address does not remove the application’s responsibility for authentication, authorization, input validation, secure sessions, or protection of administrative and diagnostic routes. Exact custom-domain DNS requirements should be obtained from current Localtonet documentation rather than inferred.
Publish a controlled folder
File Server targets a local folder path instead of an IP address and port. The Default subtype provides a browser-based file manager. SFTP supports compatible clients and automation tools such as FileZilla, WinSCP, and rsync. WebDAV is intended for mounting the folder as a native network drive through operating-system tools such as File Explorer or Finder.
Follow the Localtonet File Server documentation for the current sequence: install the Localtonet application, open the File Server Tunnel page, select Process Type, select the authentication token and server, enter the local folder path, and press Start.
Share the narrowest practical directory. Avoid exposing the entire home directory, operating-system folders, SSH keys, credentials, or application configuration containing secrets. The supplied product evidence does not establish whether every Default web manager capability also applies to SFTP and WebDAV, so verify subtype-specific behavior before depending on features such as folder encryption, Immich-compatible backup, or Smart Collections.
Forward UDP only when the application requires it
UDP does not provide the same connection-oriented behavior as TCP. Identity, replay handling, ordering, and error recovery depend on the forwarded application protocol. Confirm the service specification before selecting UDP. Use combined UDP/TCP only when the application genuinely needs both transports.
Use VPN Manager for private network access
If authorized devices need access to several private services or selected resources across local LANs, VPN Manager may match the scope better than publishing each port separately. It provides a private mesh VPN with granular firewall rules. Standard service tunnels should not be described as VPN functionality.
Frequently asked questions
Can I access a Raspberry Pi without router port forwarding?
Yes. The Localtonet client establishes an outbound connection from the Raspberry Pi, or from another device that can reach it, to a Localtonet relay. A running tunnel provides a public endpoint without requiring an inbound router port-forwarding rule or public IP address.
Which tunnel should I use for Raspberry Pi SSH?
Use a TCP tunnel because SSH is a raw TCP service. Point the tunnel to the SSH address and port reachable from the Localtonet client. If the client runs on the Pi, that target can be 127.0.0.1 and the verified SSH port.
Why does 127.0.0.1 fail when the client runs on another computer?
Loopback always refers to the machine running the client. If Localtonet runs on another computer, 127.0.0.1 targets that computer rather than the Raspberry Pi. Use the Pi’s reachable LAN address and verify SSH from the client computer first.
Does this work behind carrier-grade NAT?
The outbound tunnel model does not require the Raspberry Pi to have a public IP address, so it is suitable for common CGNAT situations. The Pi must still be able to establish and maintain the required outbound connection to Localtonet.
Does Localtonet enable SSH for me?
No. SSH must already be enabled, running, listening on the expected port, and usable with a valid operating-system account. Localtonet forwards traffic to that service but does not configure SSH users or authentication.
Will the tunnel automatically return after a Raspberry Pi reboot?
Do not assume that it will. Client startup, tunnel recovery, and endpoint behavior can depend on the current Localtonet client version and installation method. Follow current client documentation and perform a controlled reboot test before relying on unattended recovery.
Is a TCP or HTTP tunnel the same as a VPN?
No. TCP, HTTP, UDP, combined UDP/TCP, and File Server tunnels publish a particular service or folder. VPN Manager is Localtonet’s private mesh VPN feature and supports granular firewall rules for private network connectivity.
Can I publish files instead of enabling SSH?
Yes. If the goal is controlled file access rather than a terminal session, File Server can publish a selected local folder through its Default, SFTP, or WebDAV subtype. Share only the required directory and grant the minimum necessary file permissions.
Connect your Raspberry Pi through a controlled outbound tunnel
Verify SSH locally, install the matching Localtonet client for your Pi, create a TCP tunnel to the exact listening address and port, and test the assigned endpoint from an external network.
Get Started Free →

