

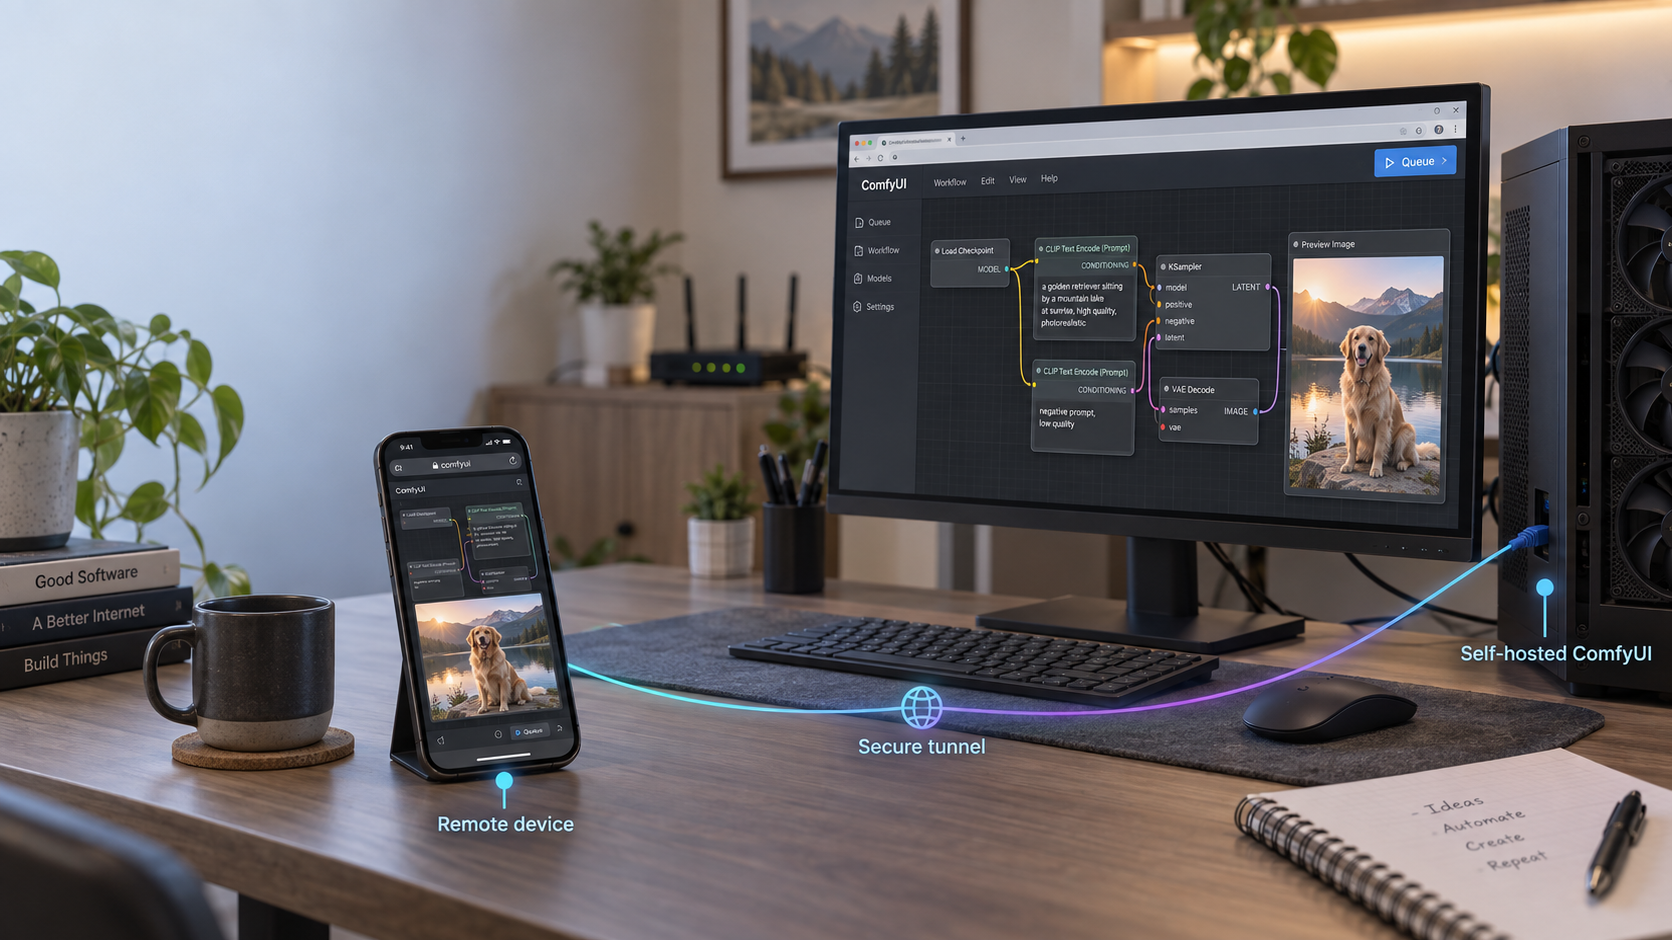
Build a reproducible local image-generation host, then expose only the protected web entry point
ComfyUI can run diffusion workflows on hardware you control, but a reliable deployment involves more than starting a container and publishing port 8188. You need a compatible model, persistent storage, working GPU passthrough, a tested workflow, an upgrade plan, and authentication before remote access. This guide explains a Linux and NVIDIA Docker workflow, shows how to keep Docker's host port on loopback, and then connects that protected local service to a Localtonet HTTP tunnel without inbound router port forwarding. Hardware requirements, model compatibility, licensing, cost, and performance vary by model and workflow, so the procedure emphasizes verification instead of fixed promises.
📋 What's in this guide
Scope, architecture, and installation choices
ComfyUI is a node-based interface for constructing image-generation workflows. A workflow connects model loaders, text encoders, samplers, decoders, image inputs, and output nodes in a graph. This makes the processing pipeline visible and reusable, but it also means that compatibility depends on the complete graph. A checkpoint alone does not guarantee that a workflow will run. The workflow may require a particular model family, text encoder, VAE, LoRA, ControlNet model, custom node, or precision.
This tutorial narrows the reproducible path to an x86-64 Linux host with an NVIDIA GPU, a working NVIDIA driver, Docker Engine, NVIDIA Container Toolkit, and a community ComfyUI container selected from its current upstream documentation. Localtonet runs on the same host as Docker, which lets us publish the container only to 127.0.0.1:8188. The instructions do not assume a specific GPU model, VRAM capacity, Linux distribution release, ComfyUI release, CUDA tag, or third-party container tag that has not been verified in the supplied evidence.
ComfyUI does not provide the Localtonet-specific container contract used by this tutorial, and community image tags, internal paths, startup flags, and bundled extensions can change. The previously suggested yanwk/comfyui-boot:cu126-slim tag and its volume paths are therefore not presented here as current facts. Before deployment, obtain the current tag, internal ComfyUI directory, startup behavior, and supported mount points from the image's upstream repository. Pin the tested image by digest. If the upstream contract cannot be verified, use an official non-container ComfyUI installation path instead of guessing.
ComfyUI also has non-Docker installation paths. Depending on the current upstream release, those may include a desktop build, a portable package, or a manual Python installation. Those options can be preferable when you need direct access to a platform-specific GPU backend. Docker is useful when its isolation and declarative storage contract fit the host, but it is not inherently faster and does not make an incompatible workflow compatible.
Request path and trust boundaries
Remote browser
    |
    | Public HTTPS address
    v
[PUBLIC TRUST BOUNDARY]
    |
[Verified authentication and authorization control]
    |
Localtonet relay
    ^
    | Outbound client connection from the host
    |
Localtonet client on the Docker host
    |
    | HTTP target: 127.0.0.1:8188
    v
Docker host loopback: 127.0.0.1:8188
    |
    | Container port mapping
    v
ComfyUI container listening on its container interface
    |
    v
NVIDIA GPU
Two different bindings are involved. ComfyUI must listen on an interface reachable inside its container so Docker can forward traffic to it. Docker should then publish that container port only on the host's loopback interface. A mapping such as 127.0.0.1:8188:8188 permits software on the same host, including the Localtonet client, to reach ComfyUI without making port 8188 directly reachable from other LAN devices.
The Localtonet client establishes an outbound connection to our relay. No inbound router port forwarding, public IP address, firewall opening, or VPN setup is required for an HTTP tunnel. The tunnel remains available only while the selected Localtonet client is connected and the tunnel is running.
Prerequisites and capacity planning
Complete the following checks before downloading a large model or creating a public tunnel. This avoids confusing host, container, workflow, and networking failures.
Host and GPU requirements
- An x86-64 Linux host supported by your chosen Docker Engine and NVIDIA Container Toolkit releases.
- An NVIDIA GPU with a current driver that supports the CUDA runtime required by the selected container.
- Enough system RAM for the operating system, Docker, ComfyUI, model loading, and any CPU offloading performed by the workflow.
- Enough GPU memory for the exact model, precision, dimensions, batch size, and graph you plan to run.
- Enough disk capacity for container layers, checkpoints, encoders, VAEs, LoRAs, custom nodes, inputs, outputs, backups, and temporary upgrade copies.
There is no universal VRAM minimum for SDXL, Flux, or another model family. A quantized or reduced-precision model may use less memory than a full-precision variant, while a high-resolution workflow with several conditioning networks may use much more. Start from the requirements published for the specific model and workflow. Leave capacity for runtime allocations rather than assuming that a model file fitting on disk means it will fit in GPU memory.
Install Docker Engine and NVIDIA Container Toolkit
Install Docker Engine using Docker's current instructions for your Linux distribution. Then install NVIDIA Container Toolkit using NVIDIA's current repository and configuration instructions for that same distribution. Repository URLs, package names, signing-key procedures, and runtime configuration can change, so this article does not reproduce a potentially stale installation script.
After installation, confirm that Docker is running and that your account has the intended permission to use it:
docker version
docker info
docker ps
Confirm that the host driver can see the GPU:
nvidia-smi
NVIDIA's toolkit documentation commonly uses a CUDA container to validate GPU passthrough. Use the exact current test image tag shown in the NVIDIA Container Toolkit documentation rather than copying a historical CUDA tag. The test should run nvidia-smi inside a container and show the same physical GPU before you proceed.
A successful host-side nvidia-smi proves that the operating system can reach the GPU. It does not prove that Docker has GPU access. Complete both checks. If the container test fails, fix NVIDIA Container Toolkit before diagnosing ComfyUI.
Choose a model and review its license
Download only models whose source, format, intended ComfyUI workflow, and license you understand. Different checkpoints and supporting files may have different terms for commercial use, redistribution, generated output, attribution, or prohibited uses. ComfyUI being available separately does not replace the license attached to a model, LoRA, VAE, text encoder, or custom node.
Keep a simple inventory containing the original download page, exact filename, file size, checksum if the publisher provides one, license, associated workflow, and date retrieved. This is useful for backup decisions and makes future troubleshooting far easier than a folder of anonymously renamed checkpoint files.
Prepare Localtonet and an authentication layer
Create a Localtonet account, obtain the device-specific AuthToken for the client that will run on this host, and keep it secret. Install the client from the Localtonet download page. Do not paste the token into Compose files, screenshots, shell history shared with others, or this article's example commands.
You must also provide a verified authentication and authorization control in front of ComfyUI before starting a public HTTP tunnel. This can be an authenticated reverse proxy or another access gateway whose behavior you have tested. The supplied Localtonet evidence does not confirm dashboard Basic Auth for HTTP tunnels, so this guide does not claim that setting exists.
Build a reproducible Docker deployment
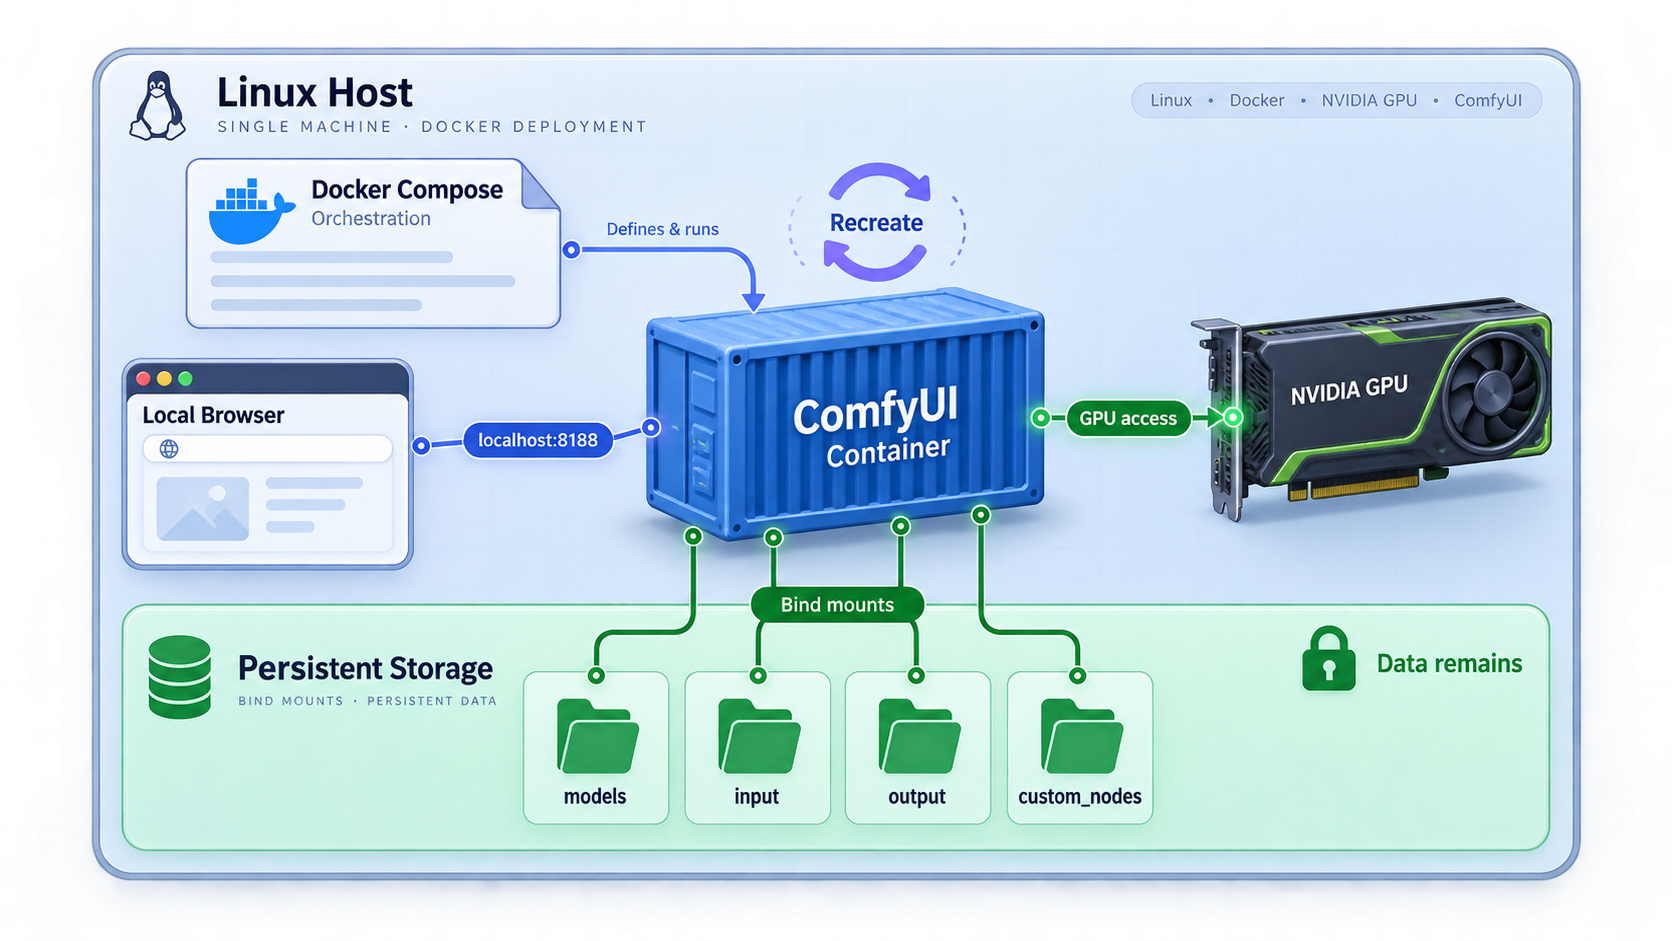
The safest deployment process begins with an explicit container contract. Record the exact image reference, digest, internal application path, listening port, launch arguments, user ID, and supported mount points from the chosen image's current upstream documentation.
Verify and pin the container image
Select a current upstream-supported image tag, pull it, inspect its metadata, and record its immutable digest. Do not rely on latest or assume that an old CUDA tag still exists.
Create persistent host directories
Create separate directories for models, input files, outputs, workflows, user configuration, and custom nodes. Adjust ownership to the user expected by the verified container image rather than making the directories world-writable.
Define the container without publishing to the LAN
Give the container GPU access, bind its verified persistent directories, and publish port 8188 as 127.0.0.1:8188:8188. Confirm that the image starts ComfyUI on an interface reachable from Docker's port forward.
Start the container and inspect its state
Start the pinned deployment, check container status, and read startup logs before opening the UI. Resolve missing mounts, invalid arguments, or GPU errors at this stage.
Confirm the loopback-only publication
Inspect Docker's published ports and the host's listening sockets. The host-side listener should be 127.0.0.1:8188, not 0.0.0.0:8188 or [::]:8188.
Create a predictable host layout:
sudo mkdir -p /srv/comfyui/models
sudo mkdir -p /srv/comfyui/input
sudo mkdir -p /srv/comfyui/output
sudo mkdir -p /srv/comfyui/workflows
sudo mkdir -p /srv/comfyui/user
sudo mkdir -p /srv/comfyui/custom_nodes
Do not run a blanket recursive chmod 777. Determine the UID and GID expected by the selected image and assign only the permissions it needs. If the image runs as root, review whether its documented configuration supports a less-privileged user. GPU access does not require every application file to be globally writable.
The following Compose fragment demonstrates the required security and persistence shape. It is intentionally a contract template, not a claim about unverified community-image paths. Replace every placeholder using the current upstream documentation for the image you selected.
services:
  comfyui:
    image: "VERIFIED_IMAGE_REFERENCE@sha256:VERIFIED_DIGEST"
    container_name: comfyui
    restart: unless-stopped
    ports:
      - "127.0.0.1:8188:8188"
    gpus: all
    volumes:
      - "/srv/comfyui/models:VERIFIED_CONTAINER_MODELS_PATH"
      - "/srv/comfyui/input:VERIFIED_CONTAINER_INPUT_PATH"
      - "/srv/comfyui/output:VERIFIED_CONTAINER_OUTPUT_PATH"
      - "/srv/comfyui/workflows:VERIFIED_CONTAINER_WORKFLOWS_PATH"
      - "/srv/comfyui/user:VERIFIED_CONTAINER_USER_PATH"
      - "/srv/comfyui/custom_nodes:VERIFIED_CONTAINER_CUSTOM_NODES_PATH"
Some images may persist workflows or user data under a combined directory rather than separate paths. Others may expect models in a different root or offer an environment variable for external model directories. Follow the verified contract exactly. A volume attached to the wrong internal directory creates the appearance of persistence while ComfyUI continues writing into the disposable container layer.
Start and inspect the deployment:
docker compose pull
docker compose up -d
docker compose ps
docker compose logs --tail=200 comfyui
docker port comfyui
Confirm the socket on the Linux host:
ss -ltn | grep 8188
The expected host-side result contains 127.0.0.1:8188. If it shows all interfaces, stop the deployment and correct the port mapping before continuing.
Install models, workflows, and custom nodes safely
A model-management interface, ComfyUI Manager, and manual checkpoint placement are different things. A manager may help install extensions or retrieve supported resources, but its availability and capabilities depend on the installed version and configuration. It does not guarantee that an arbitrary checkpoint matches an arbitrary workflow.
Manual model placement
For the most auditable approach, download the required files from their publisher, verify checksums where available, and copy them into the documented model subdirectories under /srv/comfyui/models. Common resource categories can include checkpoints, VAEs, text encoders, LoRAs, ControlNet models, embeddings, and upscalers. Use the category expected by the workflow and current ComfyUI version.
After adding a file, refresh the UI or restart ComfyUI if required by the installed version. If a loader node cannot see the model, first verify the mounted path from inside the container rather than repeatedly downloading the file:
docker inspect comfyui
docker compose logs --tail=200 comfyui
Use the verified internal path from your image contract when inspecting the container. Do not assume that all community images place ComfyUI under /root/comfy/ComfyUI.
Workflow compatibility
Start with a small workflow supplied for the exact model family and ComfyUI release you installed. Confirm that every referenced node is available and that each loader points to a file present on disk. A workflow created for one architecture cannot be made compatible merely by selecting a similarly named checkpoint.
If a workflow requires custom nodes, inspect each node's repository, maintainer activity, release history, dependencies, and requested behavior before installation. Custom nodes are executable Python code. They can read mounted files, consume GPU and CPU resources, initiate network requests, and introduce dependency conflicts.
Do not expose extension installation to untrusted remote users. A convenient install button can add code to the host's persistent custom-node directory, and that code runs again when ComfyUI starts. Back up the current node set and record versions before adding or updating an extension.
Privacy is local only when the entire workflow is local
Core generation can occur on your host, but that does not prove that every extension is offline. API-backed nodes, telemetry, model downloaders, remote storage integrations, and other extensions may contact external services. Remote browser traffic also travels through the Localtonet tunnel path. Review each component and do not describe the deployment as fully private unless you have verified its network behavior and data handling.
Verify local generation, GPU use, and persistence
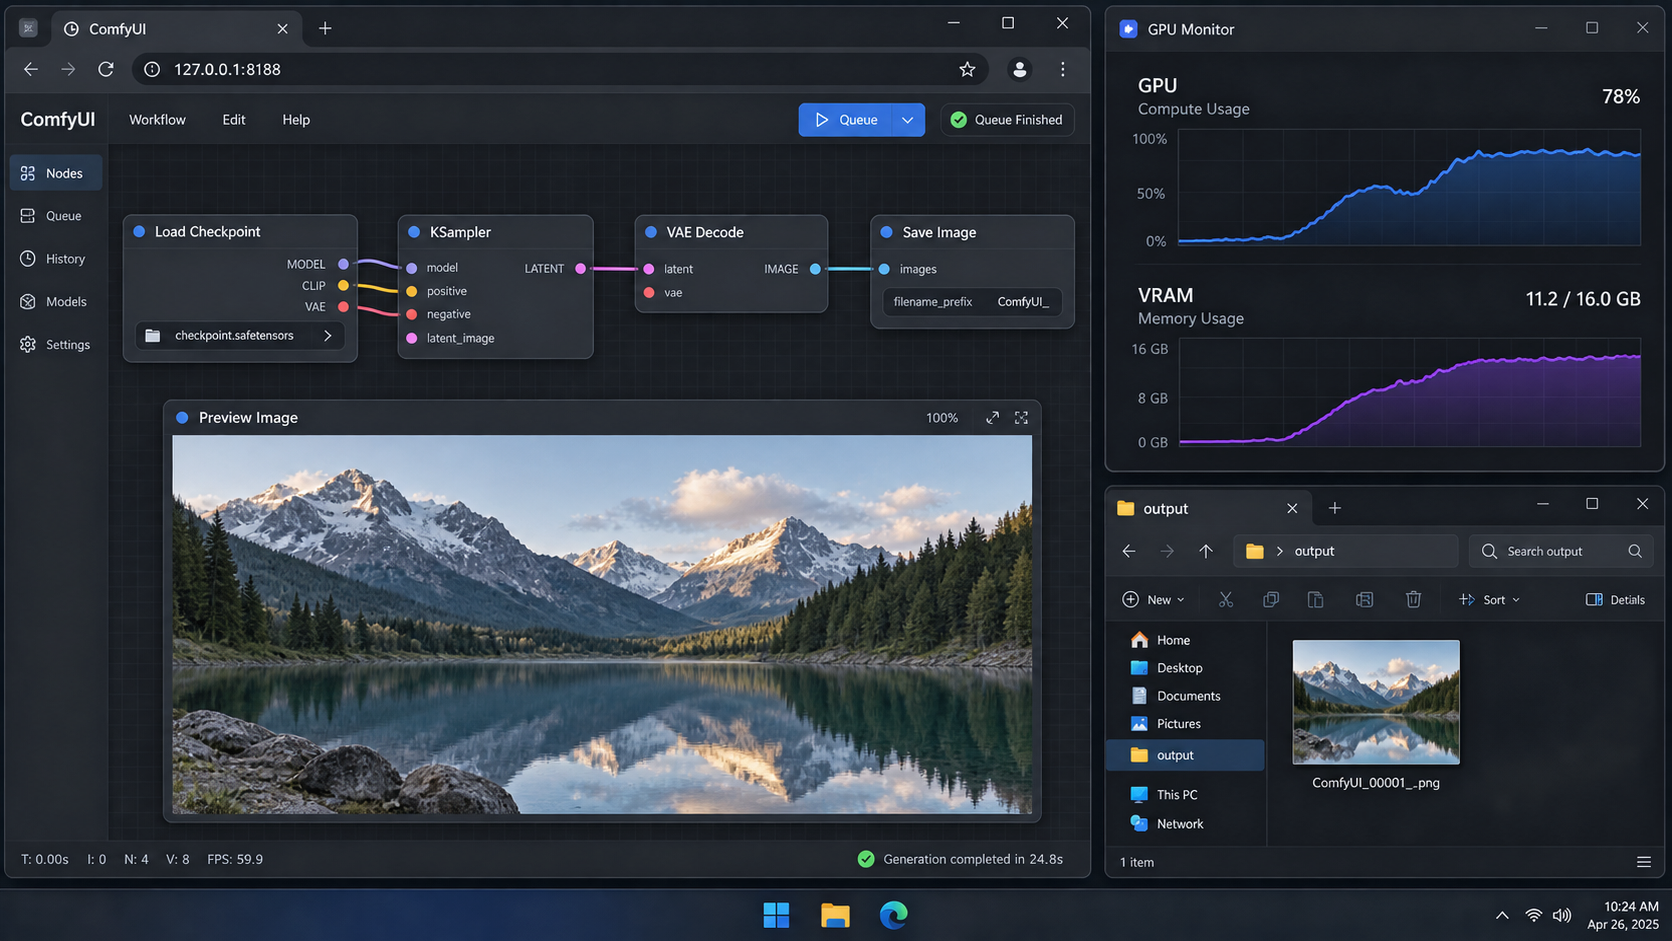
Do not create a tunnel until ComfyUI works locally. Local verification gives you a clean dividing line: if the application fails on localhost, Localtonet is not the cause.
Open the loopback URL
From a browser on the Docker host, open http://127.0.0.1:8188. If the host has no desktop, use a local command-line HTTP check or an SSH session configured for local forwarding during administration.
Load a known-compatible workflow
Use a workflow supplied for the exact model files you installed. Begin with modest image dimensions and a batch size of one to reduce the number of variables during the first test.
Queue one generation and watch the logs
Keep the container logs open while generating. Confirm that model loading and inference complete without missing-node, missing-file, dependency, or out-of-memory errors.
Confirm GPU activity
Run nvidia-smi on the host during generation. The ComfyUI workload should appear and GPU memory or utilization should change. Logs should also identify the selected execution device.
Confirm output and workflow persistence
Verify that the output appears under /srv/comfyui/output and save a workflow under the persistent workflow or user-data location supported by the image.
Recreate the container and test again
Stop and recreate the container without deleting the host directories. Confirm that models, settings, workflows, custom nodes, inputs, and outputs remain available.
docker compose logs -f comfyui
nvidia-smi

docker compose down
docker compose up -d
docker compose ps
docker compose logs --tail=200 comfyui-v to the shutdown command unless deletion is intentional
docker compose down -v removes Compose-managed named volumes. Host bind-mounted directories are not removed by that flag, but the command can still destroy other named-volume data in the project. Know which storage mechanism you selected before cleaning up.
Configure secure remote access with Localtonet
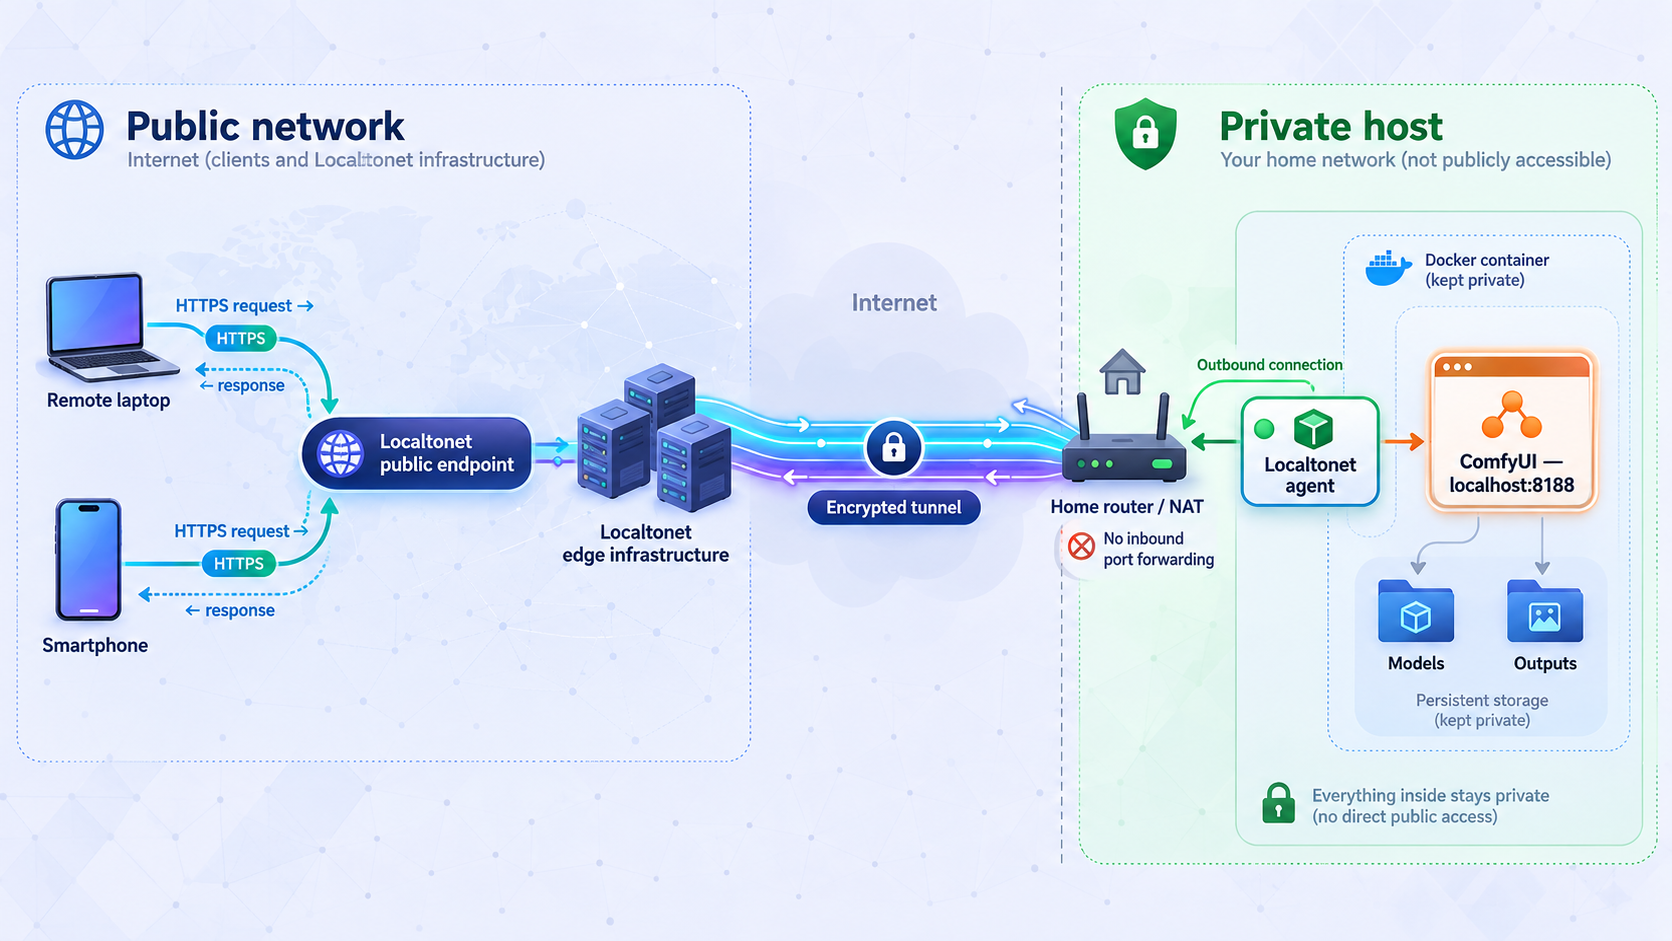
Localtonet provides the public URL and forwards requests to the local target. It does not turn an unauthenticated application into a private application merely because the URL uses HTTPS. Before starting the tunnel, place and test a verified authentication layer in front of ComfyUI. Configure Localtonet to target that protected local entry point, not an unprotected administrative interface.
A public HTTPS address can be copied, logged, shared, or discovered. HTTPS protects transport between the browser and tunnel edge, but possession of the address is not authorization. An unauthorized user may consume GPU resources, access available workflows or files, or interact with powerful custom nodes. If you do not have a tested authentication control, stop here and keep ComfyUI local.
Once the protected local endpoint is ready, use the documented Localtonet sequence.
Install and run the Localtonet client
Install Localtonet on the machine that can reach the protected local service. Use the current package for Windows, macOS, Linux, Android, Docker, or another supported option shown on our download page.
Authenticate the device
Select the device-specific AuthToken in the application or start the client with that token. Keep the token private because it identifies the client device.
Select an available relay server
Choose a currently available server or region from the dashboard. Available values can vary and should not be hardcoded from an article.
Create the HTTP tunnel configuration
Set the local target to the authenticated local entry point. If that control intentionally listens on 127.0.0.1:8188, use local IP 127.0.0.1 and port 8188. If it listens on another loopback port, target that port instead.
Start the tunnel explicitly
Creating a tunnel does not make it run. Use the Start action and verify that the selected Localtonet client is connected and the tunnel status is running.
Use the assigned public HTTPS address
Copy the public address displayed for the running tunnel. Treat it as a public endpoint even when you intend to share it with only one person.
Verify from an independent network
Test from a phone using mobile data or another network. Confirm that authentication is required before ComfyUI loads, that the UI remains connected, and that a small known-compatible workflow can be queued and monitored.
For the current product workflow, consult the Localtonet documentation alongside the dashboard. HTTP tunnels may use a generated subdomain, a selected subdomain where supported, or a custom domain. A custom domain improves naming but is not an authorization, revocation, or authentication mechanism.
Run the Localtonet client directly
On supported desktop systems, you can run the application and paste the token into the screen that opens. The current download instructions also support:
localtonet --authtoken <YOUR_TOKEN>This stores the token locally. Do not substitute a real token into documentation, screenshots, issue reports, or shared command output.
Optional Linux systemd service
On a Linux host with systemd, the current Localtonet download documentation provides these commands:
sudo localtonet --install-service --authtoken <YOUR_TOKEN>
sudo localtonet --start-service --authtoken <YOUR_TOKEN>

systemctl status localtonet
journalctl -u localtonet -f
Root privileges are required for service management. The unit is created at /etc/systemd/system/localtonet.service. The client also supports --stop-service, --status-service, and --remove-service.
Windows and macOS service support
On Windows, run the documented install and start commands in an Administrator Command Prompt or PowerShell session. The service is visible in services.msc. On macOS, the same service commands require administrator privileges and register a launchd job under ~/Library/LaunchAgents/. Always use the current platform instructions from the download page because executable locations and installation methods differ.
A connected background client does not by itself prove that a particular tunnel is running. Check both the device connection and tunnel state. Stop the tunnel when remote access is not needed.
Security and privacy boundaries
Self-hosting changes who operates the generation host, but it does not eliminate security responsibilities. ComfyUI is a powerful local application, and extensions can increase that power significantly.
Avoid mounting personal home directories, SSH keys, cloud credentials, or unrelated project data into the container. Store only the files ComfyUI needs. If multiple people use the service, decide which workflows, models, uploads, and outputs they are permitted to access instead of treating all authenticated users as administrators.
Monitor storage growth. Inputs and outputs may contain sensitive material, and generated assets can consume substantial space. Apply retention rules appropriate to your use case and include only necessary data in backups.
Routine operation, backups, upgrades, and rollback
Start, stop, inspect, and read logs
docker compose up -d
docker compose stop
docker compose start
docker compose ps
docker compose logs --tail=200 comfyui
docker compose logs -f comfyui
docker inspect comfyui
Stop the Localtonet tunnel before maintenance that could expose an error page, partially upgraded service, or unprotected fallback. Start it again only after local verification succeeds.
Back up the deployment
Back up the Compose file, the exact pinned image digest, configuration notes, model inventory, workflows, user configuration, custom nodes, and any irreplaceable inputs or outputs. Model files are often large and may be downloadable again, so your backup policy can distinguish reproducible downloads from unique data. Preserve model licenses and source records even if you choose not to back up every model binary.
For a consistent filesystem backup, stop ComfyUI first:
docker compose stop comfyui

sudo tar -C /srv -czf comfyui-data-backup.tar.gz comfyui

docker compose start comfyui
Store backups away from the primary disk and test restoration into a separate directory. A backup is not proven until you can restore the Compose configuration, persistent data, and a working generation.
Use a controlled upgrade procedure
- Stop the public tunnel.
- Record the current image reference and immutable digest.
- Export or save important workflows.
- Back up persistent configuration and custom nodes.
- Read the image and ComfyUI release notes for path, dependency, migration, and launch-option changes.
- Pull the candidate image without overwriting the known-good reference.
- Update the pinned digest in a copy of the Compose configuration.
- Start locally and inspect logs.
- Run the same small validation workflow used during initial setup.
- Confirm GPU inference, output persistence, settings, models, and custom nodes.
- Start the Localtonet tunnel and repeat the independent remote test.
Do not update ComfyUI, every custom node, the CUDA runtime, and all models in one uncontrolled change. Smaller changes make failure analysis and rollback practical.
Rollback
If the candidate release fails, stop it, restore the previous Compose configuration and data snapshot if a migration altered persistent files, then start the previous pinned digest. Read logs before reopening the tunnel. Keeping only a mutable tag makes rollback unreliable because the tag may no longer resolve to the old image.
Manage model storage deliberately
Large model collections can outgrow the container images themselves. Use stable filenames, maintain checksums where possible, and remove duplicates only after checking that saved workflows do not reference them. Before deleting a model, search your workflow inventory and confirm that a replacement uses the same architecture and required supporting files.
Self-hosted ComfyUI and hosted generators
Neither approach is categorically cheaper, faster, or more private. The result depends on the provider, local hardware, electricity price, model license, workflow, maintenance time, network path, and usage pattern.
| Consideration | Hosted generator | Self-hosted ComfyUI |
|---|---|---|
| Setup and maintenance | The provider operates the runtime, updates, capacity, and public access layer. | You operate drivers, containers, models, storage, extensions, security, backups, and upgrades. |
| Cost | May use free allowances, subscriptions, credits, or metered billing, depending on the provider. | May involve hardware, electricity, replacement parts, storage, and administration time. |
| Privacy | Requests are handled according to the provider's current service and privacy terms. | Core inference can remain local, but tunnel traffic and external-service nodes introduce additional data paths. |
| Model choice | Limited to models and controls made available by the provider. | Limited by model licenses, ComfyUI support, workflow compatibility, hardware, and available storage. |
| Performance | Depends on provider capacity, queueing, service tier, model, and network conditions. | Depends on local GPU, precision, workflow, drivers, thermal limits, and configuration. |
| Remote availability | Usually operated as an internet service by the provider. | Requires the host, ComfyUI, authentication layer, Localtonet client, and tunnel to remain operational. |
Self-hosting is most compelling when you value control over the runtime and are willing to maintain it. Hosted services remain attractive when operational simplicity matters more than controlling the execution environment.
Troubleshooting ComfyUI, Docker, and remote access
| Symptom | Checks | Safe recovery |
|---|---|---|
| Docker cannot pull the image | Check the repository name, tag, registry login requirements, architecture, and upstream release page. | Do not substitute a guessed tag. Select a documented image and pin its digest after a successful pull. |
| Container exits immediately | Run docker compose ps and inspect docker compose logs --tail=200 comfyui. |
Correct the documented command, mount paths, permissions, or required environment before restarting. |
| GPU is visible on the host but not in Docker | Check NVIDIA Container Toolkit installation, Docker runtime configuration, and GPU device requests. | Repeat NVIDIA's current container-runtime test before starting ComfyUI. |
| ComfyUI uses the CPU unexpectedly | Review startup logs, container GPU configuration, driver compatibility, and the selected build. | Stop generation and fix the runtime rather than assuming slow inference is normal. |
| Port 8188 is already in use | Run ss -ltn | grep 8188 and inspect existing containers. |
Stop the conflicting service or choose another loopback host port and use the same port in the Localtonet target. |
| Port 8188 is exposed to the LAN | Check docker port comfyui and the host socket list. |
Change the mapping to 127.0.0.1:8188:8188, recreate the container, and verify again. |
| Model does not appear in a loader | Check the model category, filename, host directory, bind mount, container path, permissions, and workflow requirements. | Move the file to the documented model subdirectory and refresh or restart as required. |
| CUDA out-of-memory error | Review model precision, image dimensions, batch size, active nodes, and other GPU processes. | Lower the workload using options supported by that model and workflow. Do not assume one optimization applies universally. |
| Custom node fails after an update | Read startup logs for import errors, dependency conflicts, API changes, or missing packages. | Restore the pinned node version or backup. Avoid updating all extensions together. |
| Local browser cannot open ComfyUI | Check container state, logs, port mapping, and http://127.0.0.1:8188 from the host. |
Fix the application locally before investigating Localtonet. |
| Local access works but the tunnel does not | Check that the Localtonet client is connected, the correct AuthToken device is selected, the relay is available, the target IP and port are correct, and the tunnel was explicitly started. | Restart only the failed layer, then verify tunnel status and test from an independent network. |
| Remote UI loads but disconnects or stops updating | Inspect browser errors, ComfyUI logs, authentication proxy logs, Localtonet state, and whether the UI's HTTP or WebSocket traffic is being handled correctly. | Confirm the protected local endpoint works first, then retest the tunnel without weakening authentication. |
| Remote generation completes but previews are slow | Compare local and remote behavior, output size, network quality, browser performance, and relay selection. | Use smaller test outputs while diagnosing. Do not assume generation time and transfer time are the same measurement. |
| Service fails after a host reboot | Check Docker, container restart status, Localtonet service status, device connection, and tunnel running state separately. | Restore each layer in order: Docker, ComfyUI, authentication, Localtonet client, then the tunnel. |
Troubleshoot from the inside out. First verify the GPU, then Docker, then ComfyUI, then the authentication layer, then the Localtonet client, then the tunnel, and finally the remote browser. This prevents a public networking symptom from hiding a local application failure.
Frequently asked questions
Why publish Docker port 8188 only on 127.0.0.1?
When Localtonet runs on the same host, it can reach the loopback listener directly. Binding to 127.0.0.1 avoids making ComfyUI directly reachable from every device on the LAN while still allowing Docker to forward traffic into the container.
Does a Localtonet HTTPS address make ComfyUI private?
No. HTTPS protects traffic in transit, but the address is a public endpoint. Use a verified authentication and authorization layer before starting the tunnel, apply least privilege, and stop the tunnel when it is not needed.
Which ComfyUI Docker image should I use?
Use a currently maintained image whose upstream documentation clearly states its supported GPU runtime, internal paths, startup options, persistence mounts, and update procedure. Test it locally and pin the resulting immutable digest. This article does not endorse an unverified moving tag.
How much VRAM does ComfyUI require?
There is no single requirement. VRAM use depends on the model architecture, precision, resolution, batch size, conditioning models, custom nodes, attention implementation, and offloading configuration. Follow the requirements for the exact model and workflow, then validate with a small generation.
Can ComfyUI Manager install every model I need?
Do not assume so. Manager features depend on the installed version and available integrations. Some resources may require manual download and placement. In every case, verify workflow compatibility and review the license for each model and extension.
Does the computer need to stay on for remote access?
Yes. The host, Docker, ComfyUI container, authentication layer, Localtonet client, and tunnel must all be operational. Creating a tunnel does not start it automatically, and the tunnel is unavailable when the selected client is disconnected or the tunnel is stopped.
Will the tunnel change image-generation speed?
Inference still runs on the host, but end-to-end experience includes interface traffic, uploaded inputs, previews, status updates, and downloaded outputs. Local GPU execution time and remote transfer time should be measured separately rather than assuming the tunnel has no effect on the overall session.
Can I use a custom domain to revoke access?
A custom domain is a naming and routing choice, not an authorization mechanism. Revoke access through the authentication system, rotate affected credentials, and stop or delete the tunnel when appropriate.
Connect your protected ComfyUI host with Localtonet
Verify generation and persistence locally, put an authentication control in front of ComfyUI, then create and explicitly start a Localtonet HTTP tunnel to that protected loopback endpoint.
Get Started Free →

