

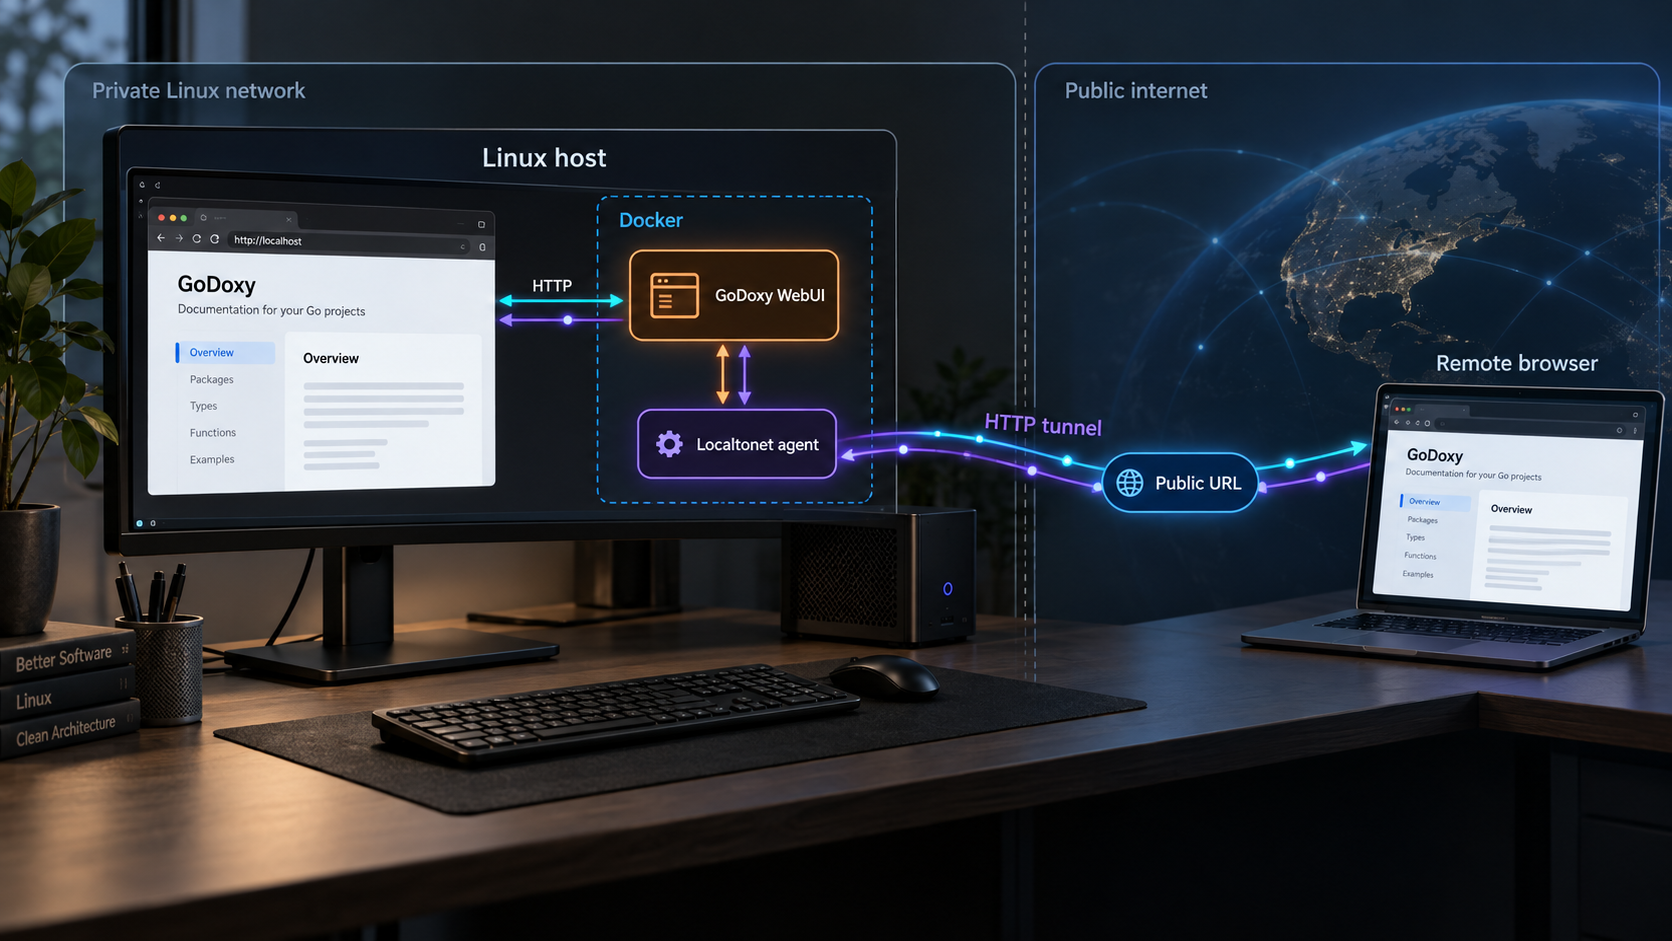
Build a working GoDoxy deployment first, verify its HTTPS WebUI locally, then add remote access without opening an inbound router port
GoDoxy is a Linux-based reverse proxy and container orchestrator with automatic container discovery, hostname-based routing, certificate management, access controls, traffic forwarding, monitoring, and a WebUI. In this guide, we install it with Docker Compose, examine the generated configuration instead of assuming a listening port, verify the service on the local network, and cover essential operating and troubleshooting tasks. Once the local deployment works, we connect it to an HTTP or HTTPS tunnel with Localtonet. Because GoDoxy relies on hostnames and can terminate TLS itself, the integration section also explains the routing and certificate details that must be tested rather than guessed.
📋 What's in this guide
How GoDoxy and Localtonet fit together
GoDoxy and Localtonet solve different parts of the remote-access path. GoDoxy runs on your Linux host and acts as a reverse proxy and container orchestrator. It can discover Docker and Podman containers, build routes from their metadata, respond to configuration changes, manage certificates, expose a management WebUI, and forward TCP or UDP traffic. GoDoxy normally decides which application should receive an HTTP request by examining the requested hostname.
Localtonet provides the external connectivity layer. Our client application runs on a device that can reach the GoDoxy service and establishes an outbound connection to a Localtonet relay server. An HTTP or HTTPS tunnel then gives you a public URL for the selected local IP address and port. This does not require an inbound router port forward, a public IP address, a VPN configuration, or a firewall rule allowing unsolicited internet traffic to the host.
The distinction matters during configuration. A successfully created Localtonet tunnel cannot repair a GoDoxy listener, DNS, certificate, or hostname-routing problem. Start by making the WebUI work from the Linux host or local network. Only then should you create a tunnel to the verified listener.
The project documentation explicitly says that GoDoxy is designed to run in host network mode and that this mode should not be changed. Consequently, do not rely on a conventional Docker port-publishing line to discover its listener. Inspect the generated .env, the resolved Compose configuration, and the host's listening sockets instead.
Prerequisites for a GoDoxy Linux installation
This guide uses the documented Docker Compose installation path because it is the most complete setup route in the available project instructions. GoDoxy officially supports Linux on amd64 and arm64. The source-build path is discussed later, but Docker Compose avoids requiring a local Go and Shadowtree build environment.
Prepare the following before running the installer:
- A Linux host using the amd64 or arm64 architecture.
- Administrative access sufficient to install and operate Docker on that host.
- Docker Engine with the modern
docker composeplugin available. curlfor the quick setup script, orwgetfor the documented manual download process.- A domain whose DNS records you can manage if you intend to use GoDoxy's normal hostname-based routing.
- A dedicated directory for the Compose file, environment file, configuration, certificates, metrics, and other persistent data.
- A backup plan for the generated configuration and persistent directories before upgrades or major edits.
- For the later remote-access step, a Localtonet account and a supported Localtonet client installed on a device that can reach the GoDoxy listener.
Confirm Docker and Compose first
Run the following checks. They do not install Docker because the correct Docker installation process depends on your Linux distribution and repository policy.
docker --version
docker compose version
Both commands should return version information. If either command is missing or cannot connect to the Docker daemon, resolve that issue before installing GoDoxy. Depending on how Docker is configured, your account may need elevated privileges or membership in a Docker-authorized operating-system group. Grant Docker access only to trusted administrators because control of the Docker daemon is highly privileged.
Plan GoDoxy DNS
The documented quick start uses wildcard DNS records that point toward the machine running GoDoxy. For example, a wildcard record for a domain allows service names such as app.example.com and files.example.com to reach the same reverse proxy. The project shows both an A record for IPv4 and an AAAA record for IPv6.
Use addresses that are correct for your network design. A private address is appropriate only when clients resolving that DNS record can route to the private network. A public DNS record pointing to a private address does not create internet reachability by itself. Conversely, pointing DNS to a public address may expose the listener if the surrounding router and firewall permit inbound traffic.
The WebUI can manage routes, containers, logs, configuration, and integrations. Treat it as an administrative service. Complete local verification, configure suitable authentication or access restrictions, and confirm that only intended users can reach it before creating public remote access.
Choose an installation path
| Installation path | Best for | Important behavior |
|---|---|---|
| Quick setup script | A new Compose deployment using the project's generated files | Runs the documented setup script inside a directory, generates compose.yml, and is followed by docker compose up -d. |
| Manual Compose setup | Administrators who want to download and inspect each starting file explicitly | Downloads the example configuration, environment file, and Compose file into the expected names. |
| Source build | Developers who need a locally compiled binary | Requires Go 1.22 or newer and Shadowtree. The extracted project instructions do not provide a complete Shadowtree installation procedure. |
Install GoDoxy with Docker Compose
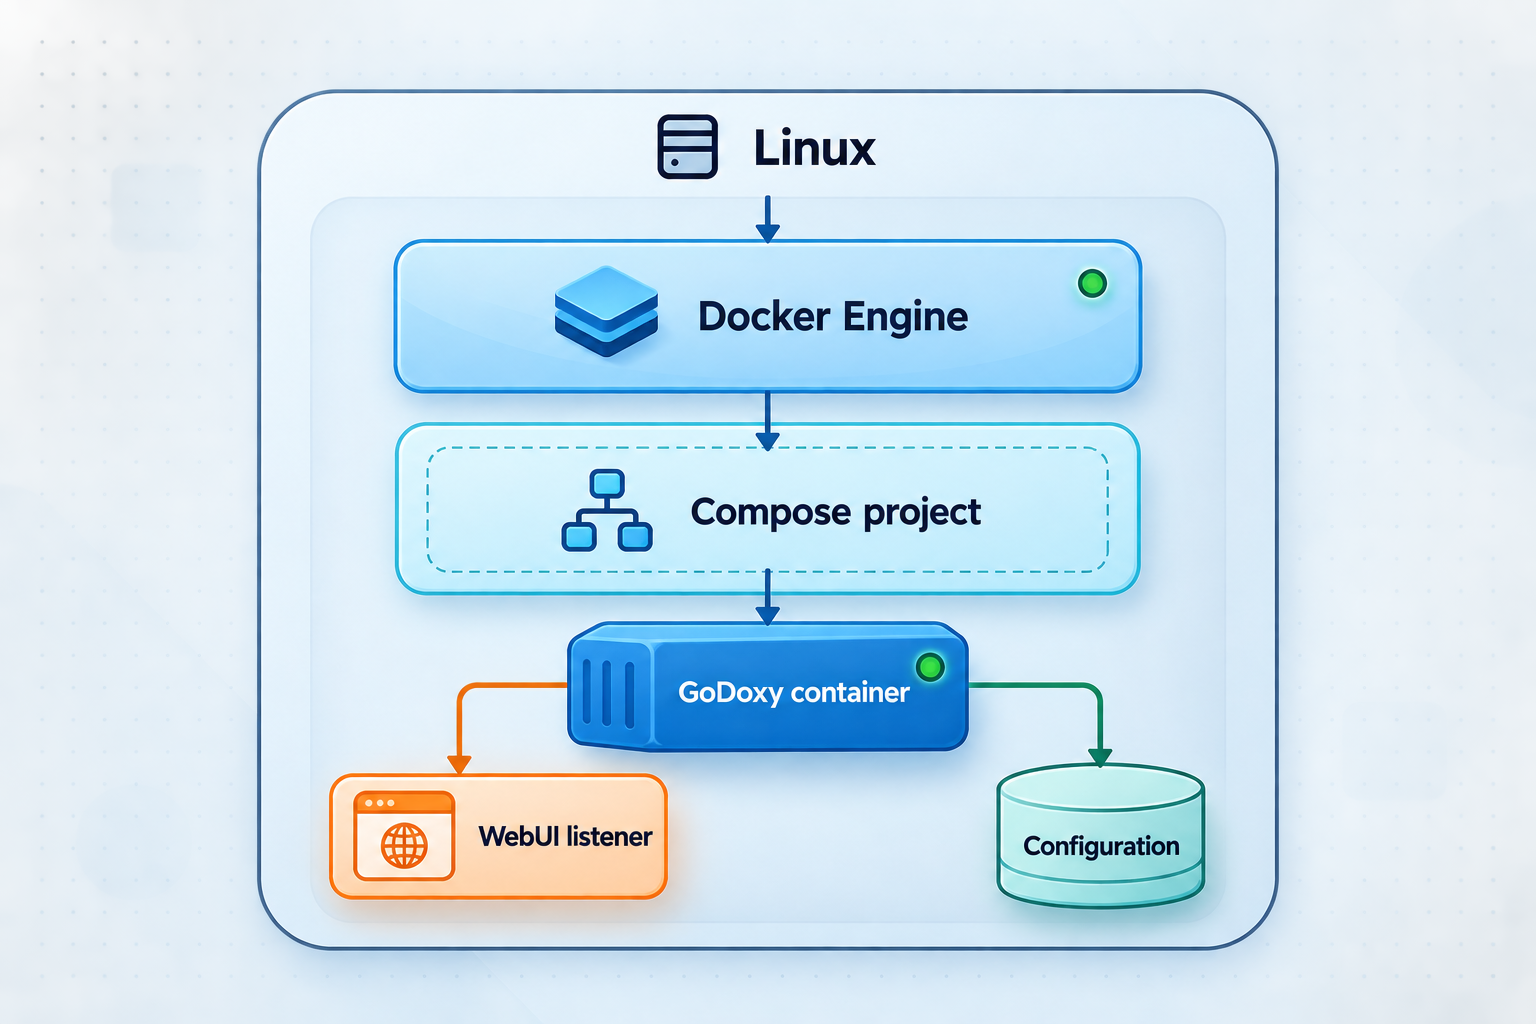
The quick setup is the primary workflow. Create a dedicated directory, enter it, run the setup script there, inspect the generated files, and start the resulting Compose project.
Create and enter a deployment directory
Keep the Compose and persistent configuration files together in a directory that is included in your backup process. The directory name and location below are local organizational choices, not required GoDoxy defaults.
Run the documented setup script inside that directory
The script retrieves the current setup logic from the project's main branch and generates the Compose configuration. Review the remote script first if your operational policy does not permit piping downloaded content directly to a shell.
Start the generated Compose service
Run the documented detached startup command from the directory containing the generated compose.yml. Then inspect container state and logs before attempting to open the WebUI.
1. Create the working directory
mkdir -p ~/godoxy
cd ~/godoxy
Avoid running the setup from an unrelated application directory. Commands such as docker compose up, docker compose ps, and docker compose logs normally act on the Compose project in the current directory.
2. Run the quick setup script
/bin/sh -c "$(curl -fsSL https://raw.githubusercontent.com/yusing/godoxy/main/scripts/setup.sh)"This is the project's documented quick-start command, but it retrieves the current script from the main branch. In controlled or production environments, download and inspect the script before executing it, record the version you approved, and review generated configuration before starting containers.
3. Inspect the generated files
Confirm that the expected Compose file exists and inspect the directory without printing secrets into tickets, chat messages, or public logs.
ls -la
sed -n '1,240p' compose.yml
If the setup created an .env file, inspect it locally with an editor. The project specifically directs administrators to modify .env when changing listening ports. Do not publish the file because environment files can contain deployment-specific values or credentials.
Docker Compose can render the resolved configuration after applying environment substitution:
docker compose configReview the output for the service definition, network mode, mounted directories, and resolved settings. GoDoxy is designed for host network mode, so do not change that mode simply to make its Compose file resemble a conventional bridged container deployment.
4. Start GoDoxy
docker compose up -dDetached mode returns control to the terminal while the service continues running. Immediately inspect its state and recent output:
docker compose ps
docker compose logs --tail=200
A running container is necessary but not sufficient. The application must also have loaded its configuration, bound the expected host sockets, and completed any certificate or provider initialization required for your selected hostname.
Manual Docker Compose setup
If you prefer to create the documented files one by one, start from an empty deployment directory and run the following commands:
mkdir -p config
wget https://raw.githubusercontent.com/yusing/godoxy/main/config.example.yml -O config/config.yml
wget https://raw.githubusercontent.com/yusing/godoxy/main/.env.example -O .env
wget https://raw.githubusercontent.com/yusing/godoxy/main/compose.example.yml -O compose.yml
Review and adapt the downloaded examples before starting the service. Then use the same startup and inspection commands:
docker compose config
docker compose up -d
docker compose ps
docker compose logs --tail=200
The documented project layout can include certs, config, and data directories alongside compose.yml and .env. The configuration directory can contain config.yml, middleware files, and provider files. Metrics data, including uptime and system information, can reside below the data directory. Certificate files shown in the documented layout include cert.crt and priv.key.
The project documents cloning the repository, using Go 1.22 or newer, installing Shadowtree, running shadowtree mod-tidy, and building with shadowtree build. Because the supplied project evidence does not include a complete Shadowtree installation procedure or the resulting binary deployment steps, this guide does not present source compilation as a drop-in replacement for the documented Compose workflow.
Configure the hostname, listener, and WebUI
The project's documented WebUI example is https://godoxy.yourdomain.com. Replace that placeholder with a hostname under your own domain. Do not assume that GoDoxy uses a particular numeric port. The official evidence supplied for this guide does not establish a universal WebUI port, and the project instructs users to change listening ports through .env.
Determine the actual listening port
Use three views together:
- Inspect
.envfor the deployment's selected listening settings. - Run
docker compose configto see the resolved service configuration. - Inspect listening sockets on the Linux host after GoDoxy starts.
docker compose config
sudo ss -lntup
The socket list shows numeric addresses and ports currently bound on the host. Match the listener with the GoDoxy process and its log output. Do not choose a port merely because it looks familiar. Host networking means the service binds on the Linux host's network stack.
Configure wildcard DNS where appropriate
GoDoxy uses hostnames to identify routes. Its quick start recommends wildcard DNS pointing to the machine running GoDoxy. If a container has the label proxy.aliases: qbt, the documented behavior allows an application to be addressed through a hostname such as qbt.domain.com. When proxy.aliases is not set, GoDoxy defaults to the Compose container_name value for this purpose.
Wildcard DNS makes multiple application subdomains resolve to one reverse proxy, but it does not itself create a GoDoxy route, issue a certificate, authenticate a user, or open a network path. Those remain separate configuration and security tasks.
Open the WebUI using its intended hostname
Once DNS, the listener, and certificate handling are ready, browse to the hostname you configured, following the project's documented pattern:
https://godoxy.yourdomain.com
Use your real domain in place of yourdomain.com. If you selected a nonstandard HTTPS port in .env, include that actual port in the URL. The exact value must come from your deployment.
GoDoxy's available features include route and configuration management, container controls, logs, metrics, uptime data, access logging, periodic summaries, custom error pages, HTTP middlewares, OpenID Connect SSO, ForwardAuth, and IP or CIDR access controls. Configure only the integrations you need and follow least privilege when assigning access to administrative functions.
Verify GoDoxy locally before adding a tunnel
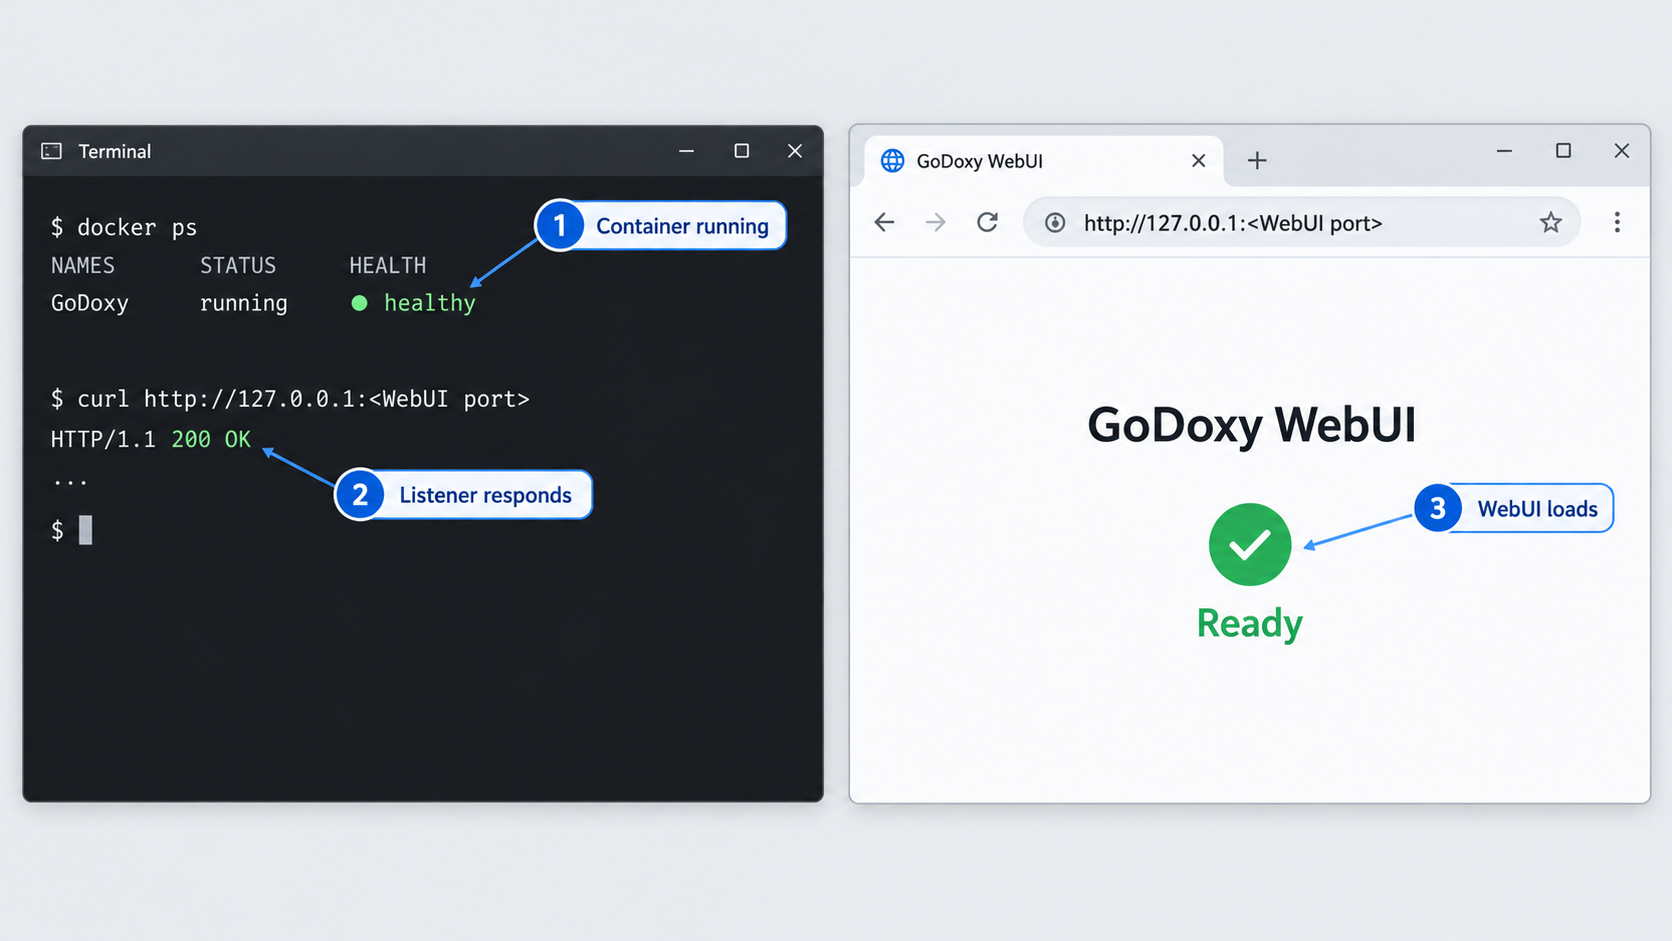
Local verification should prove four separate facts: the container remains healthy enough to run, GoDoxy is listening on the intended interface and port, the configured hostname reaches the server, and the WebUI returns the expected response for that hostname.
Check container state
cd ~/godoxy
docker compose ps
If the service is stopped, restarting repeatedly is unlikely to reveal the root cause. Inspect the logs instead:
docker compose logs --tail=300Look for malformed configuration, unavailable files, certificate-provider problems, bind failures, permission errors, or inability to communicate with the container runtime. Do not paste complete logs into a public location until you have removed hostnames, internal addresses, credentials, and tokens.
Confirm the socket
sudo ss -lntupCheck whether the expected port is listening on an address reachable by the client that will run Localtonet. A listener bound only to a loopback address can be reached by a Localtonet client on the same host, but not necessarily by a client running on another LAN device. A wildcard or LAN-address listener may be reachable from other devices, subject to host firewall and network policy.
Check DNS resolution
getent hosts godoxy.yourdomain.comReplace the example with your actual WebUI hostname. Confirm that the result points to the intended address from the perspective of the machine performing the test. Split DNS can legitimately return different internal and external answers, so perform the test from the same network path that matters for the next step.
Test the HTTPS response
curl -v https://godoxy.yourdomain.com/This test exercises DNS, TCP connectivity, TLS negotiation, hostname validation, and the HTTP response. If your chosen configuration uses a nonstandard port, append the real port to the URL. Avoid disabling certificate verification as a permanent workaround. A temporary diagnostic test can distinguish certificate validation from basic connectivity, but the finished deployment should use a certificate and hostname relationship that clients can validate.
A response obtained only by suppressing TLS validation does not prove that the final browser or tunnel path is correctly secured. Check the certificate's hostname, issuing chain, validity period, and the hostname sent to GoDoxy.
Routine GoDoxy operations and configuration care
Keep routine administration simple and predictable by running Compose commands from the deployment directory. Record local changes to .env, compose.yml, route files, middleware files, and provider configuration. Back up configuration and persistent data before replacing images or adopting a newer project release.
View current status
cd ~/godoxy
docker compose ps
docker compose logs --tail=200
Follow logs during a change
docker compose logs -f
Stop log following with Ctrl+C. This does not stop the running service.
Apply reviewed Compose configuration
docker compose config
docker compose up -d
Rendering the configuration first helps identify substitution or syntax problems before recreation. GoDoxy supports hot reloading for configuration and container-state changes, but the exact behavior depends on what you changed. Confirm the result through logs and an actual request instead of assuming every setting can be applied without service recreation.
Restart the Compose service
docker compose restartUse a restart when it is operationally appropriate, then repeat the status, socket, and HTTP checks. A restart does not correct invalid configuration.
Stop the deployment
docker compose downThis stops and removes the Compose-managed containers and networks associated with the project. Review your Compose file and backup policy before using additional removal flags. This guide does not recommend deleting volumes or persistent directories as part of routine shutdown.
Connect the verified GoDoxy WebUI through Localtonet
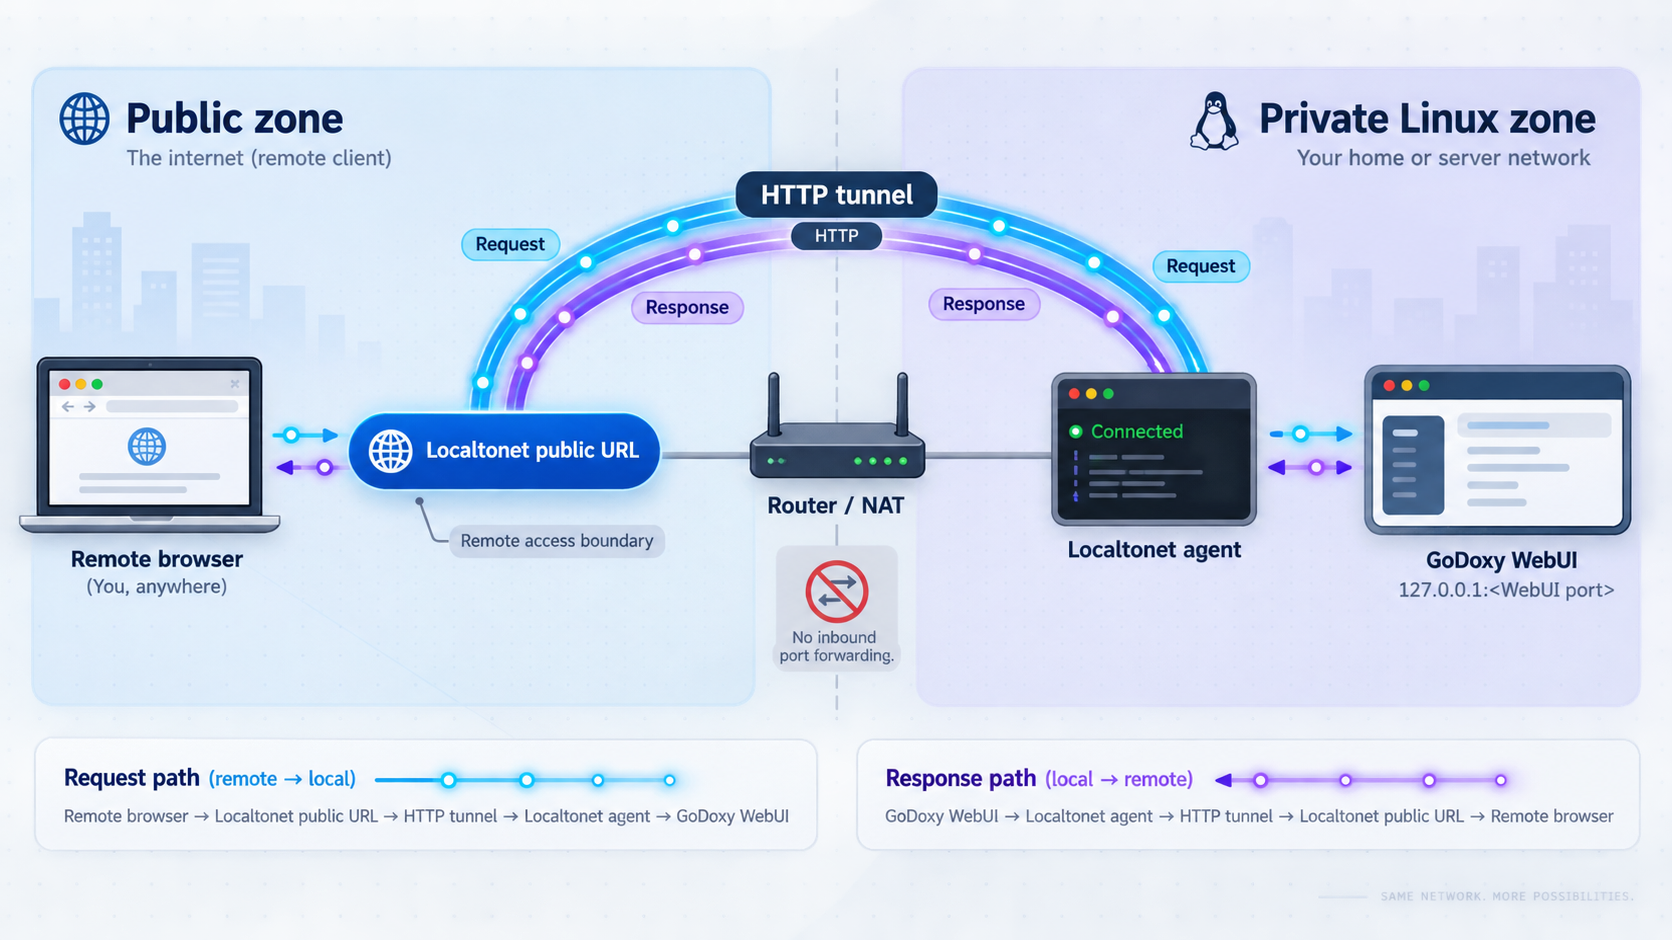
Start this section only after the local HTTPS request succeeds with the intended hostname. With Localtonet, the client device establishes an outbound connection to our relay platform. The resulting tunnel remains available only while the selected device is connected and the tunnel is running.
An HTTP-family tunnel is appropriate for browser-based access to the WebUI. GoDoxy also supports TCP and UDP services, but those require matching Localtonet tunnel types and are outside this WebUI-focused workflow. Do not use an HTTP tunnel for arbitrary non-HTTP traffic.
Install and run the Localtonet client
Install our current client on the GoDoxy host or another device that can reach the verified listener. Client installation details can vary by operating system and release, so obtain the current package and instructions from the Localtonet dashboard or documentation rather than reusing an unverified command.
Authenticate or select the client device
Use the device-specific authentication token provided through your account workflow. Never copy the token into this article, a public repository, a screenshot, or a shared log. Confirm that the intended device appears connected before creating the tunnel.
Select an available relay server
Choose a currently available server or region in the dashboard. Available values can vary, so do not hardcode a server code copied from another deployment.
Create the matching HTTP or HTTPS configuration
Enter the local IP address and the actual GoDoxy listening port discovered earlier. Match the local protocol to the working listener. If the verified WebUI endpoint uses HTTPS, do not silently treat it as plain HTTP. Use the current dashboard options and the Localtonet HTTP tunnel documentation to confirm the available HTTP or HTTPS target behavior.
Start the tunnel and test its assigned address
Creating a tunnel does not start it. Press Start, wait for it to run, and test the assigned public URL. Stop or delete the tunnel when it is no longer required.
Select the correct local target
If the Localtonet client runs on the GoDoxy host, the local target may be a loopback or host address that reaches the verified listener. If the client runs on another device, use an address reachable from that device and confirm the host firewall permits the local connection. Never assume that localhost on one machine refers to another machine.
The port must come from your GoDoxy configuration and socket inspection. The available evidence does not establish one numeric WebUI port that is safe to publish as a universal default.
Account for GoDoxy hostname routing
This is the most important integration detail. GoDoxy normally routes requests according to a hostname such as godoxy.yourdomain.com. A generated Localtonet public URL has its own hostname. Whether a request reaches the intended GoDoxy route depends on the host information delivered to the local service and, for HTTPS upstream connections, the TLS server name and certificate expected by that service.
The supplied Localtonet product facts do not establish a universal host-header or TLS server-name rewrite setting, so this guide does not claim that a generated public hostname will automatically match a GoDoxy virtual host. Test the assigned URL. If GoDoxy returns a default route, an unknown-host response, a certificate error, or another unexpected result, do not weaken TLS validation or expose a catch-all administrative route as a shortcut.
HTTP and File Server tunnels can use a generated subdomain, a selected subdomain where supported, or a custom domain. Exact custom-domain DNS requirements must be checked against the current dashboard and documentation before changing records. A custom hostname aligned with the GoDoxy route may be useful, but its DNS and certificate behavior must be verified for the actual configuration rather than inferred.
Test the entire chain from an external browser. A successful local request to godoxy.yourdomain.com proves GoDoxy works locally, while a successful request to the Localtonet URL proves that the public hostname, tunnel protocol, local target, GoDoxy routing, and TLS expectations are compatible.
Verify from outside the local network
Use a separate internet connection, such as a device not connected to the same LAN, and open the assigned public URL. Confirm all of the following:
- The request reaches the intended GoDoxy WebUI rather than a default or unrelated route.
- The browser does not report a certificate or hostname error.
- Authentication and access-control rules are enforced.
- Administrative actions are not available to anonymous users unless that exposure is explicitly intended.
- Stopping the Localtonet tunnel removes the public route as expected.
Security guidance for a remotely accessible WebUI
Publishing an administrative interface increases its reachable audience. The absence of inbound router port forwarding does not make the application public-access risk disappear. It changes how traffic reaches the service. Authentication, authorization, application updates, certificate validation, logging, and careful route selection remain necessary.
A public URL is a network route, not a substitute for application authentication. Apply least privilege and expose only the interface required for the intended users. Do not use a tunnel to evade an organization's security policies or access controls.
Troubleshooting GoDoxy and Localtonet connectivity
The container exits or repeatedly restarts
Run docker compose ps and inspect recent logs. Re-render the Compose configuration with docker compose config to catch missing environment substitutions or structural problems. Check that required files exist at the paths mounted by the Compose service and that Docker can read them.
The WebUI hostname does not resolve
Test the real hostname with getent hosts. Review its A or AAAA record and allow for DNS caching. For wildcard DNS, verify that the wildcard is placed under the correct zone and that a more specific record is not overriding it. DNS resolution only maps a hostname to an address, so continue by testing the socket and HTTPS response.
Nothing is listening on the expected port
Do not search for a guessed default. Inspect .env, run docker compose config, read the logs, and use ss -lntup. Because GoDoxy is intended to use host network mode, confirm that another process has not already claimed the configured host port.
The WebUI works on the server but not from another LAN device
Determine which address owns the listening socket. A loopback-only listener cannot be reached from another device. Also check the Linux firewall and routing between the client and server. If Localtonet runs on the same GoDoxy host, local reachability may still be sufficient, but verify that exact path rather than opening broader LAN access without need.
HTTPS reports a certificate error
Confirm that the browser is using the same hostname covered by the certificate. Check whether DNS points to the correct host and whether the request reaches the intended GoDoxy route. GoDoxy supports Let's Encrypt certificate management with DNS-01 providers, but provider-specific setup details are not established by the evidence supplied for this article. Follow the project's current documentation for the selected DNS provider rather than inventing credential fields.
The Localtonet tunnel is created but unavailable
Confirm that the selected Localtonet client device is connected and that the tunnel has been started. Creation and startup are separate lifecycle actions. Verify that the chosen device can reach the local target IP and port, then compare the configured protocol with the working local URL.
The Localtonet URL reaches the wrong GoDoxy route
This commonly indicates a hostname-routing mismatch. Compare the public hostname with the hostname configured for the GoDoxy WebUI. Review the response and GoDoxy access logs to determine which host information arrived. Do not solve this by making the management interface an unrestricted default route. Check current Localtonet custom-domain guidance and GoDoxy route configuration for a design in which the public hostname, local route, TLS name, and certificate agree.
The tunnel works locally but not from an external browser
Test whether the tunnel is still running and whether the selected client remains connected. Then check browser certificate messages, authentication responses, and GoDoxy logs. Test from a genuinely separate network to avoid confusing local DNS behavior with public access.
GoDoxy does not discover an application container
Confirm that GoDoxy can communicate with the relevant container runtime and can inspect the container. Review the container's name, labels, and port configuration. The project uses proxy.aliases for subdomain aliases and otherwise falls back to container_name. After correcting metadata, inspect the GoDoxy logs and WebUI to verify that the route appears.
Frequently asked questions
What is GoDoxy used for?
GoDoxy is a reverse proxy and container orchestrator for self-hosted environments. It can discover Docker and Podman containers, create and manage routes, proxy HTTP traffic, forward TCP or UDP traffic, manage certificates, enforce access rules, monitor systems, display logs and metrics, and manage supported containers through a WebUI.
Which Linux architectures does GoDoxy support?
The project documentation lists Linux amd64 and Linux arm64. This guide does not claim support for other operating systems or architectures.
What port does the GoDoxy WebUI use?
The evidence available for this guide does not establish a universal numeric WebUI port. GoDoxy directs administrators to change listening ports in .env. Inspect that file, run docker compose config, check logs, and inspect host sockets with ss -lntup to identify the actual port.
Should I change GoDoxy from host network mode to a bridged Docker network?
No. The project documentation states that GoDoxy is designed to run in host network mode and says not to change it. Adjust documented listening settings in .env instead of redesigning the network mode without project-specific guidance.
Does Localtonet require router port forwarding for GoDoxy?
No. Our client establishes an outbound connection to a Localtonet relay server, so this workflow does not require inbound router port forwarding, a public IP address, firewall changes for unsolicited inbound internet traffic, or a VPN setup. The local service must still be reachable from the device running the Localtonet client.
Is creating a Localtonet tunnel enough to make it active?
No. Creating and starting a tunnel are separate lifecycle actions. Select the connected device and an available relay, create the appropriate configuration, and then press Start. The tunnel remains available only while the selected client is connected and the tunnel is running.
Will a generated Localtonet hostname automatically match a GoDoxy route?
Do not assume so. GoDoxy commonly selects routes by hostname, while a generated Localtonet URL has its own hostname. The supplied product facts do not establish universal host-header or TLS server-name rewriting behavior. Test the public URL and align DNS, route names, TLS expectations, and certificates using the currently documented options.
Can I expose GoDoxy TCP or UDP routes through the same HTTP tunnel?
An HTTP tunnel is intended for HTTP-family traffic such as the WebUI. Raw TCP or UDP services require an appropriate Localtonet TCP, UDP, or combined UDP/TCP tunnel configuration. Select the tunnel type that matches the application protocol rather than sending arbitrary traffic through an HTTP tunnel.
Connect your verified GoDoxy WebUI with Localtonet
Finish the local installation and hostname checks first, then use our outbound tunnel workflow to provide controlled remote access without opening an inbound router port. Protect the WebUI with appropriate authentication and stop the tunnel whenever public access is not required.
Get Started Free →

