

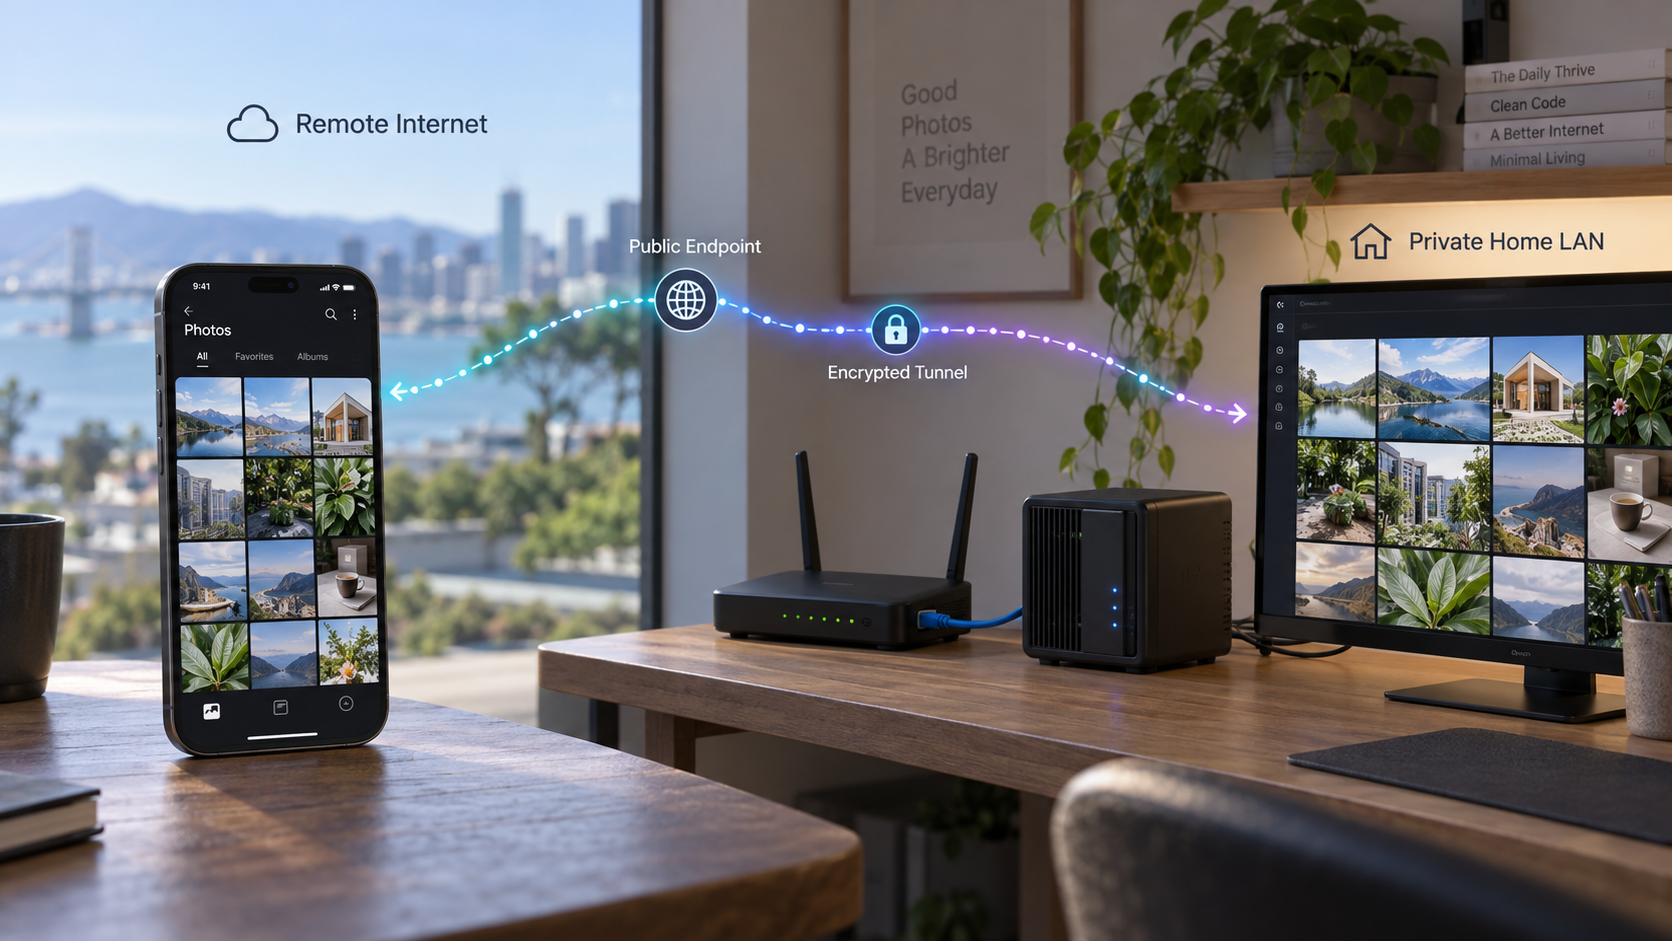
Build a private photo library first, verify it locally, then add controlled remote access
Immich is a self-hosted photo and video management platform with web and mobile access, automatic mobile backup, albums, search, sharing, maps, facial recognition, and multi-user support. This guide explains how to plan an Immich deployment, follow its current official installation workflow, verify the resulting local service, and operate it responsibly. Once the local installation works, we show how to publish its web endpoint through a Localtonet HTTP tunnel without configuring inbound router port forwarding, changing firewall rules, setting up a VPN, or requiring a public IP address.
📋 What's in this guide
Understand the Immich and Localtonet architecture
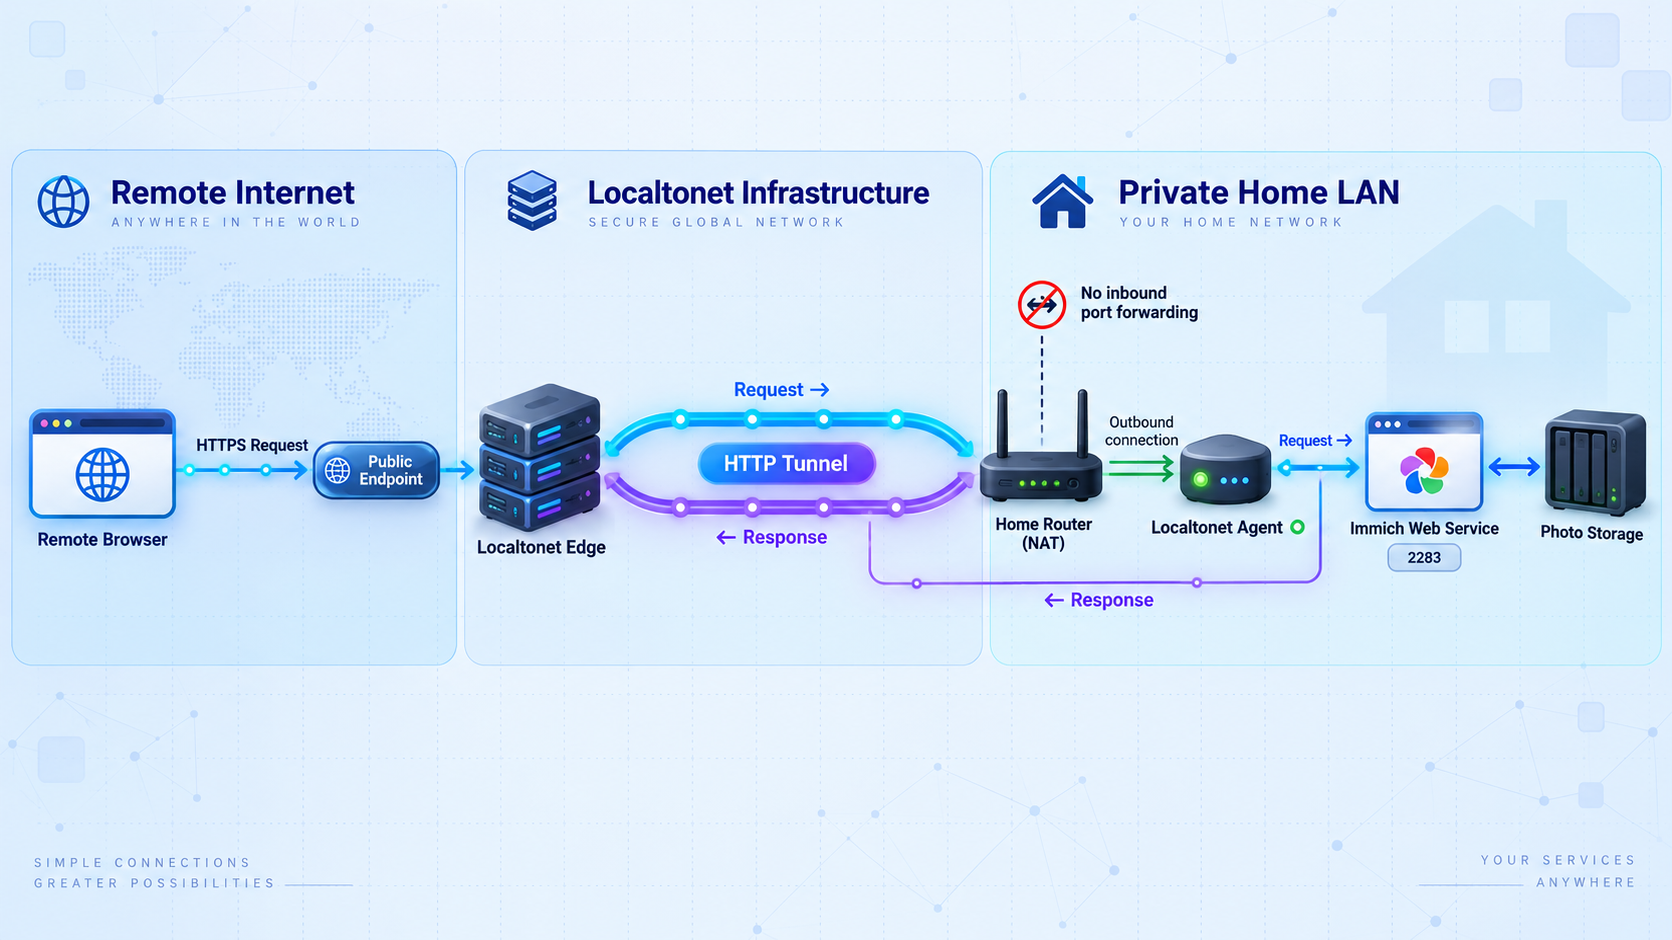
A reliable self-hosted deployment begins with a clear separation between the application and the remote-access layer. Immich runs on a host you control and provides the photo and video management service. Its web interface and API listen on a local address selected by the installation or by your configuration. Localtonet does not install Immich, store its application database, or replace its authentication. Our role begins after the Immich endpoint is running and reachable from the device on which the Localtonet client operates.
This separation matters during both setup and troubleshooting. If Immich cannot be opened from the local network, creating a tunnel will not repair the application. If Immich works locally but not through the public address, the investigation should focus on the tunnel target, client connectivity, tunnel state, or application behavior under remote access. Keeping these layers distinct prevents a networking symptom from being mistaken for an installation failure.
Immich supports both web and mobile experiences, but they use the same underlying server deployment. The project documents capabilities such as multi-user support, duplicate prevention, raw-format support, LivePhoto and MotionPhoto handling, public sharing, partner sharing, read-only galleries, tags, folder views, API keys, and OAuth. Which features you enable should reflect who will use the server and how much remote access they require.
The supplied Immich project evidence identifies the current official installation resource, but it does not establish a specific deployment command, operating-system matrix, local port, local URL, file path, environment-variable set, or default credential. Those details can change between releases and installation methods. Use the current Immich installation requirements and the values generated or selected during your own deployment rather than copying an unverified command or assuming a fixed endpoint.
Prepare the host, storage, and access plan
Before installing anything, decide where the application and its media will live. A photo library is not a disposable test service. It can become the primary interface through which a family or team browses years of irreplaceable content. Storage capacity, recovery procedures, account ownership, and update planning therefore deserve attention before remote access is considered.
Choose a suitable Immich host
Select a machine that can remain available whenever users need the library. It must satisfy the requirements in the current official Immich documentation for your chosen installation method. Confirm the host architecture, supported software versions, required runtime or container tooling, memory, storage, and any acceleration requirements directly against the documentation for the Immich release you intend to run.
Do not infer compatibility from the mere presence of source files in the repository. The repository contains server, web, mobile, machine-learning, deployment, and Docker-related code, but that does not prove that every host platform or deployment arrangement is supported. A production deployment should follow a documented installation path rather than an improvised build assembled from repository directories.
Plan media and application data separately
Identify every category of persistent data created by the selected installation. At a minimum, your recovery plan must account for the original media and whatever application state is required to reconstruct the library correctly. Do not assume that copying only the visible photo directory is a complete application backup. Likewise, do not assume that a snapshot of application state contains all original media.
The Immich project explicitly recommends a 3-2-1 backup plan for precious photos and videos. In practical terms, maintain three copies of important data, use two different storage types or failure domains, and keep one copy off-site. A synchronized copy is useful, but synchronization alone may reproduce accidental deletion or corruption. Include versioned or historical backups where possible, and test restoration instead of treating a successful backup job as proof of recoverability.
Decide who will connect
Immich supports multiple users, administrative functions in its web interface, OAuth, API keys, shared albums, partner sharing, and public sharing. Decide whether the server is for one person, a household, or a larger group. Create only the accounts and integrations that are required. Administrative access should be more restricted than ordinary browsing or upload access.
If mobile backup is part of the plan, remember that a phone needs a server endpoint it can reach. Test mobile connectivity only after local browser access succeeds. This ordering gives you a known-good application endpoint before another client, network path, or authentication flow is introduced.
| Preparation area | Decision to make | What to record |
|---|---|---|
| Host | Select a machine that meets the current official requirements. | Operating environment, architecture, installed dependencies, and maintenance owner. |
| Storage | Choose where media and persistent application data will reside. | Paths or volumes, capacity, permissions, monitoring, and expected growth. |
| Backups | Design a 3-2-1 backup and restoration process. | Backup scope, destination, schedule, retention, encryption, and last restore test. |
| Users | Determine who needs standard, administrative, sharing, or integration access. | Account owner, role, recovery method, and whether the account remains necessary. |
| Local network | Decide whether Immich should be reachable only on the host or elsewhere on the LAN. | The actual local IP or hostname, port, protocol, and listening scope. |
| Remote access | Decide whether a Localtonet HTTP tunnel is needed. | The Localtonet client device, local target, selected relay, and tunnel owner. |
A public URL makes the running service reachable. It does not create an independent copy of photos, application state, or configuration. Complete and test the backup plan separately from the Localtonet tunnel.
Install and configure Immich using the current official workflow
Begin at the official Immich installation requirements page at the current Immich installation requirements. Check those requirements before selecting an installation path. The project repository directs readers to the main Immich documentation for installation, and that documentation should remain authoritative for release-specific commands and supported deployment methods.
A safe installation process has five checkpoints: confirm requirements, select a documented deployment path, define persistent storage and configuration, start the complete application stack, and capture the resulting endpoint. These are checkpoints rather than replacements for the release-specific official instructions. The supplied evidence does not contain enough verified detail to reproduce exact commands or configuration files safely, so this draft does not invent them.
1. Confirm release-specific requirements
Review the requirements for the exact release and deployment method you will use. Confirm that the host has the required software, resources, storage, and permissions. If the documentation offers multiple installation paths, choose one and remain within that path. Combining fragments from different deployment methods can produce inconsistent configuration, missing services, or unsupported upgrades.
Record the application version you install. The supplied project evidence includes release activity, but an individual release page is not a permanent recommendation to install that version. A newer stable release may be available when you perform the installation. Check release notes for migrations, changed variables, storage guidance, and known issues before installation or upgrade.
2. Define persistent storage before startup
Configure storage exactly as required by the selected installation method. Ensure the service account or runtime can read and write the necessary locations. Place important persistent data on storage that is included in your backup process. If removable, networked, or externally mounted storage is involved, verify that it is mounted before the Immich services start.
Avoid moving directories or changing mount points casually after importing a large library. If a future migration is necessary, stop writes, back up the deployment, follow the current migration documentation, and verify the result before deleting the original data.
3. Complete the documented configuration
Use the configuration names, required values, secrets, and paths from the official instructions for your installation method. Generate unique credentials where the documentation requires them. Do not reuse an Immich password as a database password, API key, device token, or Localtonet token. Store secrets outside screenshots, public repositories, shell histories, and support messages.
The project supports capabilities such as OAuth and API keys, but their availability does not mean they should be enabled without a concrete use case. Complete a minimal authenticated deployment first. Add integrations one at a time so that any resulting problem has a narrow cause.
4. Start the complete application deployment
Start all components required by the documented installation path. A web page that partially loads is not sufficient evidence that the entire system is healthy. Check the installation's status and logs using the documented tools for that deployment. Look for repeated restarts, storage permission failures, unavailable dependencies, migration errors, and exhausted disk space.
5. Record the actual local endpoint
When startup succeeds, record the exact address used to open Immich locally. This is the value that later informs the Localtonet tunnel target. Record all four relevant properties: protocol, hostname or IP address, port, and whether that address is reachable from the machine that will run the Localtonet client.
Do not assume a port from a tutorial written for another release. The correct local target is the endpoint produced by your completed installation. If the Localtonet client runs on the Immich host, a loopback target may be appropriate if Immich listens there. If the client runs on another LAN device, the Immich service must be reachable from that device using a LAN address. Test this directly before configuring the tunnel.
Public project demonstrations may publish a server endpoint and demonstration credentials so visitors can explore a disposable demo. Those credentials are not defaults for a private installation and must never be copied into a self-hosted deployment.
Verify the Immich service on the local network
Local verification establishes a baseline. Perform it before installing or configuring remote-access components. Open the recorded endpoint from the Immich host or another authorized LAN device, depending on the listening scope you selected.
Confirm the web interface loads completely
A successful test should produce more than an initial HTML page. Confirm that navigation works, static assets load, authentication completes, and the interface does not remain stuck in a loading state. Browser developer tools can help identify failed requests, but application logs are usually more useful when a backend dependency or permission problem exists.
Create and secure the initial accounts
Complete the official first-run process shown by your installed Immich version. Use unique passwords and protect administrative credentials. Do not make the application remotely reachable while it is waiting for initial account creation or while a temporary password is still in use.
Test a small upload and retrieval cycle
Upload a small, non-sensitive test photo or video through the supported interface. Confirm that it appears in the library, opens correctly, and remains available after an application restart. Review the metadata view if relevant. Delete the test asset only after confirming that the basic write and read path behaves as expected.
This test validates more than networking. It can reveal incorrect storage permissions, unavailable persistent mounts, processing failures, or a deployment that appeared healthy only because no write had been attempted.
Verify the intended features incrementally
If you intend to use albums, shared albums, search, maps, facial recognition, raw files, motion photos, public sharing, partner sharing, or mobile backup, test them one at a time with non-critical content. Some features involve additional processing or application components. A successful login does not automatically prove that every optional workflow is operating correctly.
Restart and retest
Restart the deployment using the supported controls for your installation method. Confirm that all required services return, the endpoint remains correct, accounts still work, and previously uploaded test media is present. This catches non-persistent configuration and missing startup dependencies before real data is imported.
From the exact machine that will run the Localtonet client, open the Immich local endpoint in a browser. If that machine cannot reach Immich directly, correct local routing, listening, or host configuration first. The tunnel target must be reachable from the client device.
Publish the verified Immich endpoint with a Localtonet HTTP tunnel
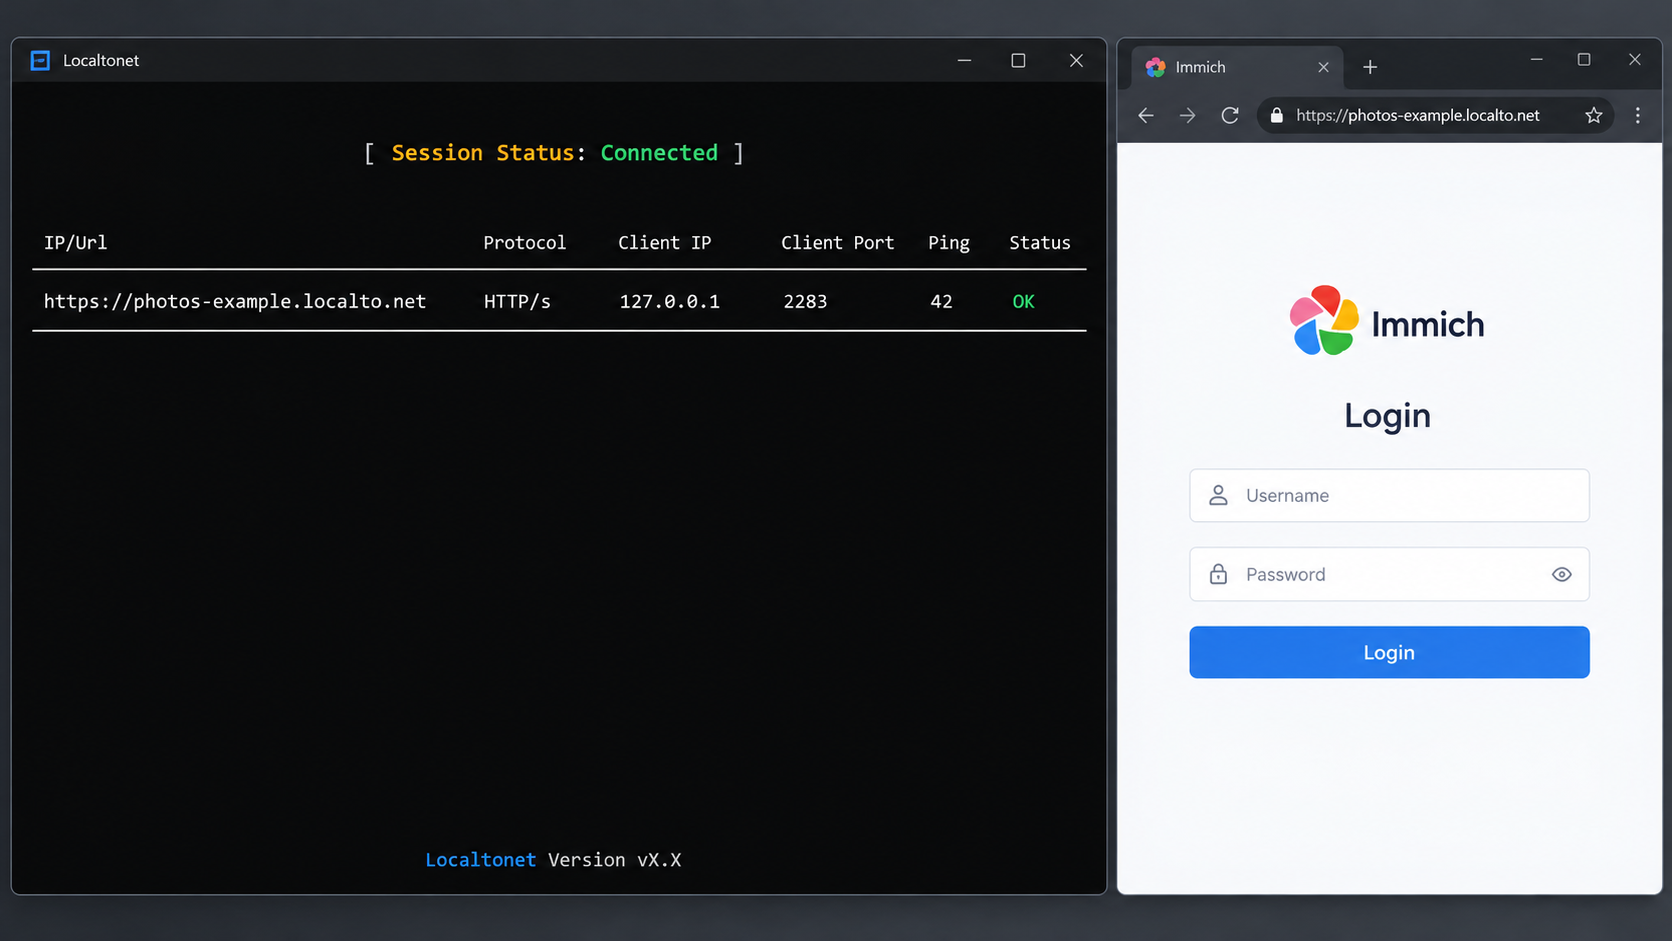
Once Immich works locally, an HTTP tunnel is the appropriate Localtonet family for its web service. The client on your selected device creates an outbound connection to our relay server, and the tunnel provides a public URL. This means you do not need inbound router port forwarding, firewall changes, VPN setup, or a public IP address for this workflow.
The Localtonet client can run on the Immich host or another device that can reach the Immich endpoint. Running it elsewhere does not remove the reachability requirement. That device must be able to connect to the configured local IP address and port continuously whenever remote access is expected.
Install and run the Localtonet client
Install our client on the Immich host or on another device that can reach the verified local Immich endpoint. Keep the client running for as long as remote access is required. Use the current Localtonet installation flow for the operating system on that device.
Authenticate and select the client device
Use the device-specific Localtonet authentication token through the supported client workflow, then select that device for the tunnel. Treat the token as a secret. Do not place it in screenshots, public configuration examples, source control, or shared support logs.
Select an available relay server
Choose a currently available server or region from the Localtonet dashboard. Availability can vary, so use the values displayed in the current product rather than copying a server code from an old article.
Create an HTTP tunnel to the local Immich endpoint
Create the HTTP configuration and enter the local IP address and port that you verified from the Localtonet client device. Choose the appropriate Process Type: Random Sub Domain, Custom Sub Domain, or Custom Domain. These Process Types serve the same local content at a public HTTPS address. Check the current documentation before configuring custom-domain DNS because exact DNS requirements are not established in the supplied evidence.
Start the tunnel
Press Start after reviewing the local target. Creating a tunnel does not mean it is running. The selected device must also be connected to Localtonet. Wait until the dashboard reports the applicable connected or running state before testing the public address.
Test the assigned public URL and manage its lifecycle
Open the assigned URL in a private browser session and sign in with a non-administrative account when possible. Test ordinary browsing before mobile backup or sharing. Stop the tunnel when remote access is not needed, or delete it when the configuration is no longer required.
The public test should cover authentication, thumbnail loading, viewing an asset, and a small upload if remote uploads are part of the intended workflow. Test from a network outside the home or office LAN so the request actually uses the public path. A phone with Wi-Fi temporarily disabled can provide such a test, subject to mobile data policies.
If the Immich mobile application asks for a server endpoint, use the public tunnel URL only after browser testing succeeds. Enter the assigned address exactly as shown. Do not use demonstration credentials or assume that an endpoint from another deployment applies to yours.
The tunnel removes the need for inbound router configuration, but it does not make an unauthenticated application safe. Finish Immich account setup, use strong unique credentials, remove unnecessary accounts and API keys, apply least privilege, and keep the application updated before enabling persistent remote access.
For the current product workflow, consult our Localtonet HTTP tunnel documentation. Use it to confirm current dashboard fields and options, especially if the interface has changed since this article was reviewed.
Secure the photo library before regular remote use
Personal photos often reveal faces, homes, travel patterns, documents, location metadata, and relationships. A photo service should therefore be handled as sensitive infrastructure rather than as an ordinary test page. Security depends on several layers working together: the host, Immich, user accounts, backups, integrations, and the tunnel lifecycle.
Keep authentication enabled and complete
Ensure every remote user has an individual account where the application workflow supports it. Avoid shared administrative credentials. Reserve administrative access for maintenance and use ordinary accounts for daily browsing or uploads. Remove accounts promptly when they are no longer needed.
If you configure OAuth, verify redirect behavior and account mapping using current Immich guidance. OAuth support is documented as an Immich feature, but secure provider configuration is deployment-specific. Do not enable it using guessed callback addresses or broad access scopes.
Protect API keys and device tokens
Immich supports API keys for integrations. Localtonet uses device-specific authentication tokens to identify client devices. These are different secrets with different purposes. Never use one in place of the other, and do not expose either in browser screenshots, public repositories, container definitions committed to source control, or troubleshooting posts.
Limit unnecessary sharing
Immich supports shared albums, partner sharing, public sharing, and read-only galleries. Review these features independently of the tunnel. A public tunnel may be necessary for an intended recipient to reach a share, but the tunnel does not define who can access that content inside Immich. Audit old public shares and disable those that are no longer required.
Patch with a rollback plan
Review current release notes before upgrades. Back up the relevant data, record the running version, and understand whether a migration is involved. Apply updates through the documented process for your installation method. After an upgrade, verify local login, media access, upload, processing, and remote access in that order.
Minimize tunnel availability
The public URL remains useful only while the selected Localtonet client is connected and the tunnel is running. For an always-available family library, monitor both services and maintain the host. For occasional remote access, stop the tunnel when it is not required. Delete obsolete tunnels rather than leaving unclear configurations in the dashboard.
| Control | Protects against | Recommended practice |
|---|---|---|
| Unique user credentials | Credential reuse and loss of accountability | Give each user an appropriate account and avoid daily use of an administrator account. |
| Protected API keys and tokens | Unauthorized integrations or tunnel control | Store secrets privately, rotate them when exposure is suspected, and remove unused credentials. |
| Current software | Known application and dependency issues | Review release notes, back up first, update through the supported method, and verify afterward. |
| Restricted sharing | Unintended access to albums or individual assets | Review public and partner-sharing settings and remove stale shares. |
| Controlled tunnel lifecycle | Unnecessary internet availability | Start the tunnel only when intended and stop or delete obsolete configurations. |
| Tested backups | Disk failure, deletion, corruption, and failed upgrades | Follow a 3-2-1 plan and perform documented restoration tests. |
Operate, monitor, update, and back up the deployment
A self-hosted photo library needs routine care after the first successful login. Create a short runbook that records the installed Immich version, chosen deployment method, local endpoint, persistent storage locations, backup scope, restoration procedure, Localtonet client device, and tunnel owner. Do not include raw passwords, API keys, or device tokens in a broadly shared runbook.
Monitor capacity and health
Photo and video libraries grow continuously. Monitor free space on every filesystem used by the deployment, not only the media destination. Application state, generated assets, logs, and temporary processing data can consume capacity as well. Investigate repeated restarts, processing backlogs, failed uploads, permission errors, and sudden changes in storage growth.
Back up before high-risk changes
Perform a backup before upgrades, storage migrations, bulk imports, account restructuring, or major integration changes. Confirm that the backup completed and that its destination is accessible. Periodically restore into a controlled environment using the current official recovery process. A backup that has never been restored remains an assumption.
Test both local and remote paths after maintenance
After restarting the host or updating Immich, verify the local endpoint first. Then confirm that the Localtonet client has reconnected and that the tunnel is running. Finally, test the public URL. This order isolates application startup from tunnel startup and makes failures easier to diagnose.
Use a small test set before large imports
Before importing an entire archive, test representative file types and sizes that matter to you. Immich documents support for photos, videos, raw formats, LivePhoto or MotionPhoto content, metadata views, and other advanced capabilities, but your workflow may include unusual files or metadata. Verify the expected behavior while rollback is still simple.
Audit access periodically
Review active users, administrators, API keys, OAuth integrations, shared albums, public shares, and partner-sharing relationships. Separately review Localtonet devices and tunnels. These are independent control planes, so cleaning up an Immich user does not remove a Localtonet device, and stopping a tunnel does not revoke an Immich API key.
Troubleshoot installation, local access, and tunnel failures
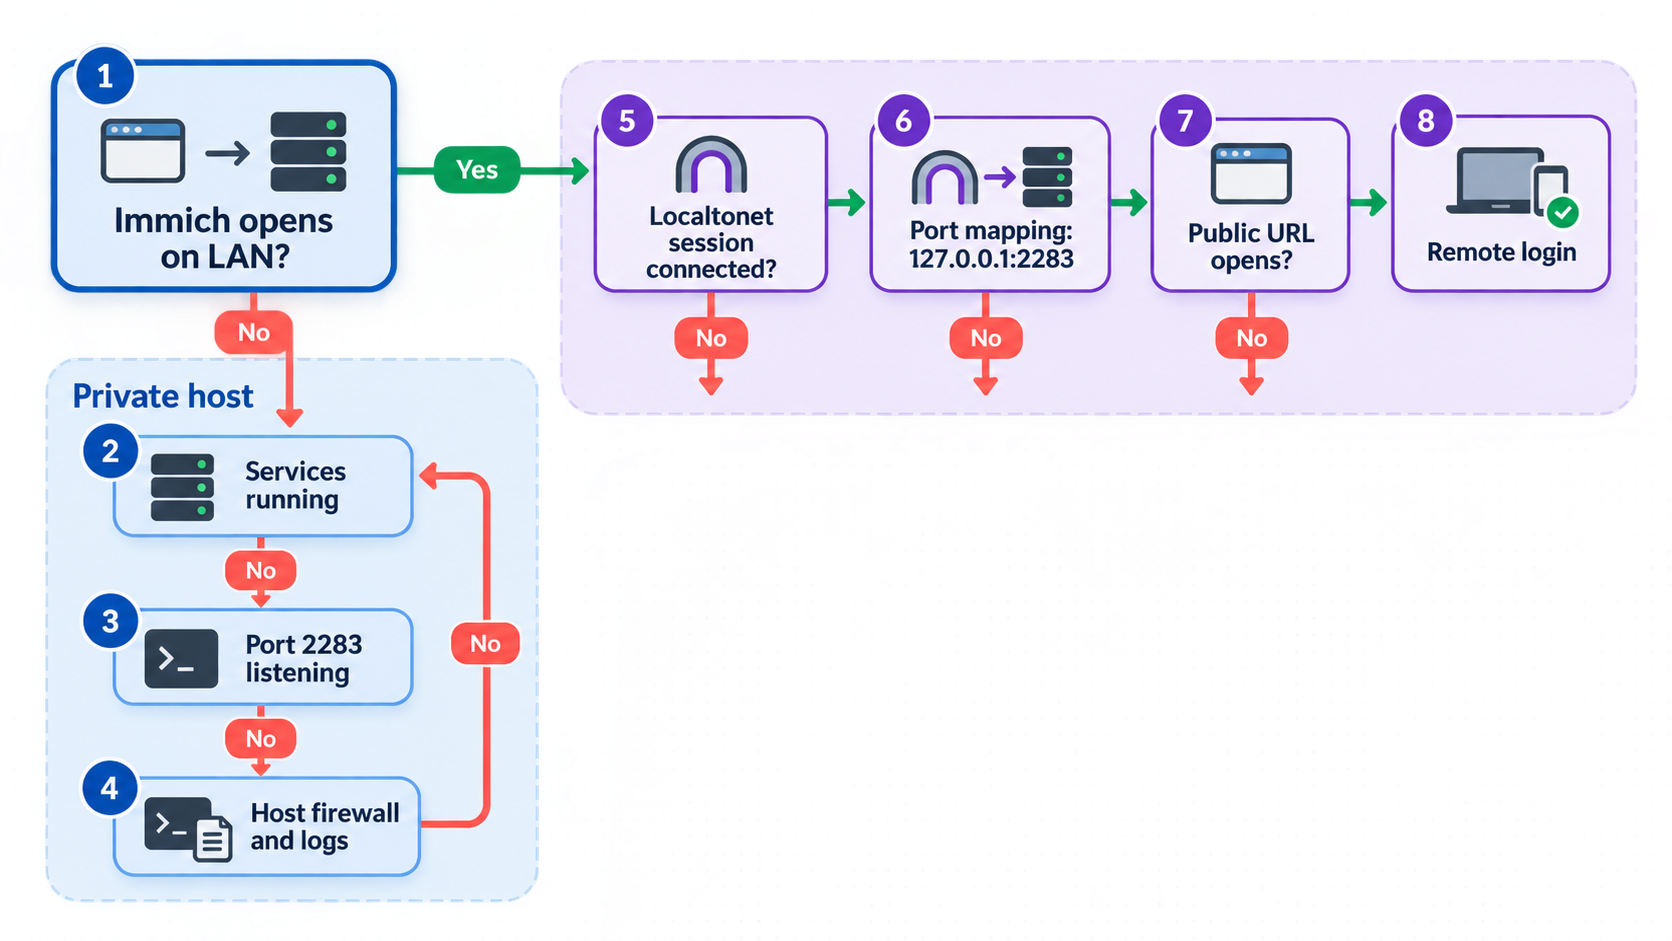
Troubleshooting is fastest when performed from the inside outward. Start with application health on the host, continue with LAN reachability from the Localtonet client, then inspect the client connection and tunnel state. Avoid changing several layers simultaneously.
The Immich page does not open locally
Confirm that the complete deployment is running according to the selected official installation method. Recheck the actual protocol, address, and port produced by your configuration. Inspect application logs for failed dependencies, migration problems, invalid configuration, unavailable storage, and permission errors. Verify that the host has sufficient free disk space.
Do not create or modify the tunnel yet. A Localtonet HTTP tunnel needs a reachable local target and cannot compensate for an application that is not listening.
Immich works on the host but not from the Localtonet client device
This usually indicates a local reachability or listening-scope issue. Confirm that the endpoint is not limited to a loopback address when the client runs on another machine. Test the host's LAN address from the client device. Review local network segmentation and host policy without disabling protections indiscriminately.
An alternative is to run the Localtonet client on the Immich host, provided that operating environment is supported by the current client installation options. The correct choice depends on your deployment and maintenance model.
The tunnel exists but the public URL does not work
Confirm that the selected Localtonet device is connected. Then verify that the tunnel has been started, because creation alone does not start it. Recheck the local IP address and port, and ensure that the same endpoint still works from the client device. Verify that the selected relay server is currently available in the dashboard.
The login page loads, but actions fail
A loading login page proves only partial connectivity. Test the same action locally. Check Immich logs while reproducing the failure, and inspect browser network errors for failed API requests. If the operation also fails locally, troubleshoot the application or storage layer. If it fails only remotely, compare the requested public address with the configured endpoint and review current Immich guidance for operation behind an external HTTPS address.
The mobile application cannot connect
First open the same public URL in the phone's browser while the phone is outside the LAN. If that fails, troubleshoot the tunnel rather than the app. If browser access succeeds, verify that the mobile application contains the exact server endpoint and that the account credentials are correct. Do not reuse the public demonstration endpoint shown by the Immich project.
Remote access stops after a restart
Check the layers in order: Immich services, local endpoint, Localtonet client connection, and tunnel state. The application and client may have different startup behavior. Even when the tunnel configuration still exists, it is unavailable unless the selected device is connected and the tunnel is running.
Uploads fail or media disappears after restart
Stop large imports and investigate persistent storage immediately. Confirm that the expected volume or filesystem is mounted and writable. Compare the current configuration with the recorded deployment layout. Do not delete apparently duplicated data until you understand which location is authoritative and have a verified backup.
Verify Immich on the host, verify it from the Localtonet client device, confirm the client is connected, confirm the tunnel is running, and only then test the public URL. This sequence identifies the failing layer without guesswork.
Frequently asked questions
What local Immich port should I enter in Localtonet?
Enter the port used by your completed and verified Immich installation. The supplied project evidence does not establish a universal port or local URL, so this guide does not guess one. Open Immich from the Localtonet client device first, then use that endpoint's local IP address and port as the HTTP tunnel target.
Does Localtonet install or configure Immich?
No. Install and verify Immich using its current official documentation. With Localtonet, you publish the already working web endpoint through an HTTP tunnel. Keeping these stages separate makes setup and troubleshooting safer.
Do I need router port forwarding or a public IP address?
No. The Localtonet client establishes an outbound connection to our relay server, so this workflow does not require inbound router port forwarding, firewall changes, VPN setup, or a public IP address.
Does the HTTP tunnel replace Immich authentication?
No. The tunnel provides network reachability to the configured endpoint. Immich remains responsible for user authentication, administrative access, OAuth, API keys, sharing, and application permissions. Complete and test authentication before starting the tunnel.
Can I use the Localtonet public URL in the Immich mobile app?
Use the assigned public URL as the mobile server endpoint only after it works in a browser outside your LAN. Enter the address exactly as assigned and use your own Immich account. Mobile access remains dependent on the Immich service, the Localtonet client connection, and the running tunnel.
Must the Localtonet client run on the Immich server?
Not necessarily. It can run on the Immich host or another device that can reach the local Immich endpoint. If it runs elsewhere, verify the endpoint from that device before creating the tunnel. A loopback-only service on the Immich host will not be reachable from another LAN device.
Is the tunnel available immediately after I create it?
No. Creating the configuration does not start it. The selected Localtonet device must be connected, and you must press Start for the tunnel. It remains available only while the required client connection and tunnel are running.
Is a Localtonet tunnel a replacement for photo backups?
No. It provides connectivity and does not create a copy of your media or application state. Follow the Immich project's recommendation to maintain a 3-2-1 backup plan, and test restoration independently of remote access.
Which Localtonet Process Type should I choose?
Random Sub Domain, Custom Sub Domain, and Custom Domain all serve the configured HTTP content at a public HTTPS address. A random subdomain is suitable when you do not need a specific name. Use a custom subdomain or custom domain only where currently supported and after confirming the applicable dashboard and DNS requirements.
Connect your verified Immich library with Localtonet
Finish the Immich installation, confirm uploads and authentication on the local network, and then create an HTTP tunnel to that known-good endpoint. Keep the client connected only for the access period you intend, and continue to manage accounts, updates, sharing, and backups within your self-hosted environment.
Get Started Free →

