

Run DevDocs locally with a loopback-only Docker port, verify the service, and publish it remotely only when needed
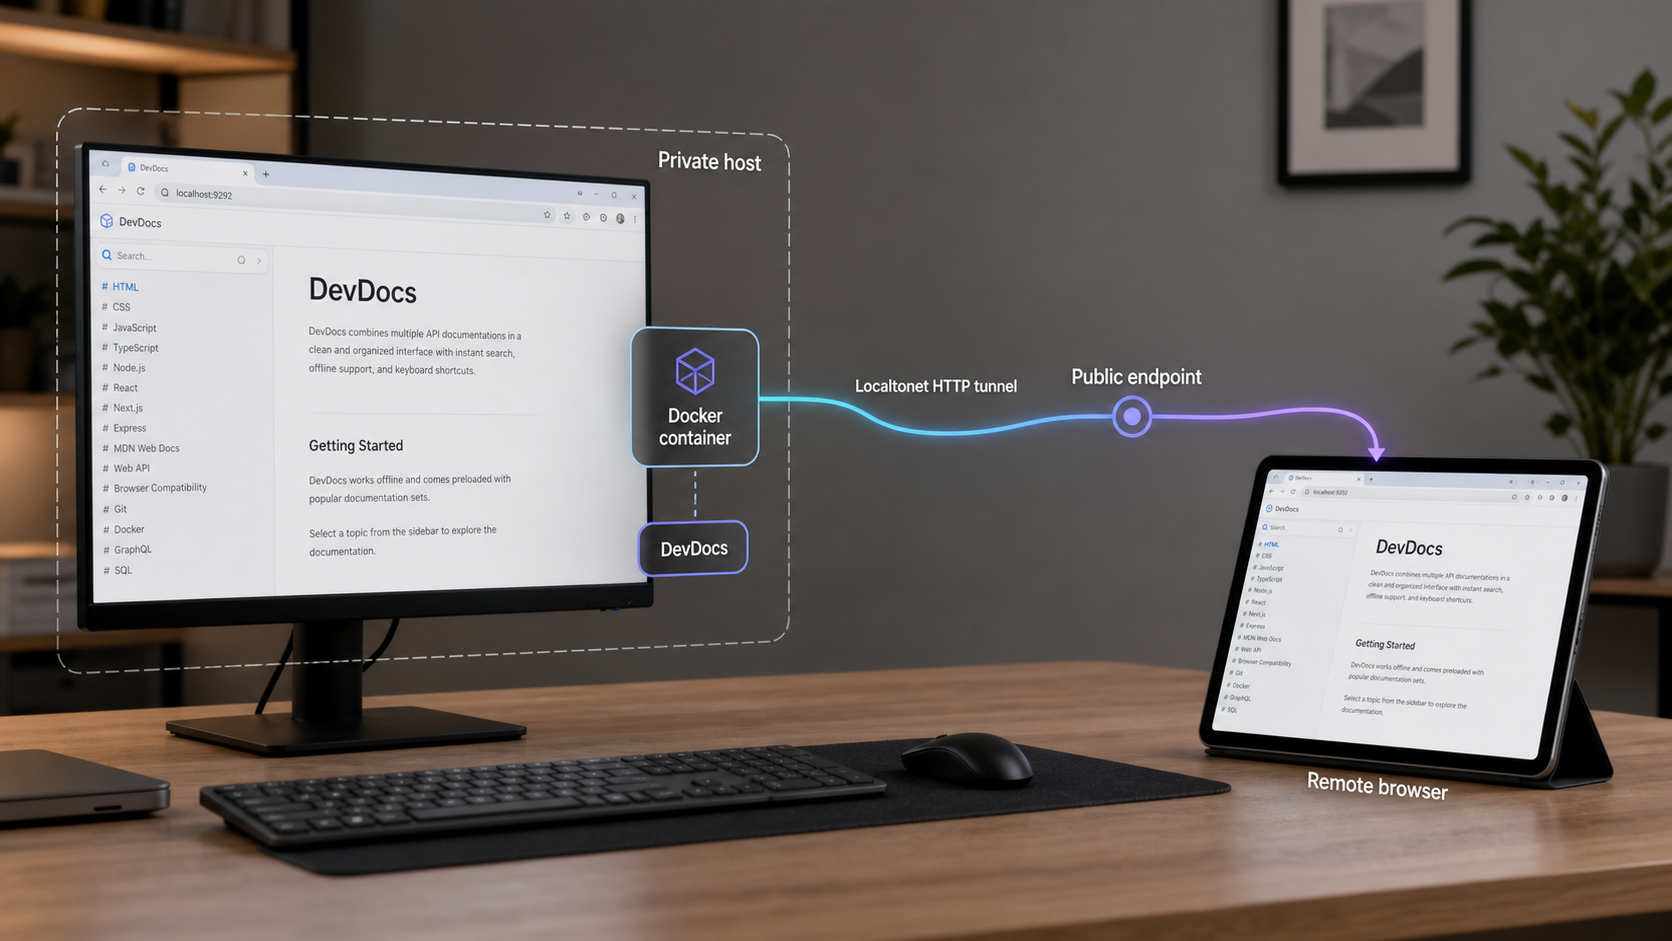
DevDocs combines many API reference sets in a fast browser interface with search, keyboard navigation, offline support, and a consistent layout. This guide uses the official DevDocs container while making the safer same-host choice of publishing port 9292 only on loopback. After verifying the container and browser interface locally, we connect it to a Localtonet HTTP tunnel for remote browser access without inbound router port forwarding or a public IP address. We also explain Docker firewall behavior, the different network design required when our client runs on another device, routine updates, alternative DevDocs installations, security, and troubleshooting.
📋 What's in this guide
What DevDocs is and how this deployment works
DevDocs is an API documentation browser that brings multiple developer reference sets into one organized web interface. Its focus is fast access to API and reference material rather than long-form programming tutorials. The interface includes instant search, a mobile version, dark theme support, keyboard shortcuts, and offline functionality. Users can select the documentation sets they need instead of loading every available reference into the browser.
The application has two major pieces. A Ruby scraper generates documentation and metadata, while a client-side JavaScript application presents that content through a small Sinatra and Sprockets application. Search and much of the application behavior happen in the browser. DevDocs also uses a service worker and localStorage to improve startup behavior and support its offline-oriented design.
The DevDocs project recommends its maintained hosted site for readers who do not need to operate their own server. Self-hosting is useful when you want a locally controlled endpoint, a repeatable internal deployment, or a server that can be made available to a remote workflow on demand. Self-hosting does not turn DevDocs into a programming tutorial platform or full-text search engine. Its content remains focused on structured API and reference documentation obtained from upstream sources.
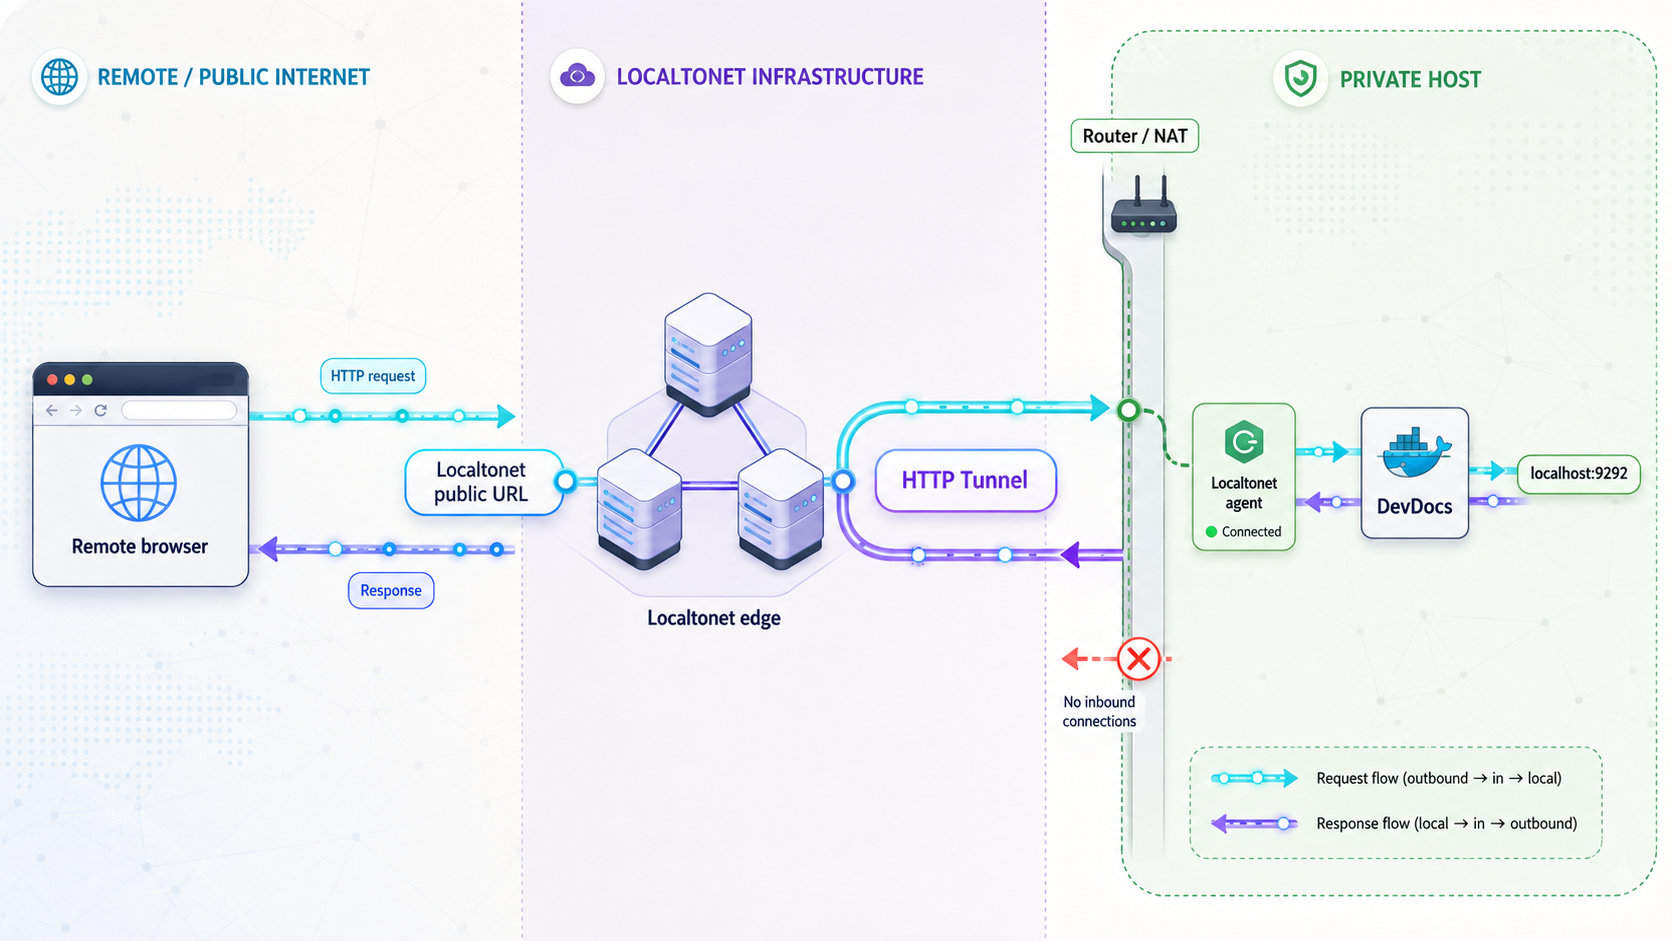
This tutorial separates the deployment into three boundaries. Docker runs DevDocs and publishes its HTTP port on the host. A local browser verifies that the application is healthy. The Localtonet client then connects outward to our relay infrastructure and forwards an assigned public HTTPS address to the verified local target. Keeping those stages separate makes failures easier to isolate.
127.0.0.1 keeps port 9292 off the host's LAN-facing interfaces.
The DevDocs repository states that the project is searching for maintainers. It also states that published container images are automatically built and updated monthly with the latest documentation. These are separate facts. Monthly image builds describe the current image process, while the maintainer notice should be considered when assessing long-term deployment risk. Test updates before relying on them in an important environment.
Prerequisites and network plan
The recommended path requires a machine with Docker installed and running. That machine must be able to download an image from GitHub Container Registry, and host port 9292 must be available on the address where you intend to publish it. You also need a recent compatible browser. The DevDocs project lists recent Firefox, Chrome, or Opera versions, Safari 11.1 or later, Edge 17 or later, and iOS 11.3 or later as its browser baseline.
Docker installation differs across Windows, macOS, and Linux, so this guide does not substitute an unverified package command for your platform's supported Docker installation procedure. Install Docker using the current instructions for your operating system, start its engine, and confirm that the client can communicate with it:
docker version
docker ps
The first command should report Docker client and server information. The second should return a container list, even when the list is empty. Resolve a missing command, permission error, or inability to connect to the Docker engine before attempting to run DevDocs.
Check whether a container already uses the intended name:
docker ps -a --filter name=devdocsReview the published ports of running containers as an initial conflict check:
docker psA non-Docker process can also occupy port 9292, and the appropriate operating-system inspection command varies. If the DevDocs container fails with a port-allocation error, inspect both Docker containers and host processes before retrying.
Choose the topology before starting Docker
The correct Docker bind address depends on where the Localtonet client will run. For the recommended arrangement, Docker and our client run on the same host. Docker can then publish DevDocs only on 127.0.0.1:9292, and the HTTP tunnel can target that same loopback address.
If our client must run on a second device, loopback publication will not work because 127.0.0.1 always refers to the device making the connection. In that topology, DevDocs must listen on an address reachable from the client device, such as an appropriate private LAN address on the Docker host. That wider publication has additional firewall and network-access consequences.
| Topology | Docker host publication | Localtonet target | Exposure consideration |
|---|---|---|---|
| Docker and Localtonet on the same host | 127.0.0.1:9292:9292 |
127.0.0.1, port 9292 |
Recommended. The Docker port is limited to host loopback. |
| Localtonet client on another LAN device | <DOCKER_HOST_LAN_IP>:9292:9292 |
The Docker host's reachable private address, port 9292 |
The service becomes reachable through that host interface, subject to routing and firewall policy. |
| Upstream DevDocs quick start | 9292:9292 |
Depends on client location | Docker normally publishes on all host addresses unless its configuration changes that behavior. |
Prepare Localtonet for the optional remote stage
Localtonet is a separate networking step, not a substitute for installing DevDocs. You need a Localtonet account, a client device that can reach DevDocs, a device-specific authentication token, and an available relay server or region selected from the current product interface. Tokens and relay choices must come from your account. Do not copy placeholder token values or server codes from a tutorial.
The maintained evidence for this revision confirms that the Localtonet client application must be installed and run on the device that will create the tunnel, but it does not provide a verified universal download URL or current operating-system-specific installation commands. Obtain the client through the current Localtonet account or dashboard workflow for your operating system and follow the instructions shown there. We do not provide a guessed package command because supported installation paths can change. After installation, run the client and confirm that its device appears connected before configuring the tunnel.
| Requirement | Why it is needed | How to confirm it |
|---|---|---|
| Docker engine | Runs the official DevDocs image | docker version reports client and server details |
| Registry access | Downloads the image from GitHub Container Registry | The pull or initial docker run completes |
| Available port 9292 | Publishes the DevDocs HTTP service on the chosen host address | No conflicting container or process owns the bind address and port |
| Compatible browser | Runs the client-side DevDocs interface | The local page, search, and navigation work |
| Connected Localtonet device | Establishes the outbound relay connection | The selected device is shown as connected in the current dashboard |
Install DevDocs with the official Docker image
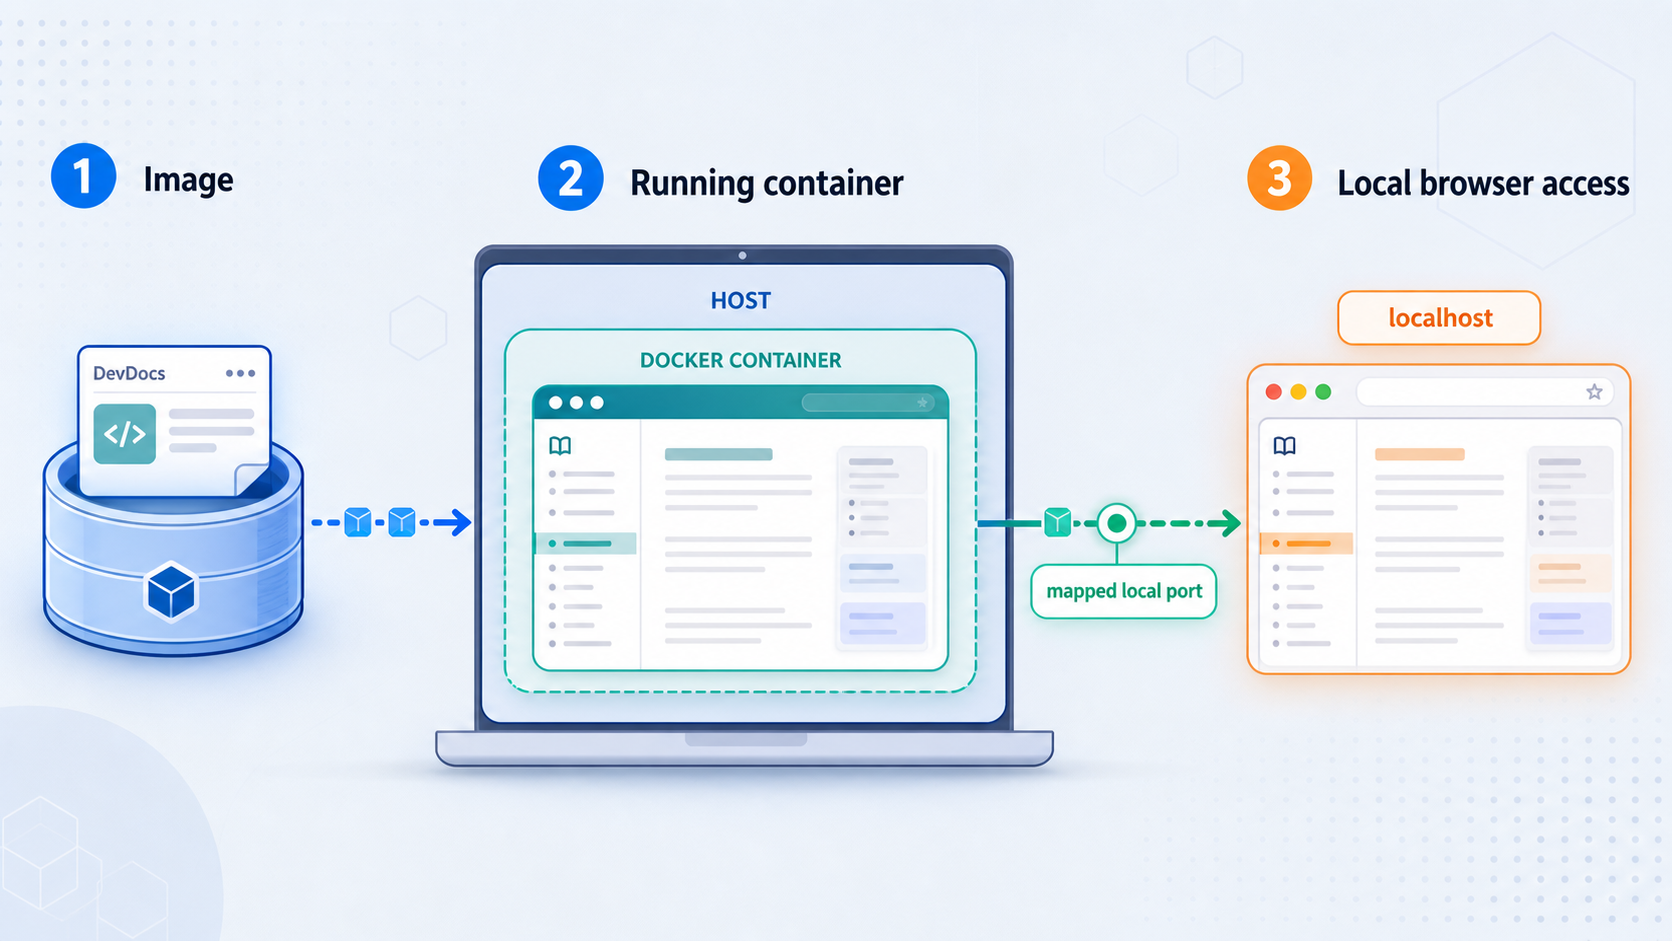
DevDocs recommends Docker as the easiest local installation method. Its standard published image is ghcr.io/freecodecamp/devdocs:latest. An Alpine-based image is also available as ghcr.io/freecodecamp/devdocs:latest-alpine. We use the standard image while tightening its host publication for the same-host Localtonet workflow.
Confirm that Docker is ready
Run docker version and docker ps. Continue only after Docker can communicate with its engine and you have resolved conflicts involving the name devdocs or port 9292.
Run DevDocs with a loopback-only host port
For Docker and Localtonet running on the same host, start the standard image in detached mode and bind host port 9292 only to IPv4 loopback:
docker run --name devdocs -d -p 127.0.0.1:9292:9292 ghcr.io/freecodecamp/devdocs:latestConfirm that the container remains running
Inspect the running-container list. If the container is absent or stops, inspect its logs before changing the deployment:
docker ps --filter name=devdocs
docker logs devdocsOpen the local endpoint
Visit http://localhost:9292 from a browser on the Docker host. Do not configure the remote tunnel until this local request succeeds and DevDocs behaves normally.
The --name devdocs argument assigns a stable container name for later start, stop, log, and removal commands. The -d argument runs the container in the background. The publication 127.0.0.1:9292:9292 maps host loopback port 9292 to container port 9292. The final argument identifies the official standard image.
Upstream DevDocs quick-start command
For reference, the upstream DevDocs README currently documents this command:
docker run --name devdocs -d -p 9292:9292 ghcr.io/freecodecamp/devdocs:latest
That command is useful as the project's canonical quick start, but its abbreviated port syntax does not request a loopback-only host binding. Docker commonly publishes such a port on all host interfaces. For the same-host Localtonet design in this tutorial, use the explicit 127.0.0.1:9292:9292 version instead.
When the Localtonet client runs on another device
A second device cannot connect to the Docker host's loopback interface. If that topology is necessary, recreate the container with a host address reachable from the client. Prefer binding to the specific private interface that should accept the connection rather than using an unrestricted all-interface mapping:
docker run --name devdocs -d -p <DOCKER_HOST_LAN_IP>:9292:9292 ghcr.io/freecodecamp/devdocs:latest
Replace <DOCKER_HOST_LAN_IP> with the appropriate private address assigned to the Docker host. Do not paste the angle-bracket placeholder literally. From the device running Localtonet, verify that http://<DOCKER_HOST_LAN_IP>:9292 works before creating the tunnel.
Localtonet does not require you to open an inbound router port or manually create an inbound firewall rule for the public tunnel. Docker port publishing is separate. Docker can create or modify host NAT and firewall behavior when publishing a container port, and an all-interface or LAN-interface binding can make DevDocs reachable outside the host. Use loopback for the recommended same-host deployment. If another client device requires LAN access, permit only the necessary private path under your host and network security policy.
Verify DevDocs before exposing it
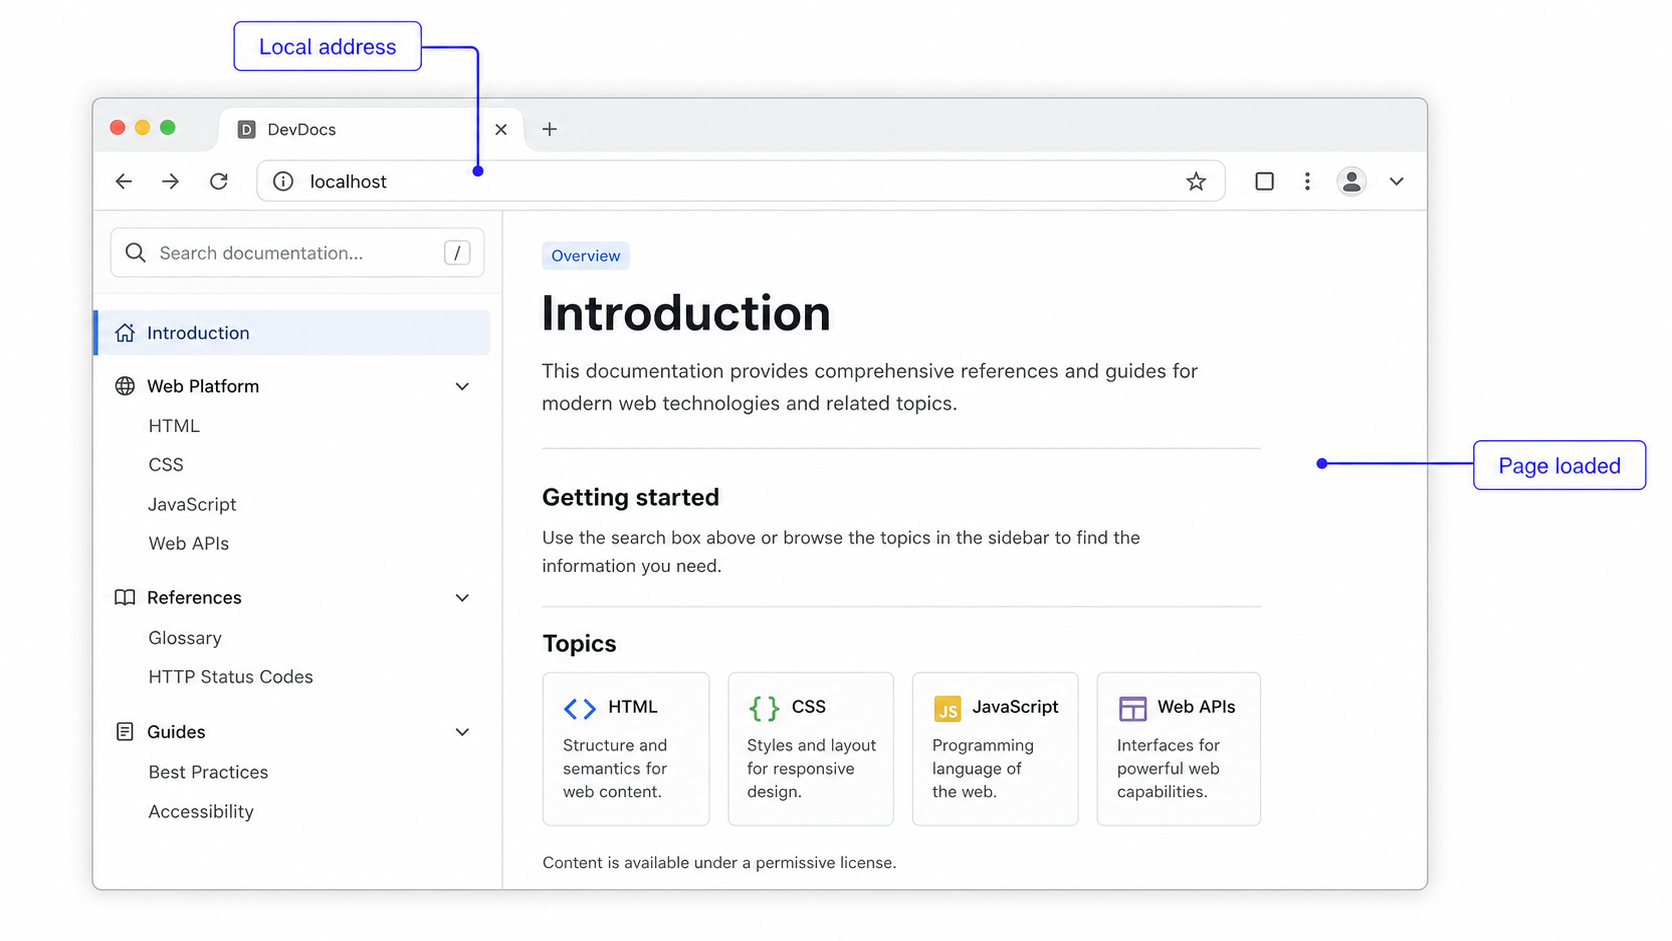
Verification should cover more than seeing an open browser tab. Confirm the container state, the local endpoint, the main interface, a documentation set, and normal browser behavior. This separates application problems from tunnel problems and makes later troubleshooting much faster.
Check the container state and port publication
docker ps --filter name=devdocs
The output should show the devdocs container as running. For the recommended topology, the published-port information should indicate that host port 9292 is bound to 127.0.0.1. If the container is absent from the running list, inspect all matching containers and read its logs:
docker ps -a --filter name=devdocs
docker logs devdocs
A container can be created successfully and still stop because of a runtime problem. Creation alone is not evidence that the web application is currently available.
Test the local browser endpoint
Open this address on the Docker host:
http://localhost:9292Confirm that the DevDocs interface appears. Test search, open a reference entry, navigate between pages, and reload the application. DevDocs is substantially browser-based, so a basic HTTP response does not prove that all client-side behavior is working.
If you use the manual installation path described later, the project notes that the first request can take a few seconds while assets compile. The container path may have different startup characteristics. Review the logs and retry after startup rather than assigning an undocumented fixed readiness period.
Check the documentation sets you need
DevDocs lets users choose their own collection of documentation. Verify that the references required by your workflow are present and usable. Self-hosting does not create a mirror of every tutorial, guide, or page from each upstream project. DevDocs deliberately focuses on API and reference material that fits its indexing model.
Verify the second-device path when applicable
If Localtonet will run on another LAN device, open the DevDocs private address from that device. A successful request from the Docker host itself is not enough because the tunnel client will use a different network path. Check the Docker bind address, host firewall policy, private routing, and port reachability before continuing.
If the appropriate local or private endpoint does not work from the device that will run Localtonet, do not troubleshoot the public URL yet. A tunnel forwards traffic to a target that the connected client can reach. It cannot make an unavailable DevDocs service healthy.
Routine Docker operations and updates
A self-hosted service needs a small operational playbook. Keep the container name stable, inspect logs before recreating it, and test every update locally before restoring remote access.
Stop, start, and restart DevDocs
docker stop devdocs
docker start devdocs
docker restart devdocs
Stopping the container makes its endpoint unavailable. A Localtonet tunnel that still points to port 9292 will no longer have a working target. Starting or restarting the container restores the process, but you should verify the local URL again before depending on remote access.
Review logs
docker logs devdocsTo follow new output while testing:
docker logs -f devdocsStop following the output with the interrupt appropriate to your terminal. Logs help distinguish application startup failures from requests that never reached the container.
Replace the container with the current published image
DevDocs states that its published images are built and updated monthly with the latest documentation. Docker does not automatically replace an existing container when the image behind a tag changes. For the recommended same-host arrangement, use this controlled replacement sequence:
docker pull ghcr.io/freecodecamp/devdocs:latest
docker stop devdocs
docker rm devdocs
docker run --name devdocs -d -p 127.0.0.1:9292:9292 ghcr.io/freecodecamp/devdocs:latest
Verify http://localhost:9292 again after replacement. If your deployment intentionally uses a second Localtonet device, preserve the reviewed private-interface binding instead of replacing it with either loopback or an unrestricted publication.
The official quick start does not document a volume mapping or complete persistence and backup model for this container command, so this article does not invent one. If your deployment depends on modified state, investigate and test that state before removing the old container.
The latest tag can change. For an important internal service, define how you will test updates and retain a known working image reference. The available evidence does not establish a support guarantee or rollback policy.
Alternative DevDocs installation paths
The published standard image is the recommended choice for a straightforward local server. DevDocs also publishes an Alpine image and documents building from source or performing a manual Ruby installation. These alternatives are useful for smaller-image preferences, contributors, custom image workflows, or environments where the prebuilt standard image is not the intended artifact.
| Installation path | Best fit | Key requirements |
|---|---|---|
| Published standard image | Fastest recommended local deployment | Docker and access to GitHub Container Registry |
| Published Alpine image | Smaller published container variant | Docker and the latest-alpine image |
| Build image from source | Testing repository code or controlling the image build | Git, Docker, a source checkout, and build resources |
| Manual Ruby installation | Development or operation outside Docker | Ruby 4.0.6, libcurl, Bundler, and an ExecJS-compatible JavaScript runtime |
Use the Alpine-based image
The project publishes ghcr.io/freecodecamp/devdocs:latest-alpine as a smaller Alpine-based alternative. For the same-host topology, run it with the same loopback restriction:
docker run --name devdocs -d -p 127.0.0.1:9292:9292 ghcr.io/freecodecamp/devdocs:latest-alpine
Do not run this while another container named devdocs exists or while the selected host address and port are occupied. Choose one image path, verify it, and keep the operational procedure consistent.
Build the Docker image from source
DevDocs documents cloning the repository and building its Dockerfile. The following keeps the documented build sequence while applying the loopback publication appropriate to this tutorial:
git clone https://github.com/freeCodeCamp/devdocs.git && cd devdocs
docker build -t devdocs .
docker run --name devdocs -d -p 127.0.0.1:9292:9292 devdocs
The first command clones the repository and enters its directory. The second builds a local image tagged devdocs. The third starts a container from that image. This does not automatically synchronize the image with later repository changes. To use newer code, update the checkout, rebuild the image, replace the container, and verify the result.
Install manually with Ruby
The documented manual path requires Ruby 4.0.6 as defined by the project Gemfile, libcurl, and a JavaScript runtime supported by ExecJS. The project states that a suitable runtime is included on macOS and Windows, while Linux requires Node.js. Package names vary by operating system, so obtain those prerequisites through the current supported channel for your platform.
After installing the prerequisites, the documented sequence is:
git clone https://github.com/freeCodeCamp/devdocs.git && cd devdocs
gem install bundler
bundle install
bundle exec thor docs:download --default
bundle exec rackup
Then open http://localhost:9292. The project notes that the first request can take several seconds while assets compile.
List available documentation and versions with:
bundle exec thor docs:listDownload selected sets by naming them:
bundle exec thor docs:download html cssUpdate installed sets or download all available sets with:
bundle exec thor docs:download --installed
bundle exec thor docs:download --all
The project states that the manual installation currently has no update mechanism beyond pulling current code from the main branch and downloading current versions of the installed documentation:
git pull origin main
bundle exec thor docs:download --installed
These commands update different layers. Git updates application source, while Thor updates documentation data. Test the server and reference content after both operations.
Configure remote browser access with Localtonet
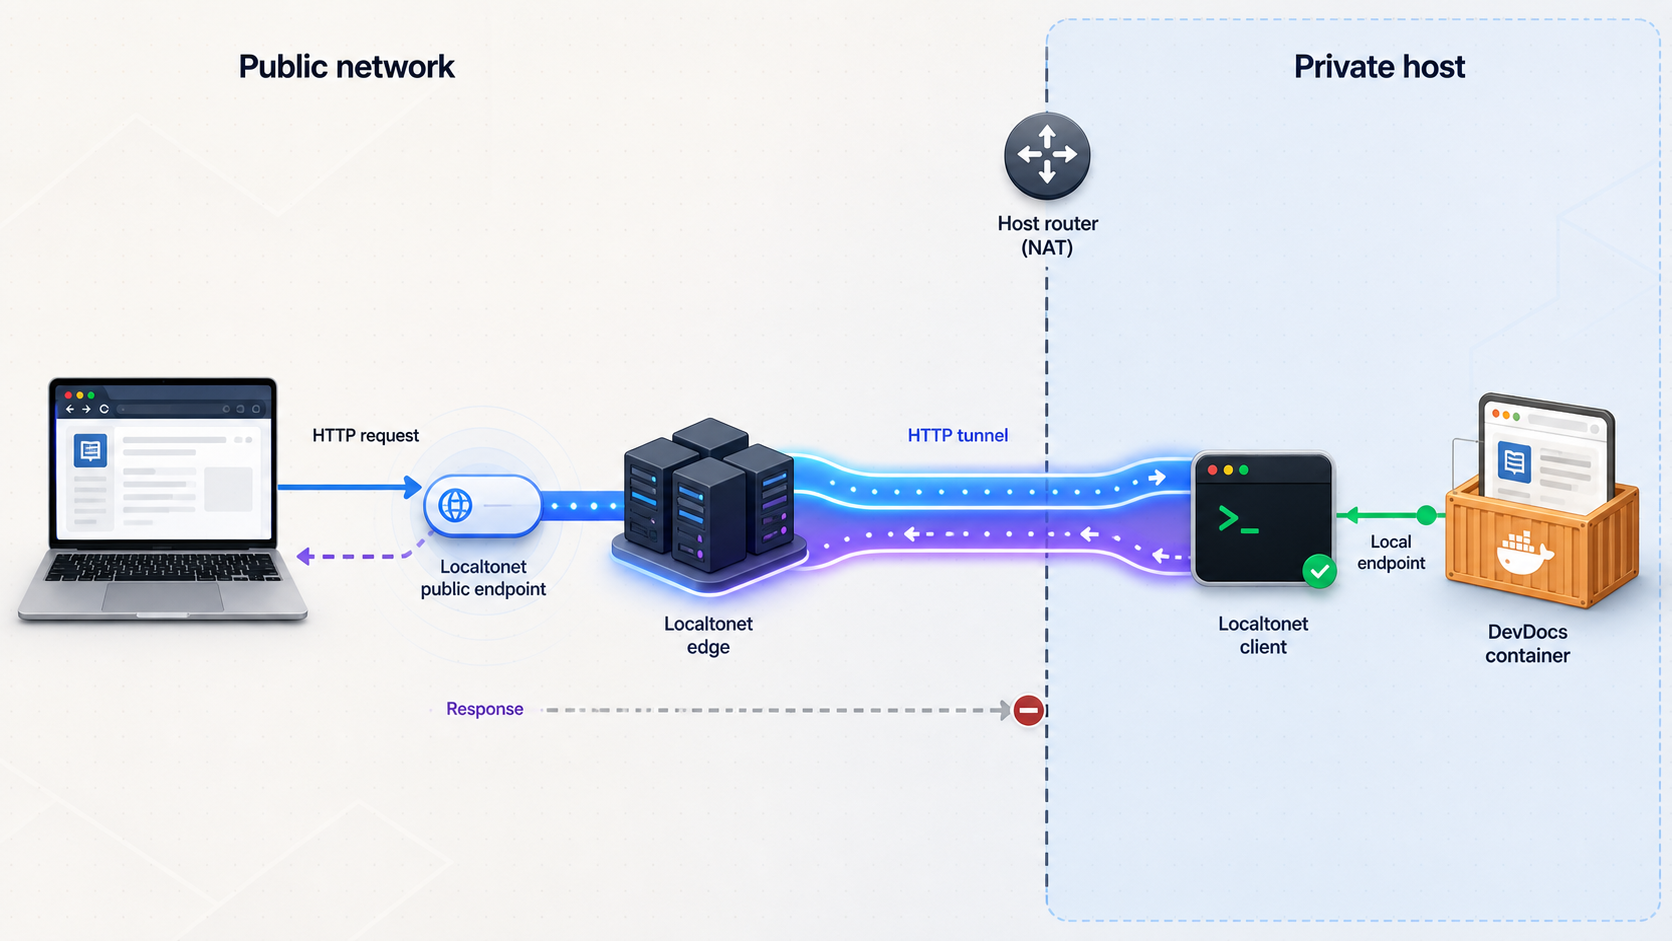
Complete this stage only after DevDocs works from the device that will run our client. The Localtonet client establishes an outbound connection to a relay server. This means the tunnel does not require inbound router port forwarding, VPN setup, or a public IP address. It also does not require manually opening an inbound firewall port for the public connection.
That statement applies to Localtonet's tunnel connection. It does not cancel the consequences of Docker publishing port 9292. With the recommended same-host loopback binding, our client can reach DevDocs without placing the Docker port on the LAN. With a separate client device, the Docker host must allow that device to reach the selected private interface and port.
This is standard HTTP tunneling, not VPN functionality. Localtonet VPN Manager is our separate private mesh VPN feature. For a browser application with a known HTTP endpoint, an HTTP tunnel is the direct fit.
Install and run the Localtonet client
Obtain the client through the current account or dashboard workflow for the operating system that will run the tunnel. The available evidence does not establish a universal installer URL or package command, so use the current product-provided installation instructions. Start the client on the DevDocs host for the recommended topology, or on another device that has already demonstrated access to DevDocs.
Select the connected device token
In the HTTP tunnel configuration, select the device-specific authentication token associated with the client that will run the tunnel. The value comes from your Localtonet account and identifies that client device. Keep it secret and redact it from screenshots, logs, repositories, and support material.
Select an available relay server
Choose an available relay server or region from the current dashboard selector. Do not copy a hardcoded server code from an article because available values can vary over time, by deployment, or by plan.
Enter the HTTP tunnel settings
Select the Process Type available for the public HTTPS address, then enter the local IP and port. HTTP tunnels can use Random Sub Domain, Custom Sub Domain, or Custom Domain, subject to current availability. For the same-host setup, use local IP 127.0.0.1 and local port 9292. For a separate client device, enter the Docker host's verified reachable private address and port 9292.
Start the tunnel
Review the selected device, relay server, Process Type, local IP, and local port, then use the Start control. Creating or saving a tunnel does not mean it is running. The selected client must also remain connected.
Test the assigned public URL
Open the assigned HTTPS URL from a separate browser or network. Test the interface, search, reference navigation, and page reloads. When remote access is no longer required, stop or delete the tunnel.
The exact arrangement of controls can change as the dashboard evolves. The verified values relevant to this workflow are the Process Type, connected device token, available relay server, local IP address, local port, and Start control. For the current presentation, consult the Localtonet HTTP tunnel documentation.
If you choose Custom Domain, check the current documentation for its DNS requirements. Those requirements are not established by the supplied evidence for this revision, so this guide does not provide guessed DNS records.
The DevDocs container must be running, the selected Localtonet client device must be connected, and the HTTP tunnel must be started. A saved tunnel configuration alone does not make DevDocs remotely available.
Security and exposure considerations
A loopback-only application and a publicly reachable URL have different risk profiles. Before starting the tunnel, decide who should be allowed to use DevDocs and what access-control layer will enforce that decision. The documented DevDocs deployment in this guide does not establish built-in account authentication, authorization roles, or an access gate.
A Localtonet public URL provides reachability. The URL itself is not proof that a visitor is authorized. Do not treat obscurity, an unfamiliar hostname, or an unshared link as an authentication mechanism. If the application does not enforce the controls your environment requires, place it behind an appropriate verified access-control layer before exposing it.
Exact Localtonet authentication, allowlist, or restriction options are not established in the supplied evidence and may vary by current product capability or plan. Review the current dashboard and documentation rather than assuming that a particular control is present. If you cannot confirm an adequate authorization mechanism, keep DevDocs on loopback and do not start a public tunnel.
Do not expose private modifications, internal reference material, embedded credentials, or other sensitive content without an adequate authorization layer. Review the endpoint from an external browser, apply least privilege, and stop the tunnel when access is no longer necessary.
Troubleshoot the complete workflow
The container name is already in use
Docker requires unique container names. Inspect the existing object:
docker ps -a --filter name=devdocsIf it is the intended container, start it instead of creating another:
docker start devdocsRemove it only after confirming that replacement is appropriate:
docker stop devdocs
docker rm devdocs
Docker reports that port 9292 is already allocated
Inspect running containers with docker ps and identify any publication using port 9292 on the same address. A non-Docker process can also own the port. Stop or reconfigure the conflict, then rerun the intended command. Keep the host-port choice and Localtonet target synchronized if you deliberately choose another port.
The container exits immediately
docker ps -a --filter name=devdocs
docker logs devdocs
Read the first relevant error rather than repeatedly restarting the container. If the image must be pulled again or the container recreated, first determine whether removal is appropriate for your deployment.
The browser cannot open localhost:9292
Confirm that the container is running and the port is published. Make sure the browser is running on the Docker host when using localhost. From another computer, localhost refers to that computer, not the DevDocs host.
Inspect docker ps and confirm that the loopback publication appears. If the Docker host is a virtual machine or uses a platform-specific container environment, browser-to-container networking may follow that platform's Docker behavior. Resolve the local Docker path before adding Localtonet.
The second Localtonet device cannot reach DevDocs
A loopback Docker binding is intentionally unreachable from another device. If you require the separate-device topology, recreate the container with a reviewed private-interface binding, verify the Docker host firewall policy, and test the private URL from the client device itself. Avoid exposing port 9292 on public or unnecessary interfaces.
The page loads but the interface does not work correctly
Test with a browser inside the project's supported baseline. Check browser developer tools for failed requests, temporarily disable interfering extensions, and review the container logs. DevDocs relies heavily on client-side JavaScript, so returned HTML alone does not establish that the application is functional.
The Localtonet device does not appear connected
Confirm that the client application is running on the intended device and that it is using the device-specific token from your account. Do not rotate, replace, or publish token values while troubleshooting. If installation or connection controls differ from this description, follow the current product interface because the available evidence does not provide stable operating-system-specific client commands.
The public URL returns an error
Work through the chain in order:
- Open
http://localhost:9292on the Docker host. - Confirm that the
devdocscontainer is running. - If the client is on another device, open the Docker host's private DevDocs URL from that device.
- Confirm that the selected Localtonet client appears connected.
- Confirm that the HTTP tunnel is started rather than merely created.
- Confirm that its local IP and port identify the endpoint reachable from that client.
- Test the assigned public URL again from a separate browser or network.
For a same-host client, use 127.0.0.1 and port 9292. For a separate client, 127.0.0.1 points back to the client device and is wrong unless DevDocs also runs there.
Local access works after an update, but expected documentation is missing
Container and manual deployments update differently. For a manual installation, use bundle exec thor docs:list to inspect available sets and bundle exec thor docs:download --installed to update installed documentation. For Docker, confirm that you replaced the old container after pulling the current image. Pulling an image alone does not alter an existing container.
Frequently asked questions
What is the recommended Docker command for this workflow?
When Docker and Localtonet run on the same host, use docker run --name devdocs -d -p 127.0.0.1:9292:9292 ghcr.io/freecodecamp/devdocs:latest. The explicit loopback address prevents Docker from intentionally publishing port 9292 on the host's other interfaces.
Why does the DevDocs upstream command look different?
DevDocs documents -p 9292:9292 in its quick start. That abbreviated form is a valid general Docker publication, but it commonly binds the host port on all addresses. This tutorial adds 127.0.0.1 because Localtonet can reach the service over loopback when both run on the same host.
Can I use the Alpine DevDocs image?
Yes. The project publishes ghcr.io/freecodecamp/devdocs:latest-alpine as a smaller Alpine-based image. Preserve the loopback publication for the recommended same-host setup and verify it locally before adding remote access.
Can the Localtonet client run on another device?
Yes, if that device can reach the DevDocs host and port. A loopback-only Docker publication will not be reachable remotely, so bind DevDocs to an appropriate private address, review the host firewall and Docker rules, and use that verified private address as the tunnel target.
Does Localtonet install or host DevDocs?
No. DevDocs runs on your Docker host or manual Ruby environment. Our HTTP tunnel forwards requests to that existing service. Install and verify DevDocs first, then configure Localtonet as a separate networking stage.
Does the public Localtonet URL authorize users?
No. A public URL provides reachability and is not, by itself, an authorization mechanism. The documented DevDocs setup does not establish a built-in authentication gate. Use an appropriate verified access-control layer if the endpoint must be restricted.
Do I need router port forwarding or a public IP address?
No. Our client establishes an outbound connection to a Localtonet relay server, so the public tunnel does not require inbound router port forwarding or a public IP address. Docker's local port publication remains a separate host-networking concern.
Does creating a Localtonet tunnel make it immediately available?
No. The tunnel must be started, the selected client device must remain connected, and the DevDocs container must remain running. All three states are required for the public endpoint to work.
Is a Localtonet HTTP tunnel a VPN?
No. An HTTP tunnel publishes the specific DevDocs web service through a public URL. Localtonet VPN Manager is our separate private mesh VPN feature. This tutorial uses standard HTTP tunneling.
How are DevDocs documentation sets updated?
DevDocs states that its published images are automatically built and updated monthly with the latest documentation. Existing containers are not replaced automatically, so pull the image, recreate the container with the intended bind address, and verify it. For manual installations, update code with git pull origin main and installed documentation with bundle exec thor docs:download --installed.
Connect your verified DevDocs server with Localtonet
Start with DevDocs working through a loopback-only Docker port, confirm the browser interface locally, and then create an HTTP tunnel for on-demand remote access. Add a verified authorization layer whenever the endpoint must be restricted to approved users.
Get Started Free →

