

Run a local project with the right native services, verify its real HTTP endpoint, and share only that endpoint
FlyEnv is a native development workspace for Windows, macOS, and Linux that manages runtimes, databases, web servers, local sites, HTTPS, and project-specific services. This guide explains how to install the current FlyEnv release, prepare an existing project without confusing project commands with FlyEnv actions, identify the site address, and verify it locally. After the local application works, we show how to publish its HTTP endpoint through Localtonet without inbound router port forwarding, firewall changes, VPN setup, or a public IP address. We also cover virtual hosts, local HTTPS, logs, lifecycle management, troubleshooting, and the security boundaries that matter when a development site becomes reachable from the internet.
📋 What's in this guide
When FlyEnv is a practical local development workspace
A local application rarely consists of source files alone. A PHP project may need PHP, a web server, a database, Redis, and Node.js for asset compilation. A Python application may need Python, PostgreSQL, Redis, and Nginx. A Node.js application may start its own HTTP process while also depending on a database or cache. Installing and operating those components separately can lead to conflicting versions, scattered configuration, and inconsistent startup procedures.
FlyEnv brings these tools into a native desktop workspace. Its current project documentation lists runtimes including PHP, Node.js, Python, Java, Go, .NET, Ruby, Rust, Bun, Deno, and others. It also lists databases such as MySQL, MariaDB, PostgreSQL, MongoDB, ClickHouse, Neo4j, and Qdrant; web and application servers including Nginx, Apache, Caddy, FrankenPHP, and Tomcat; and supporting services such as Redis, Memcached, RabbitMQ, Elasticsearch, Meilisearch, MinIO, and RustFS.
FlyEnv can install only the components a project needs, switch runtime versions by project, define project start and stop commands and ports, create local domains, enable HTTPS, configure reverse proxies, open configurations and logs, and group related services into startup workflows. These capabilities make it useful when one computer hosts projects with different runtime requirements.
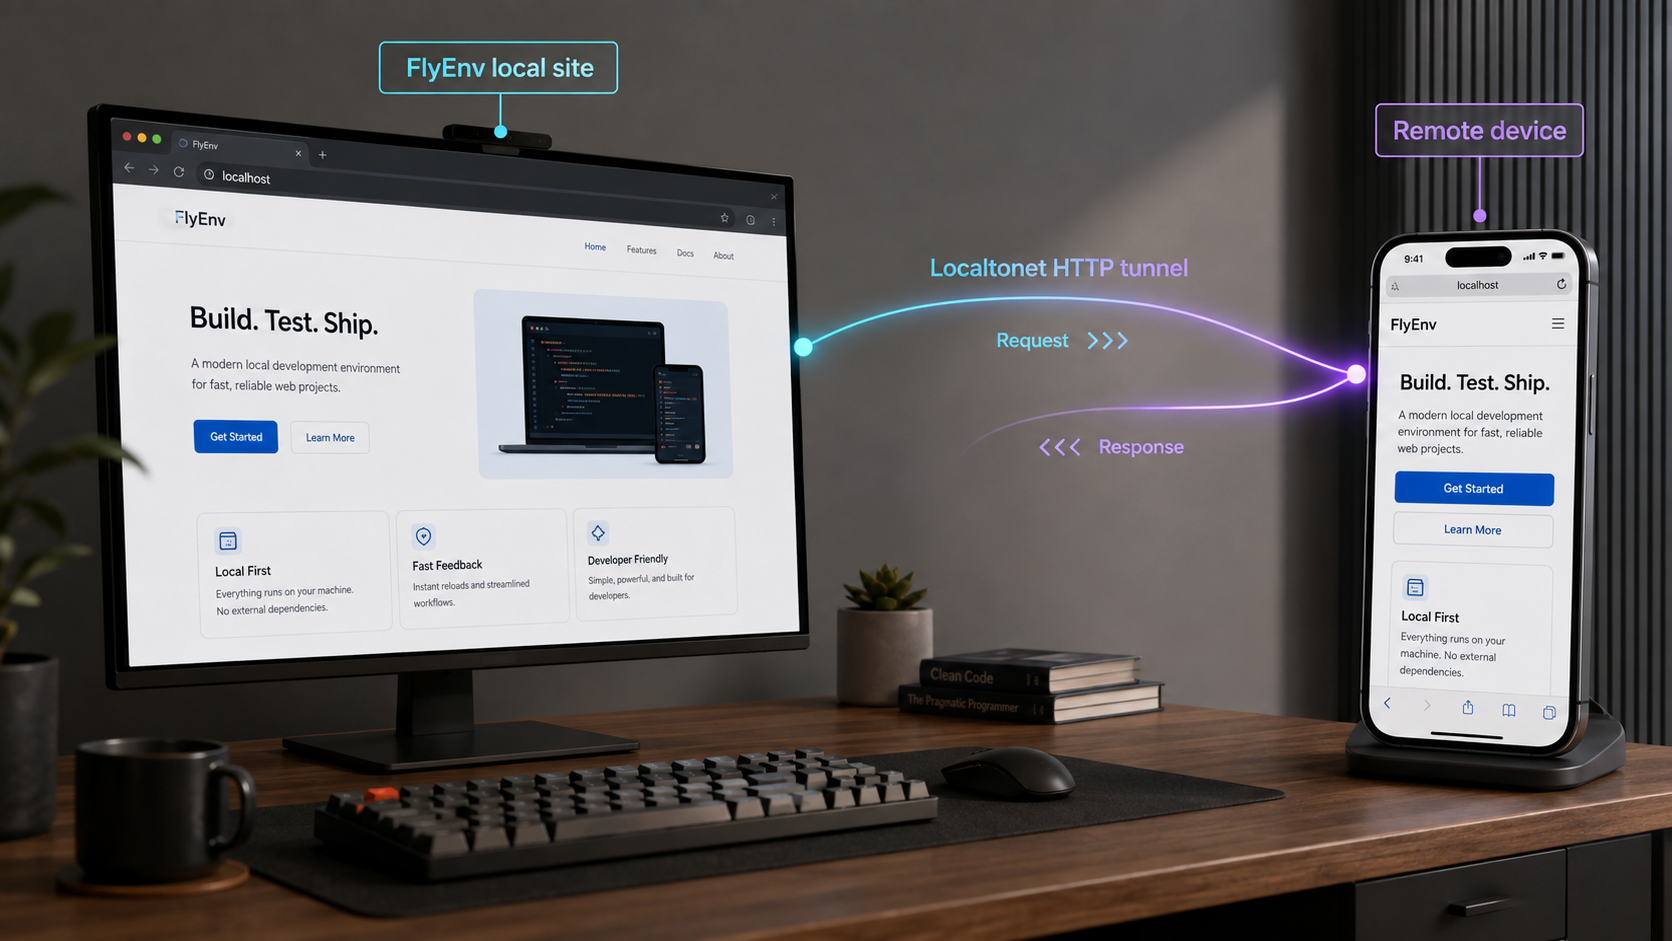
myapp.test and place applications that run on their own ports behind a local web server where appropriate.
FlyEnv, XAMPP-style bundles, and Docker overlap, but they are not interchangeable. XAMPP is familiar for a conventional Apache, database, and PHP workflow. Docker is appropriate when containerized reproducibility, image distribution, or parity with a container-based deployment is the objective. FlyEnv is designed for developers who want a desktop-managed native stack across a broader range of runtimes and services.
| Approach | Good fit | Important consideration |
|---|---|---|
| FlyEnv | Native multi-runtime projects, local sites, version switching, and desktop-managed services | The developer must still choose the project-specific runtime, services, start command, domain, and port |
| XAMPP-style stack | A conventional PHP, Apache, and database workflow | Its bundled model may not cover a broader multi-language or infrastructure stack |
| Docker | Containerized reproducibility and deployment parity | It requires container definitions and operational concepts that a native workflow may not need |
Prerequisites and scope for the setup
This tutorial starts with an existing application whose own documentation identifies its dependencies and startup procedure. FlyEnv manages the local environment, but it cannot safely infer undocumented application requirements for a manual setup. Before opening FlyEnv, identify the runtime family and supported version, the project directory, any database or cache dependencies, and the command that starts the application if it runs its own server.
Useful evidence normally comes from the project’s dependency manifest, lock file, environment template, framework documentation, or repository instructions. Examples include a PHP version constraint, a Node.js engine declaration, a Python version file, or a documented database engine. Do not automatically select the newest runtime when the project requires another supported version.
Decide how the application will be served
There are two common local serving models. A document-root application is served by a web server such as Nginx or Apache. An application-server project starts its own HTTP process on a project-defined port and may optionally sit behind a reverse proxy. The project, not FlyEnv or Localtonet, determines the correct startup command and application port.
This distinction matters later. Localtonet needs the IP address and port of a working HTTP listener. A friendly local domain such as myapp.test is useful in a browser, but the tunnel target is still a local IP address and port. If the web server selects sites by hostname, directly requesting that IP and port may return a default site instead of the intended project.
Confirm the computer and architecture
FlyEnv supports Windows, macOS, and Linux. Before downloading a package, identify the operating system, package family, and processor architecture. Apple Silicon and ARM64 Linux systems require ARM64 packages. Intel Macs use the Intel macOS package. Most 64-bit Intel and AMD Linux systems use x86_64 packages.
Understand the current Free limits
FlyEnv currently publishes a Free option that includes core runtimes, databases, HTTPS, and Startup Groups. The published usage limits include three local sites and three custom projects per runtime. This tutorial uses one project and one local site, so it fits within those listed limits as long as the account or installation has not already reached them.
Those limits matter when deciding whether to add a project as a custom project or create another local site. They do not imply that every FlyEnv capability is unlimited. Review the current information on the official FlyEnv website before planning a larger multi-project environment because product packaging can change.
The goal is to share the application’s web interface. Do not create public tunnels for MySQL, PostgreSQL, Redis, MongoDB, administrative dashboards, debugging consoles, or unrelated local tools as part of this workflow. Expose only the intended HTTP site unless a separate remote-access requirement has been reviewed and authorized.
Install the current FlyEnv release
Use the official FlyEnv repository to review the project and the FlyEnv releases page to obtain current packages. At the time of the evidence review for this revision, the repository listed version 4.19.0 packages. Release numbers and filenames change, so use the latest appropriate release instead of copying a version-specific filename from an older tutorial.
Windows
FlyEnv publishes a Windows installer and a portable Windows executable. The release assets use versioned filenames in the forms FlyEnv-Setup-<version>.exe and FlyEnv-Portable-<version>.exe. Choose the installer for a conventional installed application or the portable package when you specifically need that distribution style.
Download the selected file from the official release channel and run it using the normal Windows application procedure. Verify the package origin and any publisher information shown by Windows before approving a security prompt. The current primary evidence does not document every installer page or checkbox, so this guide does not invent a fixed sequence of Windows installer screens.
macOS
Homebrew users can install FlyEnv with the command published by the project:
brew install flyenvFlyEnv also publishes separate DMG packages for Intel and Apple Silicon Macs. Select the Intel package for an Intel Mac or the ARM64 package for Apple Silicon. Open the correct package and complete the normal macOS application installation process. Review package-origin and security prompts rather than disabling system-wide protections.
Linux
FlyEnv publishes DEB and RPM packages for x86_64 and ARM64 systems. Select DEB for a distribution that uses Debian packages or RPM for a distribution that uses RPM packages, then match the package architecture to the computer.
Local-package installation commands and dependency-repair procedures vary by distribution. The official evidence establishes the available package formats but does not establish one universal command that is correct for every supported Linux distribution. Use the distribution’s graphical package installer or its documented procedure for installing a local DEB or RPM file.
| Platform | Official installation path | Selection rule |
|---|---|---|
| Windows | Versioned installer or portable executable | Choose conventional installation or portable operation |
| macOS | Homebrew, Intel DMG, or Apple Silicon DMG | Match the DMG to Intel or ARM64 hardware |
| Linux | DEB or RPM for x86_64 and ARM64 | Match both the distribution package family and architecture |
Launch FlyEnv after installation and confirm that its main interface opens. A project website will not necessarily exist after this first launch. FlyEnv installs and manages the environment, while the application still supplies its own source code, dependency requirements, database setup, and framework-specific commands.
FlyEnv publishes a current guide and an official demos collection. Consult the guide for the labels shown by the installed release and select the demo matching the project family when one is available. Screenshots and control locations can change between releases.
Prepare one FlyEnv project without inventing project commands
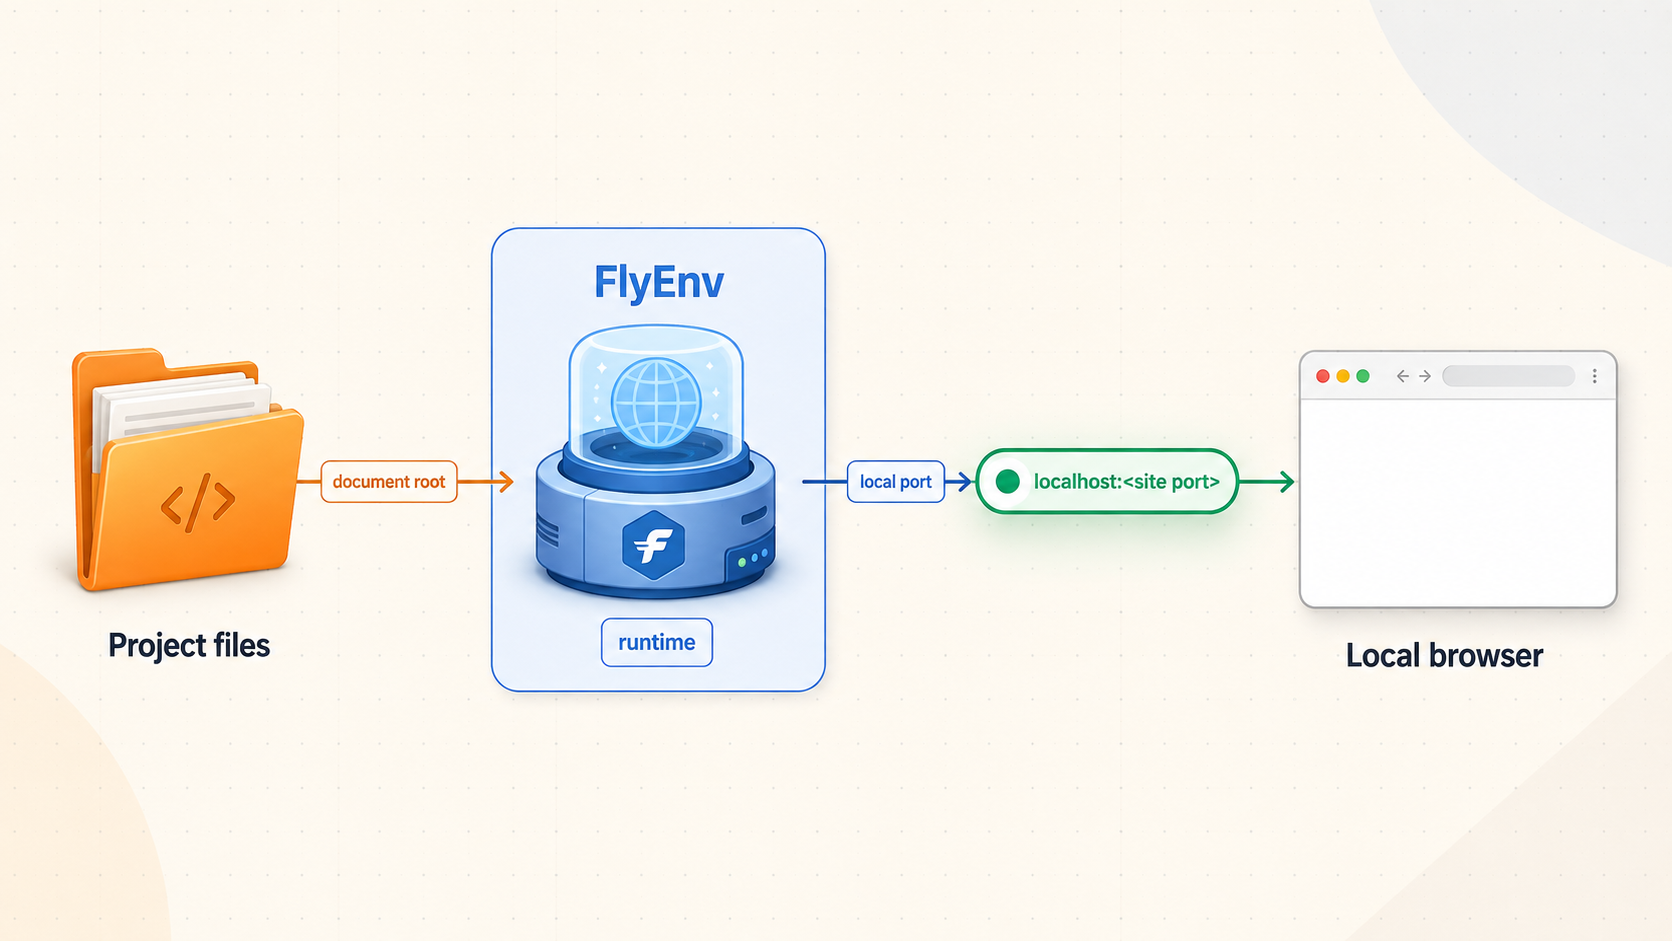
The scoped example in this guide is an existing web project that already documents its runtime version, dependencies, start command, and HTTP port. This makes the boundary reproducible: FlyEnv provides the required runtime and services, while the project’s own instructions remain authoritative for installing dependencies, preparing its database, and starting its application process.
FlyEnv’s current public material verifies that it can install runtimes and services, add custom projects, associate runtime versions by project, define project start and stop commands and ports, create local sites, configure reverse proxies, and open logs. However, the supplied current evidence does not document the exact click-by-click control sequence or stable field labels for all of those actions. Presenting a synthesized menu path as official instructions would be misleading. Use the corresponding controls shown in the installed release and confirm them against the official guide.
1. Install the required runtime or service in FlyEnv
In FlyEnv, open the area for the runtime or service required by the project and install a compatible version. Install only what the project actually uses. A Node.js application does not need PHP merely because FlyEnv supports it, and an application using PostgreSQL does not need MySQL.
Start required shared services such as the selected database or cache. If FlyEnv offers multiple installed versions, choose the version supported by the project. The exact installation control can vary with the module and release, so follow the current module label rather than an old screenshot.
2. Prepare the application using its own documented commands
Open the project directory and follow that project’s instructions to install dependencies, create a development environment file, initialize its schema, or build assets. These are project actions, not generic FlyEnv actions. For example, package installation and migration commands differ among Laravel, Django, Node.js frameworks, WordPress, and other applications.
Do not paste an unrelated framework command merely to make the example appear complete. If the project does not document its setup, resolve that gap before exposing it. FlyEnv can provide the environment, but it cannot make an unknown dependency command safe.
3. Add the project and associate its runtime
Use FlyEnv’s custom-project workflow to associate the existing project directory with the runtime version selected for that application. Where the project starts its own HTTP server, use the project’s documented working directory, start command, stop command, and port. Keep each value aligned with the application documentation.
The current Free plan lists a limit of three custom projects per runtime. If FlyEnv reports that the limit has been reached, remove an unused custom project or review the current license options. Do not work around a project limit by combining unrelated applications under one misleading project entry.
4. Create a local site only when the serving model needs one
For a document-root application, create a local site that uses the correct project directory or public document root and a compatible web server and runtime. For an application that starts its own HTTP process, a direct local port may be sufficient. A local site can also act as a reverse proxy to that process when the project needs a friendly local domain.
Choose a local domain that does not conflict with another site. Record whether the site uses HTTP or local HTTPS. The Free plan currently lists a limit of three local sites, so creating this site consumes one of those listed slots.
5. Start the required components
Start the database and supporting services first when the application depends on them. Then start the project process or web server that accepts HTTP requests. If the project has been included in a FlyEnv Startup Group, the group can start its related stack together. Confirm that each required component remains running.
Use FlyEnv’s ability to open configurations and logs when a service stops immediately or the site returns an error. The relevant log may belong to the application process, selected runtime, database, or web server. A tunnel should not be introduced until these local layers are healthy.
6. Discover and record the real endpoint
Record the final browser address and the listener behind it. For a direct application server, this may be an HTTP loopback address and a project-defined port. For a local site, it may be a domain such as myapp.test handled by Nginx, Apache, or Caddy. For a reverse proxy, also record the upstream application port so that failures can be isolated.
Do not assume that every FlyEnv project uses port 80, 443, 3000, 8000, or another common value. The correct target is the endpoint that actually serves this project.
The current public material verifies the capabilities used above but does not provide a stable universal sequence of button names for every runtime, service, and project type. This guide therefore names only verified actions and does not fabricate menu locations. Use the current FlyEnv guide or the relevant official demo to map those actions to the interface installed on your computer.
Verify the site and inspect its logs locally
A tunnel forwards traffic to a local target. It does not start a stopped runtime, install dependencies, create a missing database, run migrations, repair an invalid document root, or correct a failed project command. Complete local verification before creating a Localtonet tunnel.
Open the configured site
Open the exact local address recorded during setup. If you created a local domain, use that domain and its configured protocol. If the project runs directly on a port, use the actual loopback address and port. Confirm that the expected application appears rather than a default web-server page or another project.
Test more than the first HTML response. Load stylesheets, scripts, images, and at least one representative route. If the application has authentication, test it with a non-sensitive development account. If it reads or writes development data, perform a safe operation that confirms the database connection.
Test the listener Localtonet will use
When FlyEnv and the Localtonet client run on the same computer, a verified loopback listener such as 127.0.0.1 can be used if the application accepts requests there. When the Localtonet client runs on another device, that device’s loopback address refers to itself, not to the FlyEnv computer. The FlyEnv service must instead be intentionally reachable from the client device through an appropriate local address.
If the friendly local domain works but a direct request to the listener returns the wrong site, the web server is probably using name-based virtual hosting. Resolve that behavior before creating the tunnel. Do not assume that Localtonet will rewrite a host header or select a FlyEnv virtual host unless the current HTTP tunnel documentation explicitly provides the required behavior.
Separate local HTTPS from public HTTPS
FlyEnv can create local HTTPS sites, and a Localtonet HTTP tunnel can provide a public HTTPS address. These are separate legs of the connection. A public HTTPS address does not mean an HTTP tunnel can be pointed at an arbitrary local HTTPS-only port.
For the workflow documented here, identify a known working local HTTP listener and use that as the HTTP tunnel target. If the project is available only through local HTTPS, review the current Localtonet tunnel options and choose a documented configuration that matches the origin protocol. Do not put an HTTPS listener into an HTTP target solely because both display a website in a browser.
Find the failing layer in the logs
Use FlyEnv’s configuration and log access for the selected runtime, service, project, or web server. Application output can reveal a failed dependency import, occupied port, invalid environment value, or database error. Web-server logs can reveal an incorrect document root, upstream failure, or virtual-host mismatch. Database logs can reveal startup or local authentication problems.
Do not publish the site while it returns an error, redirects to an unintended address, displays the wrong virtual host, exposes debug output, or cannot reach its required development services. Fix the FlyEnv project first. A public tunnel will reproduce or obscure the same failure.
Share the verified FlyEnv site with Localtonet
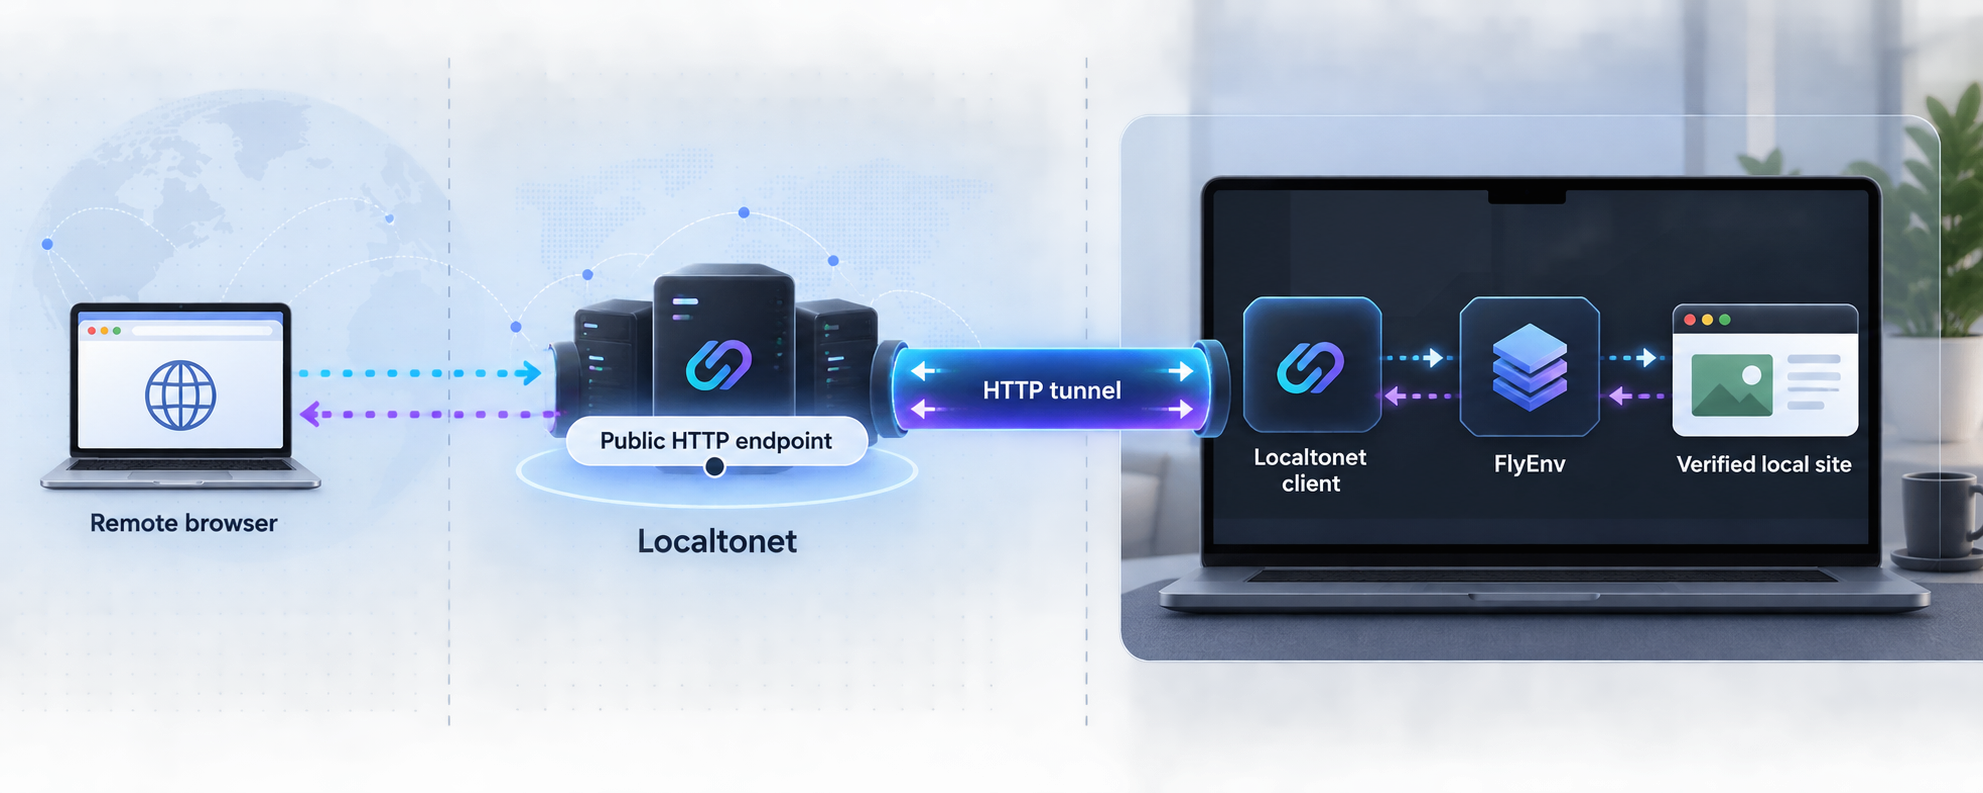
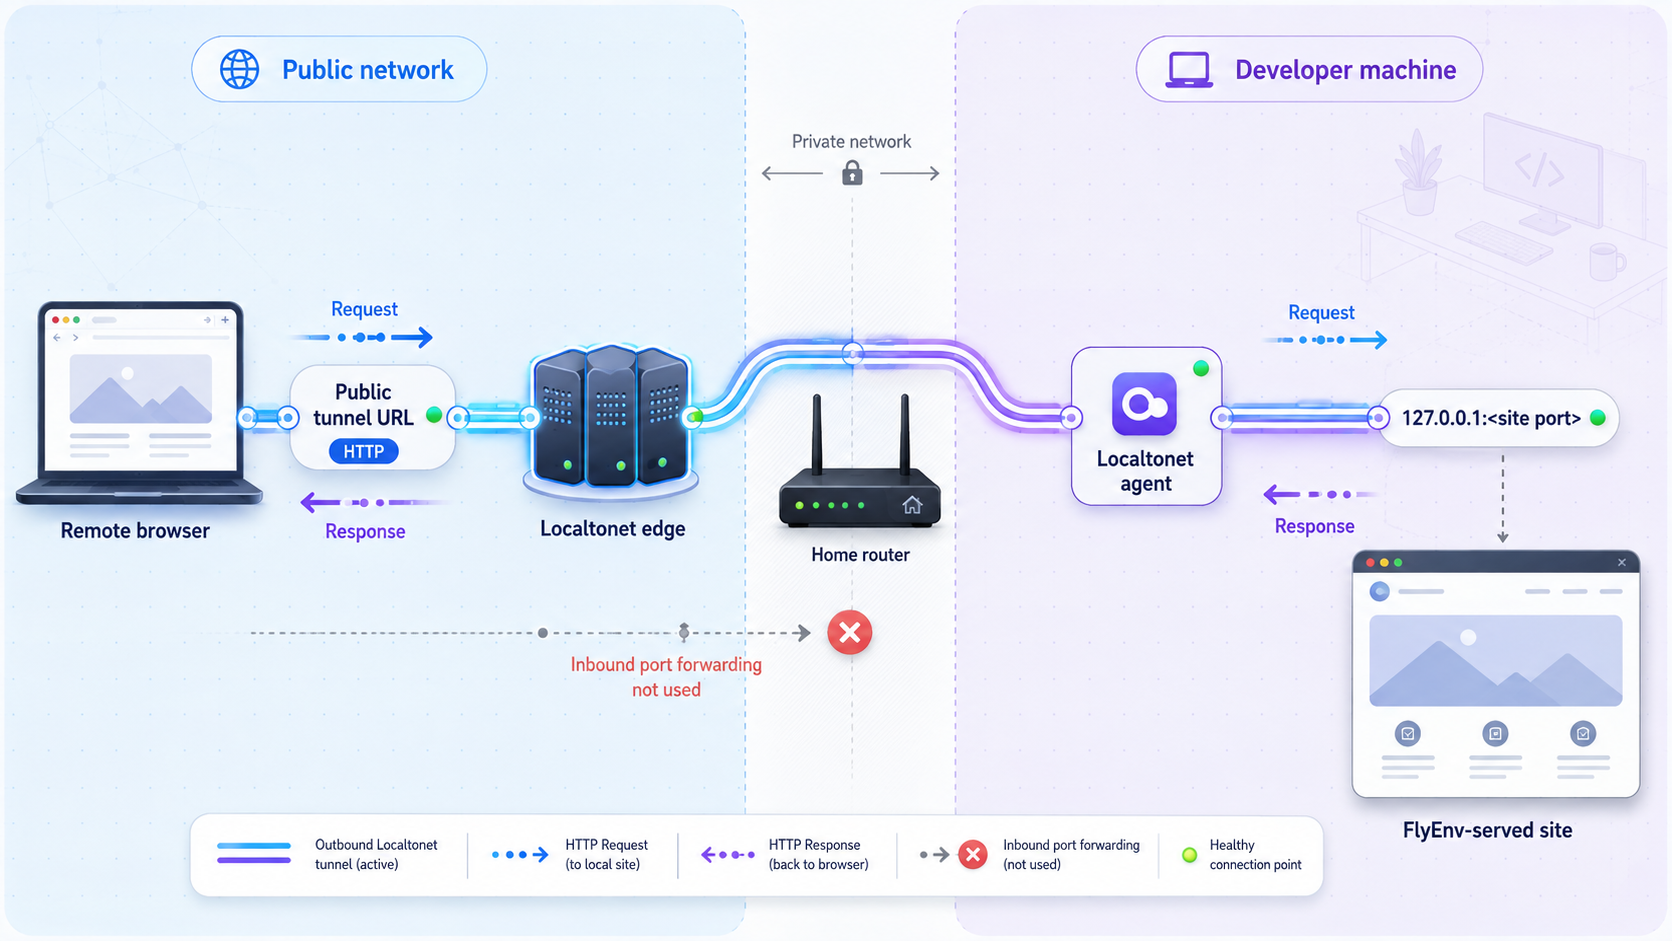
Localtonet exposes the already working HTTP endpoint. Our client application establishes an outbound connection to a Localtonet relay server, so this workflow does not require inbound router port forwarding, firewall changes, VPN setup, or a public IP address.
FlyEnv and Localtonet remain separate lifecycle layers. FlyEnv runs the local project and its dependencies. Localtonet provides remote reachability to the selected endpoint. Creating a tunnel does not start the FlyEnv project, and starting the FlyEnv project does not automatically start the tunnel.
Install and run the Localtonet client
Run our client on the FlyEnv computer or on another device that can reach the verified local HTTP listener. The client must remain connected while the site is being shared.
Open the HTTP Tunnel page and select Process Type
Create an HTTP tunnel and select the required Process Type. HTTP tunnels can use Random Sub Domain, Custom Sub Domain, or Custom Domain, subject to the choices currently available for the account. All three serve the target through a public HTTPS address.
Select AuthToken and Server
Select the device-specific AuthToken for the client that will carry the tunnel, then select an available Server. Obtain server and region values from the current dashboard rather than copying a code from another tutorial.
Enter the local IP address and port
Use the exact HTTP listener verified earlier. If our client runs on the FlyEnv computer, this can be the verified loopback listener. If it runs elsewhere, use the intentionally reachable local address of the FlyEnv service.
Press Start
Creating the tunnel does not mean it is running. Press Start and confirm that the selected client and tunnel are connected before opening the assigned public HTTPS address.
Verify the public result
Open the assigned address from another device or a separate browser profile. Test the same routes, static assets, forms, authentication behavior, and safe development operations used during local verification.
See the Localtonet HTTP tunnel documentation alongside the current dashboard. Custom-domain DNS requirements should be taken from current documentation before changing DNS. For a temporary review, Random Sub Domain avoids adding custom-domain DNS to the first test.
Look for local-only URLs
A page can load publicly while generating assets, redirects, API requests, or callback URLs that point to localhost, a .test domain, a private IP address, or an internal port. Those destinations are unavailable to a remote visitor. Adjust the application’s development base URL or proxy configuration using that framework’s documented method.
Frameworks use different environment variables and trusted-proxy settings, so there is no safe universal configuration key. Keep production secrets out of the local environment and do not disable security checks simply to make a temporary public URL work.
Protect the development site before sharing it
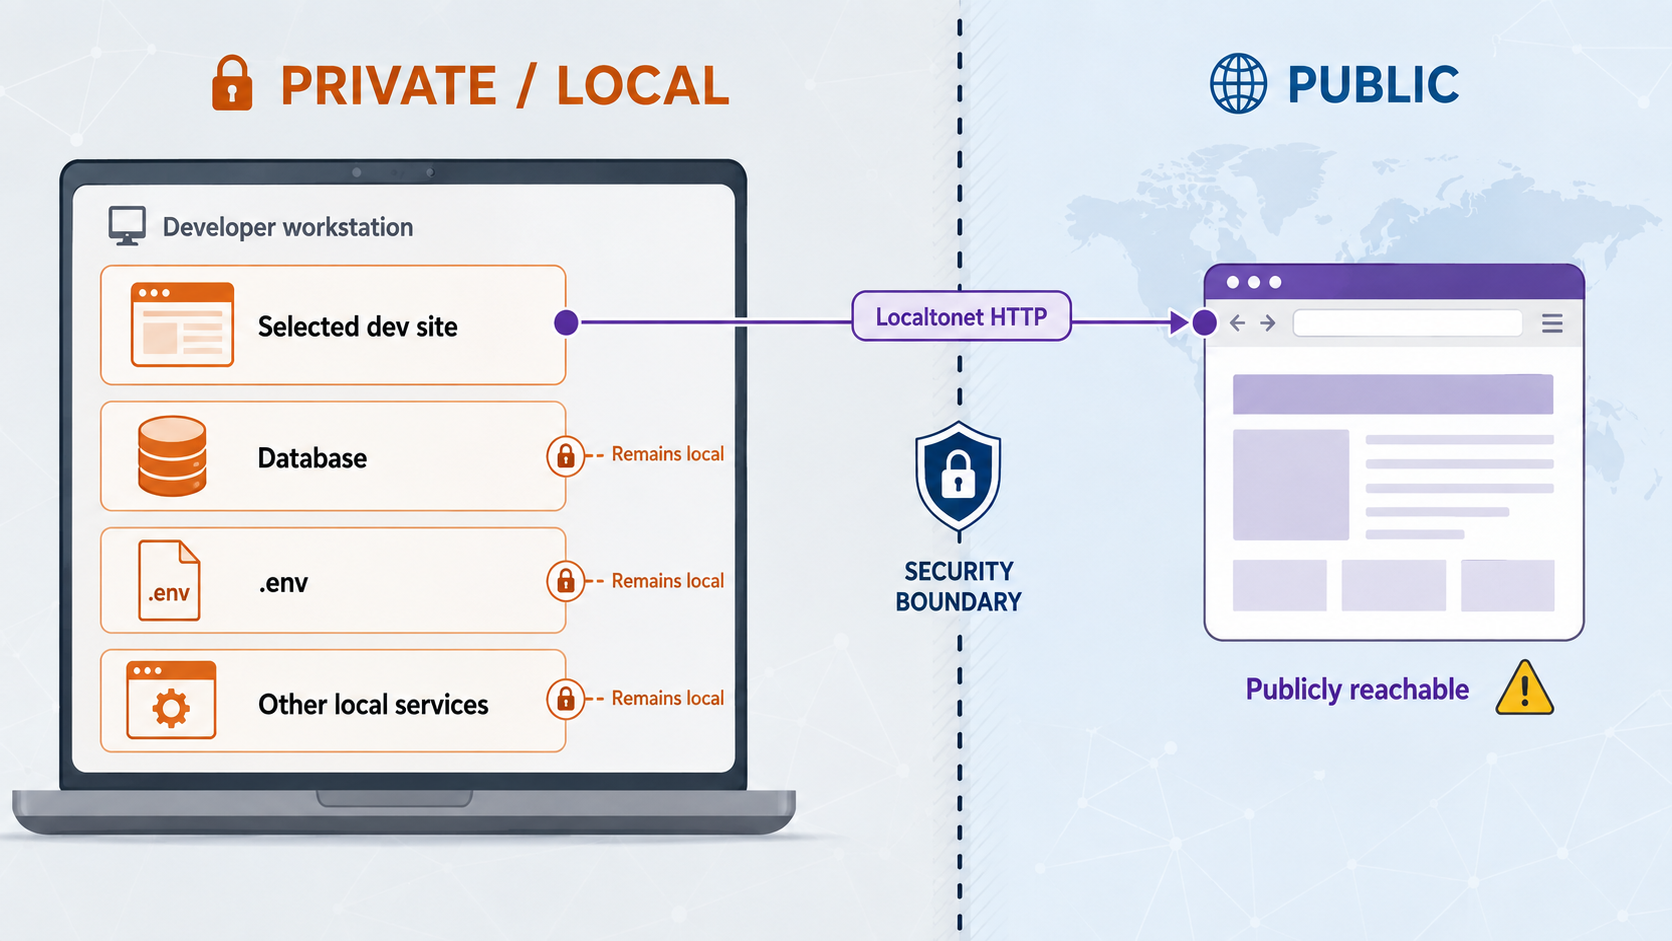
Development applications often disclose more information than production deployments. Detailed exceptions, framework profilers, database inspectors, source maps, mail previews, seed accounts, file browsers, and administrative tools may be useful locally but risky on an internet-accessible address. Treat the tunnel URL as public even when it is intended for one collaborator.
Localtonet provides a path to the selected service. It must not be used to bypass organizational policies or application authorization. Obtain approval where required, keep authentication enabled, protect the device AuthToken, remove secrets from screenshots, and stop the tunnel when the remote task is complete.
Review side effects before giving anyone the public address. A development application may send email, trigger webhooks, upload files, execute queued jobs, or contact external systems. Replace production integrations with development-safe equivalents where the application supports them, and make sure a reviewer cannot modify production resources.
Operate, restart, and shut down the shared site
A working session depends on both systems. The required FlyEnv runtime, web server, project process, database, and supporting services must remain active. The selected Localtonet client must remain connected, and the tunnel must remain running. Sleep, shutdown, a network change, or a stopped process can interrupt the public address.
Routine startup
Start the FlyEnv services or Startup Group required by the project. Open the local site and perform a quick health check. Only after the local endpoint works should you run the Localtonet client and start the saved tunnel. This order makes failures easier to identify.
Routine shutdown
Stop the Localtonet tunnel as soon as remote access is no longer required. A stopped tunnel can be started again if the configuration will be reused. Delete it when it is no longer needed. Then stop the FlyEnv project and supporting services that are not required for other local work.
The public endpoint is available only while the selected Localtonet client is connected and the tunnel is running. Stopping the tunnel does not delete the FlyEnv project, and stopping FlyEnv does not remove a saved tunnel configuration.
Changes to the local port
If the application later starts on another port, update and locally verify the application first. Then update the Localtonet target to the new verified IP address and port. Never assume that an old tunnel configuration will discover a changed project port automatically.
Troubleshooting FlyEnv and Localtonet together
FlyEnv opens, but the local site does not
Confirm that the required runtime, database, web server, and project process are running. Check the selected runtime version, project directory, document root, start command, port, and development environment configuration against the project documentation. Open the relevant FlyEnv-accessible logs and resolve the first local error before testing a tunnel.
The project exits immediately
Review its application output for a missing dependency, invalid command, occupied port, unsupported runtime version, or absent environment value. If the project command works only in a particular directory, make sure the configured project working directory is correct. The startup command remains project-specific.
The local domain works, but the IP and port show another site
This usually indicates name-based virtual-host selection. The web server uses the request hostname to select a site. Verify the local-site configuration, listener, and reverse proxy. A dedicated local HTTP listener that unambiguously reaches the intended project can simplify tunneling, but the exact FlyEnv setup depends on the selected web server and current interface.
The tunnel exists, but the public address is unavailable
Check the tunnel lifecycle first. A saved tunnel is not automatically active. Confirm that the selected client device is connected and that Start was pressed for the tunnel. If the computer slept or the client closed, restore the connection and check the running state again.
The public address returns a connection error
Retest the exact local target from the Localtonet client device. Verify that an HTTP service is listening on the configured IP address and port. If Localtonet runs on another computer, 127.0.0.1 refers to that computer, not to the FlyEnv host. Also confirm that the target is HTTP rather than a database, raw TCP service, or HTTPS-only listener.
The HTML loads, but styles or scripts fail
Inspect the generated asset addresses. Remote browsers cannot retrieve assets from localhost, a private IP address, a local .test domain, or an unexposed development port. Update the framework’s development URL configuration and verify that any required asset-building process remains active.
Redirects return visitors to the local domain
The application may generate absolute redirects from a configured base URL or its interpretation of proxy information. Use the framework’s documented development URL and trusted-proxy settings. Avoid guessing environment-variable names because they differ by framework.
The application reports database or cache failures
Treat this as a local stack problem. Confirm that the required service is running, the development credentials are correct, and the schema or migrations were prepared according to the project. Keep the backend service private while troubleshooting it.
Access stops after sleep or restart
Restore the FlyEnv services and verify the site locally. Then run the Localtonet client, confirm its device connection, and start the tunnel. A startup group can simplify the FlyEnv side, but it does not start the Localtonet tunnel.
| Symptom | Likely layer | First check |
|---|---|---|
| Local and public pages both fail | FlyEnv project or application | Runtime, project process, web server, dependencies, and logs |
| Local site works but the public address does not connect | Localtonet client, lifecycle, or target | Client connection, tunnel running state, IP address, and port |
| Public HTML loads but assets fail | Application URL generation | Absolute asset URLs, base URL, and asset process |
| The wrong site appears | Web-server virtual host | Hostname selection, listener, document root, and reverse proxy |
| Access stops after sleep or restart | Service lifecycle | FlyEnv services, Localtonet client, and tunnel running state |
Frequently asked questions
Is FlyEnv a direct replacement for XAMPP?
FlyEnv addresses the broad need for a manageable local development stack, but it supports more than the conventional Apache, database, and PHP combination. It covers multiple runtimes, databases, web servers, local sites, HTTPS, reverse proxies, project-specific versions, and supporting services. Migrating still requires matching the original project’s runtime, document root, database, and server behavior.
What are the current FlyEnv Free limits that affect this tutorial?
FlyEnv currently lists limits of three local sites and three custom projects per runtime for the Free option. This workflow needs no more than one project and one local site, but existing entries also count toward those limits. Check the current FlyEnv website before planning a larger setup.
Does every FlyEnv site use the same port?
No. FlyEnv supports local domains, several web servers, reverse proxies, HTTPS, and project-defined ports. Use the protocol, IP address, and port actually configured for the selected project. Do not assume a port based on another framework or tutorial.
Which Localtonet tunnel should I use for a FlyEnv website?
Use an HTTP tunnel for a verified local HTTP website. Configure its local target with the IP address and port that serve that site. Databases and other non-HTTP services are separate use cases and should remain private by default.
Do I need router port forwarding?
No. Our client establishes an outbound connection to a Localtonet relay server. This workflow does not require inbound router port forwarding, firewall changes, VPN setup, or a public IP address. The client and tunnel must remain connected and running.
Can Localtonet start the FlyEnv project?
This workflow treats them as separate systems. FlyEnv starts and manages the local project and services. Localtonet exposes the already running endpoint. Start and verify the FlyEnv project before starting the tunnel.
Can I put a local domain such as myapp.test directly into the tunnel target?
The HTTP tunnel target is a local IP address and port. A FlyEnv local domain may identify the site in a local browser, but you must verify that the target listener selects the intended virtual host. Do not assume automatic hostname rewriting.
Should I expose MySQL, PostgreSQL, or Redis with the site?
Not for normal website sharing. Keep backend services private and expose only the application’s HTTP interface. Review any separate raw-port requirement independently and apply authentication, least privilege, and organizational approval.
Will the public address work after I close the client?
No. The public endpoint is available only while the selected Localtonet client is connected and the tunnel is running. The FlyEnv project and every local service it requires must also remain active.
Share your verified FlyEnv development site
Prepare the project with the runtime and services it actually needs, verify its HTTP listener locally, and create a Localtonet HTTP tunnel for that single endpoint. Keep backend services and production data private, test the result from another device, and stop the tunnel when the review is complete.
Get Started Free →

