

GitLab SSO Provider
This section explains how to configure GitLab as an SSO provider in Localtonet to protect your HTTP tunnels.
GitLab SSO works with both gitlab.com and self-hosted GitLab instances, as long as OAuth 2.0 is enabled.
When Should I Use GitLab SSO?
GitLab SSO is recommended when:
Your team already uses GitLab accounts
You want to restrict tunnel access to GitLab users
You are using self-hosted GitLab (Enterprise / Community Edition)
You prefer OAuth-based authentication without external IdPs
Step 1: Create an OAuth Application in GitLab
Before adding GitLab as an SSO provider in Localtonet, you need to create an OAuth application in GitLab.
For gitlab.com
Go to: GitLab Applications
For self-hosted GitLab
Go to:
https://<your-gitlab-domain>/-/profile/applicationsClick New application.
Fill in the application details:
Name
Any descriptive name (e.g.Localtonet Tunnel SSO)Redirect URI
http://auth.localtonet.com/auth/callbackScope
✅
read_user✅
openid✅
email✅
profile
Click Save application.
Copy the following values:
Application ID (Client ID)
Secret (Client Secret)

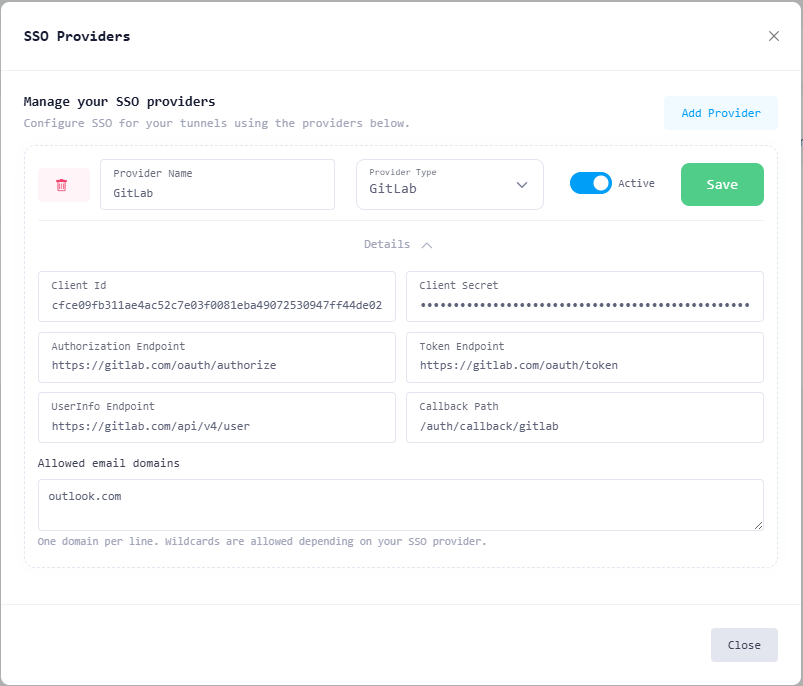
Step 2: Add GitLab Provider in Localtonet
Open the SSO Providers section in your Localtonet account.
Click Add Provider.
Fill in the provider details:
Provider Name
Any descriptive name (e.g.GitLab,Company GitLab Login)Provider Type
Select GitLabClient ID
Paste the Application ID from GitLabClient Secret
Paste the Secret from GitLab
Configure the OAuth endpoints.
For gitlab.com
Use the following endpoints:
Authorization Endpoint
https://gitlab.com/oauth/authorizeToken Endpoint
https://gitlab.com/oauth/tokenUserInfo Endpoint
https://gitlab.com/oauth/userinfo
For self-hosted GitLab
Replace the domain with your GitLab instance:
https://<your-gitlab-domain>/oauth/authorize
https://<your-gitlab-domain>/oauth/token
https://<your-gitlab-domain>/oauth/userinfo
Callback Path
/auth/callback/gitlab
(Optional) Configure Allowed Email Domains
Example:
company.comOnly users with matching email domains will be allowed
Toggle Active to enable the provider.
Click Save.
Step 3: Enable GitLab SSO for an HTTP Tunnel
Open the HTTP Tunnel Settings for the tunnel you want to protect.
Navigate to SSO Providers → Manage.
Enable SSO for this tunnel.
Toggle GitLab to activate it.
Configure optional tunnel-level settings:
SSO Path(s) – paths that require authentication
Logout Path – logout endpoint
Allowed Domains / Emails / Usernames – additional access rules
Click Save Changes.
What Happens Next?
When a user accesses the tunnel URL:
The request is intercepted by the Localtonet authentication layer.
The user is redirected to GitLab for authentication.
After successful login, the user is redirected back to the tunnel.
Access is granted if all provider and tunnel rules are satisfied.
Your local application does not handle authentication.
Notes & Best Practices
GitLab SSO uses OAuth 2.0 + OpenID Connect
Ensure the email scope is enabled
Self-hosted GitLab must allow OAuth applications
Use domain restrictions for company-only access
Rotate client secrets periodically
Common Issues
Invalid redirect URI
→ Ensure the callback URL matches exactlyEmail not returned
→ Verifyemailscope is enabledAccess denied after login
→ Check domain/email restrictions in provider or tunnel settings